• Home
  • Recipes
    • Vegetarian
    • Seafood
    • Snacks
    • Chicken
    • Mutton
    • Egg
    • Roti & Parathas
    • Dessert
    • Sides
    • Soups
    • Salad & Bowls
    • Rice
    • Daal
    • Bakes
    • Roasted
    • Beverages
    • Sauces, Spices & Curry Base
    • Chutney & Dips
    • Festive Recipes
  • Cuisine
    • Bengali
    • Maharashtrian
    • Rajasthan
    • Punjab
    • Chennai
    • Andhra
    • Mangalore
    • Mughlai
    • Kashmiri
    • Chinese
    • Singapore
    • Mexican
    • Continental
    • Italian
    • French
    • American
    • Thai
    • Bangladeshi
    • Arab & Persia
    • North East
  • Meal Type
    • Breakfast
    • Lunch
    • Dinner
    • Snacks
    • Dessert
    • Appetizer
    • Accompaniments
  • How To
    • Preservation Techniques
  • Travel
    • East India
    • West India
    • North India
    • South India
    • Asia
    • America
  • Lifestyle
    • Craft & Creation
    • Experiences
  • Musing
  • Contact
  • Bengali Blogs

Curries & Stories

pinterest facebook twitter instagram tumblr linkedin
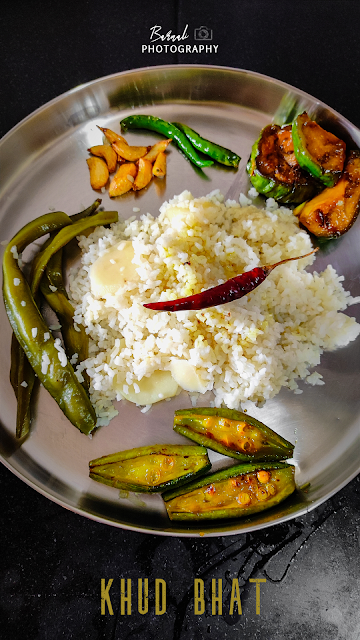
Khud Bhat

First of all wish all my readers a very Happy New Year! May this new year help all of us become a better version of ourselves.

Even though I was born in the 80s, still there are many Bengali traditional foods which I had not experienced in my lifetime yet. khud bhat is one such traditional preparation which I had heard a lot about but got to experience only recently. 

Khud (broken rice) is a grade of rice consisting of grains broken in the milling process.  In Bengal you will find khud rice in many grocery shops so it not that difficult to get hold of some. 

This type of broken rice is traditionally cooked and had with an assortment of fried sides or bhortas. In Bangladesh sometime I have noticed, khud bhat is made more like a pulao with a lot of onions and aromats in it. This is the version of Khud bhat which is made at my home. It is a very simple preparation and light on the stomach.

Preparation Time : 15 minutes 
Cooking Time : 30 minutes 

Serves - 2 adults

Ingredients :

For Rice
  • Khud Rice - 100 Gm
  • Water - 200 Gm
  • Potatoes - 2 (cut in roundels) 
  • Broad beans - 4 to 5
  • Green Chili - 2 to 3
  • Salt - As per taste
For Assorted Fries
  • Dried Red Chili - 2
  • Green Chili - 3 to 4
  • Turmeric - 1/2 tsp
  • Brinjal (Medium) - 1 (cut in thick rounds)
  • Parwal (Potol) - 5 to 6 ( cut in halves)
  • Garlic cloves - 15 to 20 
  • Salt - To Taste
  • Sugar - to taste
  • Mustard Oil - for frying


Video :


Procedure:

1. Wash and drain the rice. Cut the Potatoes in roundels.

2. Take a deep bottom Kadai or Pan and add the washed rice. Add double the amount of water.

3. Place the potato roundels on the rice in a single layer. Place some broad beans or any other seasonal vegetable that you want. Also add two green chilies

4. Add salt and mix in the water

5. Now cover and cook the rice on medium flame.
Note: It is always better to cook Khud Bhat in a kadai, as in pressure cooker you cannot adjust water mid way through and the rice can end up being mushy.

6. While the rice cooks, prepare the vegetables for making the fries. First cut the brinjal in thick roundels and halve the parwals. Now marinate the brinjal and parwal with salt sugar and turmeric. Bengalis add sugar to the brinjals and parwals to enhance the taste of the fries. I have used powdered sugar here which easily melts. leave the marination till the vegetables release water.

7. In another Kadai heat mustard oil. Once the oil is hot fry a couple of red chilis.

8. Now fry the garlic cloves, green chilies, brinjals and parwals in batches. 

9. Check if the rice is done, it should take around 20-30 minutes. The rice should not be mushy. 

Once the rice is done, serve the rice with all the assorted fried vegetables and a dash of the mustard oil left in the kadai and enjoy!

Share
Tweet
Share
No comments


Back in Pune the weather is right now in a transitional phase - neither hot nor cold. A couple of days last week we even got Kalboishakhi during afternoon hours which brought down the temperature considerably. But the morning hours especially around noon time is pretty hot. This kind of weather makes you feel lazy and I am no exception. I just want to have a good plate of wholesome meal and lay back with my books or indulge in writing. One pot meals are my usual go to thing when I am especially in the lazy zone but still want to have something delicious. Shah Jeera chicken pulao is one such recipe which I made by chance one day.

During my last summer visit to Kashmir I had got some really good quality Shah Jeera from the Gurez hotel chef. Shah Jeera is something which usually is very rarely used in Bengalis cuisine. So it never was a pantry staple for me. But post my Kashmir visit, since the chef had advocated about the aroma these tiny little things impart to any dish I was curious to try it out in some of my rice preparations to start with. The first thing I had made was a simple Jeera rice substituting the regular jeera with shah jeera and oh boy what a taste transformation it was! I was hooked after that. Usually during weekends I would prepare quick and dirty veg pulaos to go with some non veg dish. I started using Shah jeera in some of my veg pulaos and definitely it was a game changer for me. Without too many masalas the pulao would still turn out yummy. 

This gave me the thought to try making a very simple chicken pulao in which shah jeera dominated the flavor profile. That's how this recipe was born. Folks who like a really masaledar biryani type pulao would find this one a tad too simple. But if you are one of those people like me who doesn't like too many spices in their pulao then you might give this one a try. A new recipe with a hint of Arabic flavor profile. It also reminded me of some of the dishes  I had tasted in Gurez.

Interesting to note is you can skip the complete chicken part to just make a yummy shah jeera veg pulao.

Marination Time : 30 minutes
Preparation Time : 10 minutes
Cooking Time : 30 minutes

Serves - 1 adult

Ingredients :
  • Ambemohar / Gobindobhog / Fragrant Rice - 150 gm
  • Chicken Thigh - 1
  • Shah Jeera - 1/4 tsp
  • Ginger Paste (fresh) - 1/4 tsp
  • Clove - 1
  • Cardamom - 1
  • Cinnamon - 1/2 inch
  • Red Carrots (diagonal half moon / matchstick)  - 20 gm
  • French Beans (diagonally chopped) - 15 gm
  • Turmeric - 1/4 tsp
  • Refined Oil + Ghee - 2 tsp
  • Salt - as per taste
  • Sugar - as per taste
  • Warm water - as needed
Ingredients for marination:
  • Shah Jeera - 1/4 tsp
  • Black peppercorn - 10
  • Bay Leaf - 1/2
  • Lemon - 1/4th
  • Red Chilli Powder - 1/4 tsp
  • Turmeric - 1/4 tsp
  • Turmeric powder - 1/2 tsp
  • Refined Oil - 1/2 tsp
  • Salt - as per taste

Procedure:

1. Start by toasting the Shah Jeera and bay leaf on medium flame on a tawa, continuously using the spatula so that it does not get burnt. When you get a nice aroma take it off and let it cool down. Then grind it using a mortar pestle or a masala grinder.

2. Coarsely grind the peppercorn

3. Now marinate the clean chicken with the ground shah jeera, bayleaf and black pepper along with the other ingredients mentioned under marination. Rest it for about 30 minutes to 1 hour.


4. Now take any steamer ( as per the size of the chicken). I had used a steel perforated steaming bowl. Oil it nicely to prevent chicken from steaming. I kept the steamer on a stand inside a pressure pan filled with 2 cups of water. Then placed the marinated chicken on the steamer. Post that close the lid of the cooker but don't put the vent weight. Keep the gas flame in the lowest (sim) and steam for 10-15 minutes. Open the lid and take out the chicken. The chicken should be around 80-90% done. Preserve the water which is there in the bottom to cook the pulao.

5. Wash the pressure cooker and let it heat. Add any neutral oil when hot. Let the oil heat up then fry the steamed chicken for a couple of minutes by turning side. Keep it aside.


6. Now for prepping the rice. You can take any fragrant rice, wash it and let it dry for an hour before cooking

7. In the same oil in the pressure cooker where you shallow fried the chicken, add your spices for tempering - one cardamom, two cloves, 1 inch cinnamon stick and 1/4 tsp shah jeera. 


8.  When the spices are fragrant, add grated ginger and toss it for a minute. Now add the chopped vegetables. Stir fry for a couple of minutes. At this stage if you want you can add cashew nuts and raisins as well.


9. Now add the washed and dried rice. Fold in and fry for a couple of minutes.


10. Add turmeric, salt and sugar. 


11. Now you need to use the reserve stock water from Step No 4. Add double the amount of water to rice ( 2:1). Fold in everything.


12. Now place the chicken thigh in the middle. And add a slitted green chili. Pressure cook it for 2 whistles or till rice is cooked. Let the pressure die out.


13. Open the lid and using a fork fluff the pulao. The simple and easy pulao is done. Serve this with your choice of accompaniments. 


Do let me know how you liked the simple and easy pulao recipe. You can make a good raita or serve this with some fresh salad. The flavors of this chicken are somewhat like Mandi chicken (Get the recipe HERE) but its much simpler to make.  


Share
Tweet
Share
No comments


Last year when I was in Kolkata for my annual vacation time, I could spend prolonged time at my hometown. Because of the work from home policy, for the first time after I left home for my job, I could spend so much time back at home. And once you stay for so long you start understanding what you have been missing staying away from your home state. Like almost every weekends we would go and spend time at my relatives, there would be long adda sessions just like the old times when I was in my teens. It would be so good spending time talking with others instead of being glued to the phone or laptop. 

Then there would be the trips of the local produce markets. Kolkata has undoubtedly some of the best produce market in the whole country. The moment you step into one you will be bedazzled with the vast variety of fresh vegetables, fruits and fishes. The sheer variety of leafy vegetables itself is such a temptation, mainly because in Pune where I live, the variety is limited to maximum 3-4 varieties at a time. I think more than going out for sightseeing in Kolkata I love visiting the produce markets. For a foodie like me, they are literally a temptation central. 

The third thing is definitely the availability of infinite choices of street food. You would get the most exotic flatbreads and curries even in your neighborhood food shack. I would often get rumali rotis and chicken chaap packed from my nearest food shack and it was super delicious. You are really spoilt for choices I food when you are in Kolkata. I wonder how people manage to maintain their weights, because the moment I see all those street food I am tempted to eat them all! And best part, it is cheap. Street food in Kolkata would not burn a hole in your pocket but definitely make you full. 

And not only street foods, since you have so many relatives around whenever you visit their home you get treated to delicious home made food. Some of them which I had not had in like million years. Just like the dish called Muri ghonto - a signature dish in Bengali cuisine. Muri or Muro in Bengali means fishhead. So Muri ghonto literally translates to fish head medley. Traditionally there are a couple of ways to make it - either the crispy fried fish head is cooked with rice like a biryani or it is cooked with daal. Muri ghonto is typically considered to be a side dish and is had along with rice. So in yesteryears it was also made with chide or poha (flattened rice) instead of rice. I think the recipe originated to utilize the leftover fish heads in the household in older days. Our great grandmas and grandmas were really pro chefs who could think of making such amazing lip smacking dishes from even leftover ingredients. And Bengali cuisine is full of many such traditional recipes which were born out of the need to use leftover produce. 


To be honest, I had only head about muri ghonto before but never got the chance to taste it. Since the cooking process for this recipe is a little elaborated and many a times the fish heads are the most under rated things, gradually not many households used to make these old elaborate recipes on daily basis. So last year when I was visiting one of my masis home and she informed that my dida (grandma) was making muri ghonto for us that day I was really excited. And I was so ill informed about this dish that I had thought muri ghonto was like other ghontos where you would make a medley of some veggies and masalas and add the fish head to it. But at the lunch table when my dida served the muri ghonto, to my surprise it had rice in it.  I was a little flabbergasted for a few seconds, I was trying to understand how to eat a rice dish as a side with steamed rice. But then I decided what the heck, let me just try it on its own first. So i took the very first spoonful of it and was totally taken aback by the flavourful dish. Rich in spices, the flavour of the fried fish head was like the perfect match with the aromatic gobindobhog rice. To the uninitiated the combination of fish head in rice might sound a little weird but believe me it was really a match made in heaven and you wont understand how good it tastes unless you eat the version made by someone's grandma. Yes that's right, you just cannot bring the magic into this dish that your grandma would! 

But I was not gonna let that deter me from making this myself. So once I was back in Pune I asked my mom to get the recipe from grandma once again ( because I had forgotten when she had told me) and decided to go all in for it. How bad can it be was what I was thinking when I made it. And surprisingly it turned out amazing even at the first try. I was so overjoyed by it that I made it again a couple of times and each time loved it more. So I am now sharing this recipe with you all. While I would still say this definitely would not measure upto what your grandma would probably make but still it is worth the try - at least you will be able to keep a traditional recipe going and help it not get lost in the folds of time. I have added raisin and cashew in this recipe because I liked the taste. But traditionally they are not added so you can skip it. Also if you would have noticed from the title itself this is a pressure cooker method I have used just to make your lives easier and believe it the consistency turned out great. But if you have enough time at hand then go for a kadai method by all means. At the last step instead of pressure cooker use the kadai and cook it.

Marination Time : 10 minutes
Preparation Time : 10 minutes
Cooking Time : 30 minutes

Serves - 2 adults

Ingredients :
  • Catla Fish Head - 4 half pieces
  • Gobindobhog/ Ambemohar Rice - 200 gm
  • Onion - 1 medium sized, chopped
  • Potato - 1 big, cubed
  • Garlic Cloves - 8-9 or 1 tsp
  • Ginger - 1 1/2 inch or 1 tsp
  • Dried Red Chili - 3
  • Bay Leaf - 2
  • Kismis (Raisin) - 15-20 (Optional)
  • Kaju (Cashew) - 8-10 (Optional)
  • Cardamom - 3
  • Cinnamon stick - 1 inch
  • Cloves - 2-3
  • Jeera Powder - 1 tsp
  • Dhaniya (Coriander) powder - 1 tsp
  • Kashmiri Red Chili powder - 1/2 tsp
  • Turmeric powder - 1/2 tsp
  • Garam Masala powder - 1 pinch (optional)
  • Green Chili - 2-3 slitted
  • Ghee - 1 1/2 tsp + 1 tsp
  • Mustard Oil - 1/3 cup
  • Salt - as per taste
  • Sugar - as per taste
  • Warm water - as needed


Procedure:

1. Take the fish head from a big Catla or a paka mach as we say in Bengali. For this recipe I had taken the head of a Catla fish which weighed around 1.5 to 2 Kg. Clean the head thoroughly. If you want to keep the gills you can clean it and keep them too. Marinate the clean fish heads with 1/2 tsp of turmeric, salt and 1/2 tsp of mustard oil. Let it rest for 10-15 minutes.

2. Now wash the rice till the water runs clear. Drain the water and place the washed rice in a sieve with small pores. Place a bowl below to collect any excess water. Let it air dry. Or put it under a fan. The sieve will help in better air circulation and dry the rice easily. It will take around 30 minutes for the rice to dry.

3. Make a paste of the ginger and garlic. Chop the onions finely. Keep aside.

4. To make the masala paste in a bowl take turmeric, red chili powder, jeera powder, dhaniya powder and garam masala powder. Add 2 tbsp of water, give it a good mix and let the masala paste rest for 10-15 minutes before using it.

5. Heat mustard oil in a Kadai. When the oil is hot fry the marinated fish heads in batches till it is a little browned on both sides. Keep it aside.

6. In the same oil fry the cubed potatoes till the sides start getting some color. We don't need to completely cook the potatoes at this stage. Keep aside. 

7. Now take mustard oil and 1 tsp ghee in a Kadai and heat it. Once the oil is hot, add the Kaju and Kismis. Fry on medium heat for about a minute. Now add the airdried rice. Fry for about 1-2 minutes on medium heat. Take out the fried rice with kaju and kismis in a separate bowl. 

Note: Please note Kaju & kismis is totally optional. It is not traditionally added to muri ghonto, but I like the sweetness from the kismis and the crunch of the kaju in the final version hence I added these.


8. Now top up the mustard oil and 1 tsp ghee in the same Kadai and heat it. Once the oil is hot, toss in the bay leaves, whole red chili (break the chili and add), cloves, cinnamon and cardamom. Give it a toss till fragrant. 

9. Add the chopped onions and a pinch of salt. Fry till the onions are slightly browned. 


10. Add the ginger garlic paste. Sauté till the raw smell is gone.


11. Now add the masala paste that you had made in Step 4. Give it a good stir. Cook the masalas till oil separates. 


12. Add the fried fish heads and fried potato cubes into the masala. Fold everything in so that the fish heads are coated in the masala. Fry for 2 minutes. 


13. Now add the fried rice you prepared in step 7. Fold everything in. If you like break the fish heads at this point. I liked to keep them fairly whole so that it is easy to fish them out while serving.


14. I made this recipe in a pressure cooker/pan so amount of water is very important here. We do not want a completely dry or a completely mushy texture at the end. Transfer the whole thing from the Kadai to the pressure cooker/pan. Add exactly 2 times the water of the amount of rice you had taken and then add about 1/4 cup of more water. For me this was the perfect water ratio. Throw 2-3 slitted green chili. Stir in 1 tsp of ghee and a pinch of garam masala powder. Close the lid and pressure cook it for two whistles. Let the rice sit for a while without any flame before you open the lid. 


Usually Muri ghonto is considered a side dish which is served with steamed rice. But I had added more rice to make this muri ghonto because I wanted to have it as is, somewhat like a pulao. I had it with fresh salad.


Share
Tweet
Share
No comments

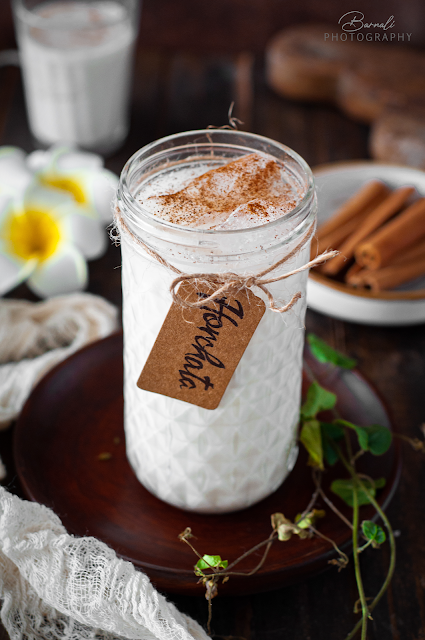
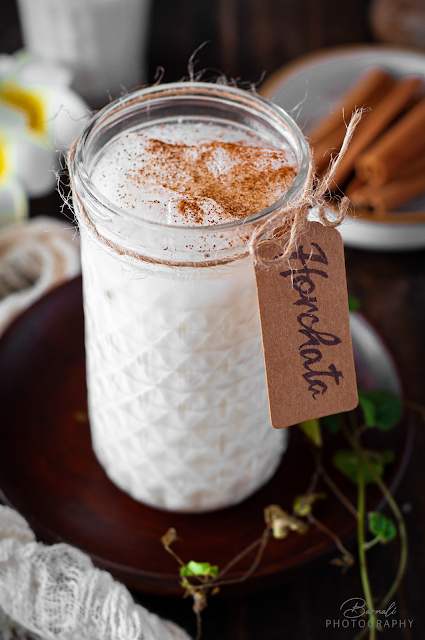
Horchata recipe


16 March

Its almost Holi. This year probably we can expect the Holi scene to be very similar to pre pandemic days. When we speak of Holi can we not talk about some refreshing drinks to cool us off after all that playing in the sun? The usual Holi recipes would call out for Thandai, Kanji, Mojitos and all the known suspects. But why not try a different cooler this time? Something very creamy, delicious and refreshing? Something which doesn't involve nuts, especially with people like me who doesn't really have a liking towards nuts, will absolutely enjoy this drink. 

Till now the only Mexican thing most of our subcontinent is aware is nachos or burritos. But Mexican cuisine has a lot of different things to offer. They are so similar like the Indian cuisine and yet very different. In fact when I was living in States, whenever I missed a good rice meal, I would head over to Chipotle ( a famous Mexican fast food chain) instead of any Indian restaurant (because the kind of Indian dishes served over there is not exactly what appeals to my palate) and gorge on the scrumptious burrito bowl. It is my most favorite meal till date! Also you might not be aware but some Mexican drinks are really amazing. 

Horchata recipe


When I was staying in San Diego, we visited the border town of Tijuana, Mexico. It was such a thrill that we were crossing borders to reach a different country. We had taken a city tour ticket and the conductor dropped us at a designated spot, dishing out many statutory warnings like 'don't buy silver, people will swindle you here', 'be cautious when you are crossing roads' etc. etc. To the point that it almost sounded scary. Me and my roommate skeptically set out to explore the area while all the warnings still ringing in our ears loud and clear. Maybe we looked like a couple of teenagers (we always got that wherever we went!) so no one thought we would be having enough money to buy silver! Thus we weren't approached by any so called swindlers. Tijuana appeared a very lively place. Whenever we were walking past the restaurants we smelled some heavenly aroma coming from inside. There was lots of music playing everywhere. It was in one such restaurant we got to taste Horchata for the first time. Back then I wasn't such a food connoisseur. So I didn't make out much form the drink apart form the fact that it tasted awesome and had a beautiful rich cinnamony aroma which lingered on the tongue. We left Tijuana that day but the taste of Horchata remained with us for quite long. 

Fast forward many years after that, I had completely forgotten about that experience. A few weeks ago  Facebook threw me a notification of photos from the Mexican trip and that's when I remembered about this unique drink from Mexico. I just had to revive that memory so I got down to work of gathering all the essentials. The key to this recipe is soaking the rice and cinnamon for almost 5-8 hours or better overnight. It helps develop the flavors nicely. So you need to be a little patient to enjoy this drink. There can be a good number of variation with the base recipe and I think I will be trying them out this summer and posting on my blog. So stay tuned on that.

Horchata (pronounced or-chah-tah) is a popular Mexican drink that is often described as a sweet rice milk beverage. One would find this drink at most Mexican restaurants in the United States and abroad. Mexican food is usually spicy and this refreshing drink helps to balance out the heat from those dishes. This recipe has several different adaptations depending on where you are drinking it. Mexican versions are usually made from rice, while the Spanish kind uses tiger nuts. 

Some additional trivia : The Mexican horchata dates back to the 16th century, but there are even older versions. In fact, the term "horchata" describes a group of related drinks with roots in ancient Rome and North Africa. The Romans' version was not based on rice or nuts, but on barley, which for a time was believed to possess curative properties. The Romans "milked" dried barley in water to form the basis for the drink they called "hordeata," which literally means "drink made from barley". As both the Roman and North African versions of horchata de chufa made their way around Europe, different cultures adapted the horchata using different grains, nuts, and seeds. 

Horchata is a simple yet satisfying drink on a hot summer day. So lets get to the recipe now.

Horchata recipe


  • Can you add nuts?
  • Yes you can. Almond compliments the best. For this recipe you can add 1/4th cup of almonds.
  • Can it be made dairy free?
  • Yes you can. Replace whole milk with canned coconut milk or non-dairy milk such as almond milk.
  • Which Rice can I use?
  • Avoid glutenous rice in this recipe (e.g Indrayani). Use long grain rice like Basmati or some fragrant rice like Ambemohar, Gobindobhog etc. They impart a nice floral smell.
  • How long can you keep Horchata?
  • The horchata base will stay nice in the fridge for up to 3 days. Don't leave it at room temperature. Always refrigerate.
  • What are the different sweeteners you can use?
  • You can use sugar, condensed milk, honey, maple syrup etc. can be used. Stevia can be used for a sugar free option. Adjust the sweetness level as per your liking. 
  • Any Serving suggestions?
  • This drink tastes divine when served on the rocks. Chill the Horchata in the refrigerator for an hour and then fill up a glass with ice cubes. Pour the horchata over ice and garnish with a sprinkle of cinnamon powder or cinnamon sticks. 


Preparation Time : 15 minutes
Resting Time: minimum 5 hours or overnight

Serves - 2 serving

Ingredients :
  • Uncooked white rice (Ambemohar/ Gobindobhog/ Jasmine/ Basmati etc.) - 1/2 cup
  • Cinnamon Sticks - 3 to 4 (2 inch sticks)
  • Water - 2 cup
  • Condense Milk - 200ml
  • Vanilla Essence - 1 tsp
  • Milk - 100 ml (or as required)

Ingredients for serving:
  • Ice Cubes 
  • Ground Cinnamon Powder
Equipment:
  • Blender
  • Mixing Bowl
  • Spoon
  • Strainer & Cheesecloth

Procedure: 

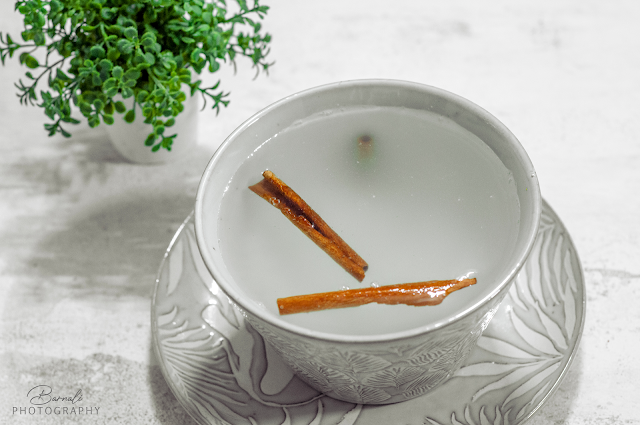
1.  Add rice, cinnamon sticks and water to a mixing bowl. Let soak at room temperature for about 2 hours, then transfer to the refrigerator overnight until the rice softens and the cinnamon stick is soft enough to break into smaller pieces.

Note: Some people recommend slightly blitzing the mixture in a blender just enough to break up the rice and then soak it overnight. I did not do this.

Horchata recipe

2. After 8 hours or the next day, transfer the cold rice mixture to a high-powered blender and blend to combine. Blend about 30 - 60 seconds on high speed or until finely pulverized, stopping occasionally and shaking blender if mixture sticks to the bottom. I blended it for about a minute in total. 

3. Now strain this mixture with a cheesecloth lined fine-weave mesh strainer. When finished, discard the remaining solids in the strainer and transfer the strained liquid to a pitcher or big container. This is the Horchata Base.

Horchata
Horchata Base after straining

4. Now add the vanilla essence, milk and condensed milk. The condensed milk will give it sweetness as well as a thick consistency. Add the condensed milk as per your taste. For me I added 200 ml of condensed milk for this recipe for optimum sweetness.

Tip: You can also make this without condensed milk. Just add full cream milk to the consistency you want and add sugar or any preferred sweetener along with it.

5. Mix all the things together nicely, making sure the condensed milk is well incorporated.

Tip: You can also blitz this mixture for 20 seconds in a blender to achieve the final consistency quickly.

6. Now transfer this drink to the refrigerator for a couple of hours before serving or until it is chilled.

Serve it in a glass filled with ice cubes. Garnish with cinnamon sticks or cinnamon powder. Enjoy!

Horchata


Share
Tweet
Share
No comments
Older Posts

About me

I am a software engineer by profession and a writer at heart. Born and brought up in Kharagpur, I moved to the city of dreams Mumbai when I got my first job. Till then I had not cooked a single dish in my life. Not even Maggi or tea. My dad had a strong belief that his little princess never will be in a situation where she had to cook for herself. Hence I was not allowed to spend time in the kitchen till I was studying.


So when I faced the daunting task of living alone, dabbas came to initial rescue. After that I managed a whole year on just boiled vegetables and rice. And then I landed in US. The bounty of fresh produce and cooking ingredients available in the super marts eventually lured me into making my very first meal ever. There was no turning back after that. I finally discovered how much I was in love with cooking and being creative in the kitchen.


This blog is a humble attempt to present our culinary heritage to one and all and document some of the very traditional recipes which gets passed on through generations just by word of mouth.


So just sit back with a cup of tea or coffee and enjoy the curries and the stories related to each.


Follow Us

Footprints

Blog Archive

  • ▼  2026 (4)
    • ▼  May (1)
      • A Suitcase Full of Stories: My Heartfelt Shopping ...
    • ►  January (3)
  • ►  2025 (3)
    • ►  December (1)
    • ►  June (1)
    • ►  February (1)
  • ►  2024 (21)
    • ►  December (2)
    • ►  September (1)
    • ►  August (3)
    • ►  July (4)
    • ►  May (2)
    • ►  April (5)
    • ►  March (3)
    • ►  January (1)
  • ►  2023 (7)
    • ►  December (2)
    • ►  November (1)
    • ►  October (1)
    • ►  May (1)
    • ►  March (1)
    • ►  January (1)
  • ►  2022 (18)
    • ►  September (1)
    • ►  August (2)
    • ►  July (2)
    • ►  June (3)
    • ►  April (1)
    • ►  March (3)
    • ►  February (2)
    • ►  January (4)
  • ►  2021 (60)
    • ►  December (5)
    • ►  October (5)
    • ►  September (5)
    • ►  August (7)
    • ►  July (6)
    • ►  June (5)
    • ►  May (3)
    • ►  April (4)
    • ►  March (6)
    • ►  February (6)
    • ►  January (8)
  • ►  2020 (55)
    • ►  December (5)
    • ►  November (3)
    • ►  October (10)
    • ►  September (7)
    • ►  August (7)
    • ►  July (9)
    • ►  June (3)
    • ►  May (9)
    • ►  March (1)
    • ►  January (1)
  • ►  2019 (3)
    • ►  November (1)
    • ►  April (1)
    • ►  January (1)
  • ►  2018 (1)
    • ►  December (1)
  • ►  2017 (4)
    • ►  December (2)
    • ►  November (1)
    • ►  September (1)
  • ►  2016 (10)
    • ►  August (1)
    • ►  July (2)
    • ►  June (5)
    • ►  April (1)
    • ►  March (1)
  • ►  2015 (10)
    • ►  December (1)
    • ►  August (1)
    • ►  June (1)
    • ►  May (2)
    • ►  April (4)
    • ►  March (1)
  • ►  2014 (22)
    • ►  November (2)
    • ►  August (2)
    • ►  July (3)
    • ►  June (2)
    • ►  May (4)
    • ►  April (3)
    • ►  January (6)
  • ►  2013 (22)
    • ►  November (2)
    • ►  October (4)
    • ►  September (5)
    • ►  August (2)
    • ►  July (1)
    • ►  June (1)
    • ►  May (2)
    • ►  April (1)
    • ►  March (1)
    • ►  February (2)
    • ►  January (1)
  • ►  2012 (31)
    • ►  December (4)
    • ►  October (3)
    • ►  September (8)
    • ►  July (1)
    • ►  June (1)
    • ►  May (14)
  • ►  2010 (9)
    • ►  July (3)
    • ►  June (2)
    • ►  April (1)
    • ►  March (2)
    • ►  February (1)
  • ►  2009 (4)
    • ►  February (2)
    • ►  January (2)

recent posts

Pinterest Board

Popular Posts

  • Champaran Mutton / Ahuna Mutton - A Bihari Delicacy
      When I finish a long week of work, self doubt, frustration of dealing with people and finally when the weekend comes, I feel cooking somet...
  • Kochur Dum / Kochur Dalna / Arbi Masala/ Taro or Colocasia Curry
    August 19 Kochu or taro is one of my favorite vegetables. It is as versatile as potato only much more tasty. It is equally starchy an...
  • Tetor Macher Jhol (Bitter Gourd Fish Curry)
    Anything Bitter hardly finds takers. Same applies for Bitter Gourd. As a kid I hated bitter gourd in any form. Grown ups around me would...
  • Khandeshi Kala Masala - Kala Mutton Masala
      25 September Maharashtra is a land of unique local flavours. And still it is mainly known for its Vada Pavs, poha, pav bhaji and modaks. I...
  • Macher Bhorta | Fish Bharta | Mach Makha| Bengali Style Mashed Fish
      October 18 Bhortas or bharta as we call it in pan India, are the quintessential Bengali food, a staple in Bangladeshi cuisine. They are th...
  • Complete Details to plan your ISKON Mayapur Visit
    Radha Madhav during Pushya Abhishek on 6th Jan 2023 First of all wish you a very happy new year. I have been away from blogging for a while ...
  • Varhadi Mutton - A Traditional Vidharba Cuisine
    Varhadi is a dialect of Marathi typically spoken in Vidarbha region of Maharashtra. Vidarbha is the north-eastern region of Maharashtra ...
  • Dim Toast | Egg Toast | Dim Pauruti | Savoury French Toast
      April 25 Calcutta or Kolkata. A city known for its food and culture, where hospitality and love are synonymous with lip-smacking grub. Cho...
  • Golda Chingri Malaikari (Giant River prawns in coconut milk gravy)
    One of the main reasons I love Kolkata is because of the fish we get here. Its so fresh and one can get restaurant grade fish quality even i...
  • Pahadi Bhatt Ki Daal | Black Soyabean Dal
      Happy 76th Independence Day to all my readers! Today we are celebrating 75 years of independence and that is such a remarkable thing. the ...

Liebster Award

Liebster Award

Very Good Recipes

Very Good Recipes

You can find my recipes on Very Good Recipes

Contact Us

Name

Email *

Message *

Pages

  • Travelogue Index
  • VEGETARIAN RECIPE
  • CHICKEN RECIPES
  • SEAFOOD RECIPES
  • MUTTON RECIPES
  • RICE RECIPES
  • EGG RECIPES
  • DAAL RECIPES
  • ROTI & PARATHA RECIPES
  • BAKING RECIPES
  • SWEET RECIPES
  • SNACKS RECIPES
  • SIDES RECIPES
  • SOUP RECIPES
  • SALAD & BOWLS RECIPES
  • ROASTED RECIPIES
  • JAM & PRESERVE RECIPES
  • BEVERAGE RECIPES
  • SAUCES, SPICES & CURRY BASE RECIPES
  • CHUTNEY & DIPS RECIPES
  • FESTIVE RECIPES
  • Contact Us
  • TRAVELOGUES OF EAST INDIA
  • TRAVELOGUES OF WEST INDIA
  • TRAVELOGUES OF SOUTH INDIA
  • TRAVELOGUES OF NORTH INDIA
  • TRAVELOGUES of ASIA
  • North East Recipe

This Blog is protected by DMCA.com

DMCA.com for Blogger blogs
FOLLOW ME @INSTAGRAM

Curries n Stories © 2020 All rights reserved.
Created with by BeautyTemplates