• Home
  • Recipes
    • Vegetarian
    • Seafood
    • Snacks
    • Chicken
    • Mutton
    • Egg
    • Roti & Parathas
    • Dessert
    • Sides
    • Soups
    • Salad & Bowls
    • Rice
    • Daal
    • Bakes
    • Roasted
    • Beverages
    • Sauces, Spices & Curry Base
    • Chutney & Dips
    • Festive Recipes
  • Cuisine
    • Bengali
    • Maharashtrian
    • Rajasthan
    • Punjab
    • Chennai
    • Andhra
    • Mangalore
    • Mughlai
    • Kashmiri
    • Chinese
    • Singapore
    • Mexican
    • Continental
    • Italian
    • French
    • American
    • Thai
    • Bangladeshi
    • Arab & Persia
    • North East
  • Meal Type
    • Breakfast
    • Lunch
    • Dinner
    • Snacks
    • Dessert
    • Appetizer
    • Accompaniments
  • How To
    • Preservation Techniques
  • Travel
    • East India
    • West India
    • North India
    • South India
    • Asia
    • America
  • Lifestyle
    • Craft & Creation
    • Experiences
  • Musing
  • Contact
  • Bengali Blogs

Curries & Stories

pinterest facebook twitter instagram tumblr linkedin


Unlike the bright, refreshing sweets of summer, winter desserts embrace richness. They take their time—allowing ingredients to meld, deepen in flavor, and fill the home with an aroma that feels like a warm embrace. Think of the golden ghee glistening on a fresh bowl of moong dal halwa, the molten warmth of nolen gur in a steaming kheer, or the soft, spiced crumble of a perfectly baked pie. Every bite is a reminder of childhood winters, of gathering around the kitchen, of stories shared over sweets that taste like home.

Winter is really the season of indulgence, and nothing defines the comfort of chilly evenings better than warm, slow-cooked desserts. While gajar ka halwa often takes center stage, there’s another winter gem that deserves just as much love—Red Carrot Kheer. Made from the vibrant, seasonal red carrots available only in the colder months, this kheer is a revelation in taste, texture, and warmth.

Before I stumbled upon the magic of Gajar Kheer, my go-to winter dessert was always Gajar Halwa as soon as red carrots appeared in the market. But this time, I wanted to try something different, so I decided to make kheer—and it turned out absolutely amazing!

Unlike gajar ka halwa, which can sometimes feel overly rich and cloyingly sweet, red carrot kheer has a delicate balance of natural sweetness and creamy decadence. The slow simmering of grated carrots in milk allows their earthy, honeyed essence to infuse into the dish, creating a dessert that’s lighter, more nuanced, and far more comforting on a winter night. With hints of cardamom, saffron, and a sprinkle of nuts, it’s the perfect antidote to the biting cold—a bowl of nostalgia and warmth that doesn’t overwhelm the palate.

This winter, if you’re looking for a dessert that’s indulgent yet not overpowering, red carrot kheer is the one to try. It’s the quieter, more sophisticated cousin of gajar ka halwa, and once you taste it, you might just find yourself making the switch.

Preparation Time : 20 minutes 
Cooking Time : 35 minutes 
Serves - 4 serving
Ingredients :
  • Red Carrot- 2 Medium 
  • Ambemohar / Gobindo Bhog / Fragrant rice - 2 tbsp ( soaked for 30 minutes)
  • Full Cream Milk - 500 ml
  • Milk Powder - 20 gm
  • Bay Leaf - 1
  • Sugar - 3 Tsp ( as per taste)
  • Salt - 1 pinch


Procedure :

1. Grate the red carrots. Heat ghee in a heavy-bottomed pan and sauté the grated red carrots on low flame for 4-5 minutes until they soften slightly. This enhances their natural sweetness and removes any raw taste.

Tips: You can add 1 tsp of sugar to the carrots as well 

2. In a separate deep pan, bring the full cream milk to a gentle boil. Add the bay leaf and let it infuse for a minute. Lower the flame and let the milk simmer while stirring occasionally so that no layer is formed on the milk.

3. When the milk is reduced to 3/4 then Mix the milk powder with 2 tbsp of warm milk to make a smooth paste and add it to the kheer. 

4. Coarsely grind the soaked rice and then, sprinkle in the ground fragrant rice into the thickened milk and stir well. The rice will help thicken the kheer naturally while adding a delicate aroma.. 

5. .Keep Stirring and checking the kheer till the rice is cooked. You can press a rice fragment between your fingers to check if they mash easily. 

6. Once the rice is cooked add sugar and a pinch of salt. Adding sugar earlier will deter the rice from cooking. The salt is optional but helps balance the sweetness.

7. Add the sautéed carrots to the simmering milk and continue to cook on low flame, stirring occasionally, until the milk reduces slightly and takes on a orange hue. 

8. Let the kheer cook for another 5-7 minutes until the consistency is rich and creamy.

9. Remove the bay leaf and give the kheer a final stir. 

Serve warm for a cozy winter dessert or chill it for a refreshing treat later.


Share
Tweet
Share
No comments
Mashed Potato


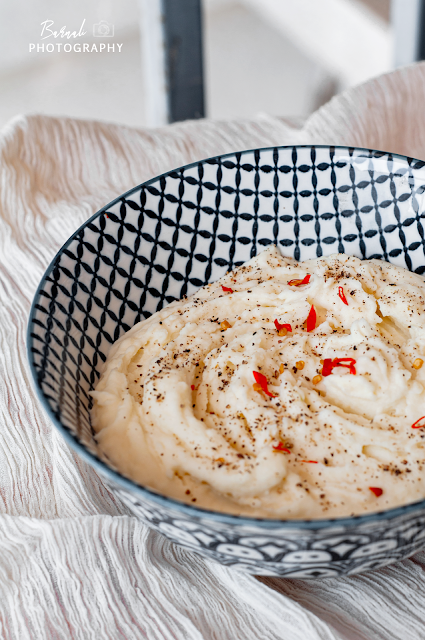
Last week there was a customer visiting one of our Pune offices from US. I was asked to anchor a few presentations for the customer for which I went to office - first time after November 14 last year. That was the fateful week when I got diagnosed with Sciatica followed by a very painful period of 3 months to recover. I think I will write about my Sciatica recovery journey in details so that it may help anyone looking for some light in the dark tunnel. But that's for a different blog. Let's come back to the present, when I was asked to visit office for the customer visit. The visit went really well as the customer was one of the most kindest and delightful personality, almost felt like he was just like Santa Claus by his personality and looks. So after wrapping up our presentation it was time for lunch. For all such corporate lunch events, usually our company has tie ups with various five star hotels who provide the food based on customer preference of cuisine. This time the food was from Sheraton grand, it was a complete Western platter - Chicken Steak in brown gravy, mashed potato, fish schnitzel and stir fried vegetable as salad. Looking at the brand name of Sheraton, my expectations rose and I was salivating at the thought of having a succulent piece of well seasoned chicken followed by some dreamy creamy mashed potato. In case if you did not know, I just love a good mashed potato, and this was the first time I was about to try one from a five star kitchen. It took just a bite of the mashed potato to abruptly crash my billowing expectations. The mashed potato was bland, grainy, dry and seemed like someone had just literally mashed a boiled potato and served. No where, I repeat not where it resembled a traditional mashed potato, which is supposed to be fluffy, creamy, melt in mouth gorgeous. The Chicken steak  lacked seasoning and the gravy was just a lumpy mass. The icing was the fish schnitzel which had a very thin layer of fish and had become cold by the time it reached the table. The customer in fact asked me what was he eating, might be because he did not identify any of the dishes which were supposed to be made as per his palate. No offence to Sheraton Grand, but I felt mortified in front of my customer. At the same time I also realized the mashed potato I make at home is hundred times more delicious and authentic than the one served by the five star hotel. 

So it was the obvious decision to share my version of mashed potato recipe with all of you. Mashed potato is like a Bengali Aloo seddho on a sedative! Hence I strongly feel all Bengalis would any day love a mean potato mash. This mashed potato can be enjoyed on its own or you may also make a traditional brown gravy to serve along. I would definitely recommend making the gravy as it just compliments the mashed potato and levels it up deliciously.

Preparation Time : 15 minutes 
Cooking Time : 40 minutes 

Serves - 2 adults

Ingredients :

For Mashed Potato
  • Potato - 2 big (skin on)
  • Water - for boiling
  • Milk - 1/2 cup
  • Fresh Cream - 3 tbsp
  • Butter - 2 tsp
  • Fresh Garlic - 3 cloves 
  • Fresh ground pepper powder - 1 tsp
  • Salt - As per taste
For Gravy
  • Chicken Stock - 3 cups
  • Chicken bullion cube - 1
  • All purpose flour - 2 tsp
  • Milk - 1/4 cup
  • Butter - 3 tsp
  • Thyme - 1 sprig 
  • Salt - To Taste

Mashed potato with gravy
Mashed potato topped with brown gravy


Procedure - Mashed Potato:

1. Wash and rinse the potato, making sure there is no dirt on the potato skin.  Make deep gashes on the potato to ensure it is cooked through. Now take enough water in a pressure cooker and add salt. Boil the potatoes in a pressure cooker for 3-4 whistles with skin on. Adjust the whistles as per the quality of the potato.

Tip: Instead of boiling the potatoes with skin on, you can peel off teh skin, chop the potatoes in small pieces and boil in water as well. But boiling the potato with skin on ensures the potato does not get watery when mashed. 

2. Once the potato is cooked drain the water and peel off the skin. This needs to be done when the potato is still hot so be careful.

3. Using a masher mash the peeled potatoes into a uniform texture. Use your fingers to feel any lumps in the mashed potato. If you still feel lumps then best way is to sieve the mashed potato through a steel strainer, pressing hard to ensure all lumps are broken down and the final mashed texture is lump free. Mash till you get a smooth, fluffy and light consistency. Do not mash too much as this will break down the starches more and make for a gummy texture.

4. While the potatoes are still hot you need to add the butter. If either the mashed potato or the butter is cold then you can put the mashed potato in the microwave for 20 seconds and then add the butter. This will help the butter to melt evenly. Mix well.

5. Now finely grate the garlic cloves and make it into a paste. Add to the mashed potato and mix well.

6.  Now fold in the fresh cream and milk mixed together. 
Tip: warm the fresh cream and milk a bit before adding to the mashed potato for best results. You can always add more butter, warm milk , fresh cream to get your desired consistency.

7. When everything is well integrated and the texture is silky and smooth, add the seasoning and the pepper powder.
Tip: The salt balance is the game changer in this recipe. You need to add the right amount of salt as per your taste to avoid it being bland.

Serving Tips: Mashed potatoes are served warm. So you can make mashed potatoes in advance and while serving warm it in the oven and add a few teaspoon of milk while you are reheating, then give it a nice stir and serve. You can top it off with some fresh herbs, pepper powder or some butter. 

Procedure - Mashed Potato 

1. Take a microwave safe mixing bowl and break the chicken bullion cube. Add milk and the chicken stock to this and give it a nice stir. Pop it into the microwave for about 30 seconds making sure the chicken bullion cube is dissolved well. 

Check the seasoning in this mixture, sometimes the chicken bullion cube contains a lot of salt, so make sure you check the seasoning and adjust accordingly.

2. Now melt butter in a saucepan over medium heat. Add the flour, thyme and whisk together till it turns golden brown.

3. Now add the stock mixture into teh saucepan and give it a good stir. Add pepper powder and stir constantly till the mixture comes to a boil.

4. Reduce heat and continue to stir until thickened. You will see they are slowly turning a shade of light brown. That's your cue to take it off the heat. Do a final taste test and you are good to go.

Serve it over your warm mashed potatoes, steamed chicken or rice and enjoy!

Additional Tip : If you have some leftover gravy then just fry some chicken cubes with salt and pepper and then pour over this gravy, cook for 5 minutes and you have a quick chicken gravy good to go with rice!


Share
Tweet
Share
No comments
Burnt Tomato Chutney

If you want a tangy, spicy chutney to go with your rice or flatbreads but you don't want to spend a lot of time in preparation and cooking what do you do? You can try out this easy peasy burnt tomato chutney which gets done under 15 minutes and has super amazing taste and flavors.

This burnt tomato chutney is very popular accompaniment in the north eastern states of India and is a common part of Assamese and Naga cuisine. Burnt, roasted or smoked spicy chutneys are regularly served along with a thali consisting of rice, daal, vegetable and meat or fish preparation. Sometimes mashed potato is also added in this chutney to give it body and a different taste.

The highlight of this chutney is the rustic smokey flavor from the charred tomato and chilies. This chutney is so good that you wont even need a separate vegetable dish if you have it with rice and daal. 

Preparation Time : 5 minutes
Cooking Time : 5 minutes

Serves - 2 adult

Ingredients :
  • Tomato - 2
  • Green Chili - 1  (Adjust as per heat tolerance)
  • Coriander Leaves (chopped) - 1 tbsp
  • Onion (medium) - 1/2 chopped
  • Garlic - 3-4 cloves (optional)
  • Mustard Oil - 1 tsp
  • Salt - To Taste

Video :


Procedure:

1. Wash and dry the Tomatoes.

2.  Cut the tomatoes in large pieces
Tip - You can roast/char the whole tomato also, but cutting them into large pieces ensure the charred smokey aroma is more prominent in the chutney. Also it gets cooked quickly.

3. Place the tomato pieces and green chili on a mesh over open fire. Once black burnt spots start appearing turn over the pieces to get a uniform char on all sides. The amount of char on the tomatoes can be adjusted as per your liking.
Tip: At this stage you can also add garlic for charring. Garlic gives a little additional kick to the dish.

4. Take the charred tomatoes and chilies off the fire and place it in a plate. With a masher or your fingers mash the tomatoes and the chillies while they are still hot as its easy to mash them before they cool down.  

5. Now add chopped onion, chopped coriander leaves, mustard oil and salt and give everything a good mix.

Serve this chutney with your choice of rice or Indian flatbread with daal and enjoy!


Share
Tweet
Share
No comments


3rd October

We are finally into October! Mahalaya is just around the corner which means its time for Durga Puja! And Durga Puja definitely means grabbing on a lot of good food. So to prepare yourself for this festive season it is always recommended to keep a healthy detox drink as part of your regular diet plan. 

Hence I am starting October on a healthy note by sharing a favorite detox drink - Kokam juice. This tarty and citrusy fruit is a  favorite among the Konkans and is widely available in the Malabar regions of India. You can find many dishes like dal and curries being made with Kokum in Maharashtra.

My tryst with Kokum started with Sol kadi - a flavorful concoction of Kokum, water, coconut milt, ginger and green chili. Its a lovely summer drink here in Maharashtra and I absolutely love it with a fish curry thali specifically. Slowly I started exploring and knowing more amount this amazing fruit and what all you can do with this little wonder fruit. 

Kokum comes with an array of known health benefits. The presence of vitamin C helps boost immunity,  the garcinol it contains has antioxidant, anti-inflammatory, and anti-allergenic properties. But what has brought kokum into the spotlight is the presence of hydroxyl citric acid (HCA) in it, which is said to shrink appetite and reduce fat in the body, further helping you lose weight, the healthy way. It has become a new fad to include Kokum juice in your regular diet for healthy weight loss. You must have also heard some Bollywood celebs taking about Kokum drink as their preferred post workout drink.

Kokum juice or kokum sharbat will not only cool you down your body but also help detoxify your body. You can include this in your early morning routine and it will work wonders for you. The recipe is also very simple, you can just create the Kokum Juice paste in advance and use it to prepare your detox drink anytime you want. I am sharing two recipes with Kokum below. Check them out below.


Soaking Time: 1-2 Hr
Preparation Time : 5 minutes 
Cooking Time : 5 minutes
Serves - 3 glasses

Ingredients :
  • Dry Kokum - 1/2 cup
  • Water - 1 cup
  • Ground Roasted Whole Jeera (Cumin) - 1 tsp
  • Black Salt/ Rock salt - 1/2 tsp 
  • Sugar - 4 tbsp ( adjust as per taste)

Equipment:
  • Vessel
  • Strainer
  • Masher

Kokum Juice : Method

1. Soak some kokum in water and remove the seeds.

2. After 1-2 hours of soaking, strain the water and keep aside the water.

3. Now in a mixer grinder, take the soaked kokum and add half of the water. Make a smooth paste.

4.  Dry roast some cumin seeds. Roughly pound the roasted cumin seeds it in a mortar pestle. Keep this ground roasted cumin seed aside.

4. Take a pan, add the remaining kokum water and add the sugar. Cook on low heat for 5 minutes till the sugar melts. 

5. Now add the Kokum paste to this water. Give it a good stir. Cook for 5 more minutes and bring it to a boil.

6. Now let the mixture cool. Once the mixture has cooled strain it. 

7. Now add the roasted cumin seed powder and salt to this and give a nice stir. Your Kokum juice paste is ready. Store it in a jar. You can refrigerate it for a week.

To make the juice, take 2 tbsp of the pulp and add chilled water to it and give a nice stir. Add a few ice cubes and a sprinkle of ground roasted cumin seeds. It is best served chilled.


Kokum Water : Method

1. Soak a handful of kokum in water overnight. Strain out the water next morning and drink it by warming up a bit. Add a little seasoning of your choice. You can store this water for later usage as well. 

Note: You can use the soaked Kokums to prepare the Juice paste as detailed above.


Share
Tweet
Share
No comments


30 September

The humidity from the long rain spells is finally lifting a bit and there’s a brisk chill in the air. September is a beautiful time. late summer produce like juicy plump tomatoes are still found in abundance in the local produce market while the weather feels like fall. So this year I am thinking of creating a fall series of dishes which will bring together the light and delicate flavors of summer with the comforting style of autumnal cooking.

What is the best you can do with beautiful ripened tomatoes? Of course make them into a hearty thick and warm tomato soup. 

I have never been a fan of tomato to start with. As a child I used to hate tomato because of its mushy texture. Then once I started train journeys, tomato soup became a constant companion as the pre dinner or the lunch refreshment served onboard. It was perfect to satiate the hunger pangs we would feel in between the meals.

Rail travels always evokes a sense of romanticism. I really miss those old days when me with my extended family of 10-15 members would travel in trains to hill stations during our summer breaks. Adults sharing stories and banter sitting across the berths and kids engrossed in a game of ludo was how our train travel would look like. Not to mention the homemade snacks that would keep doing the rounds as the stories would pick up pace. 


The Indian Railway Style tomato soup has its own old world charm. Not because it would taste out of the world but because whenever I think about the soup served on the Indian railways it also brings back the fond memories from each travel. 

Though in past few years it has been more of an air travel but still today when if I happen to travel in train and have the tomato soup it feels like a time warp. Everything might have changed in the last 20 years but the taste of tomato soup served in the trains still reminds me of the childhood travels. We would empty the pepper powder packet into the hot soup served in paper cups, adjust the seasoning, dip the breadsticks into the bite sized Amul butter chiplets and dunk them into the soup till the butter starts melting away. This was the only way you could eat those bone hard breadsticks without breaking your teeth literally. 


But even after these tiny hurdles we would always crave for this in-between meal soups. They would give us the perfect excuse to sip on the warm soup sitting beside the window and staring at the beautiful sceneries whooshing past. 

The long train journeys and family gateways might have become a thing of past in the post covid world but the unmistakable aroma of tomato, black pepper, and toasted bread still plays on my senses and makes me want to go back in time. 

I hope the recipe I am taking about today takes you also back to those days of amazing train travels. This roasted tomato soup is totally a summer-crossing-into-fall type of soup and ready in around 30 - 35 minutes

Checkout other soup recipes on my blog:

  • Spicy Thai Pumpkin Soup 
  • Mushroom Bok Choy Soup
  • Chicken Clear Soup

Preparation Time: 5 minutes
Roasting Time : 20-25 minutes 
Simmer Time : 5 to 10 minutes
Serves - 3 - 4 servings

Ingredients :
  • Red Ripe Tomatoes - 8 cut into halves
  • Onion - 1, peeled and quartered
  • Garlic Pod - 3
  • Cracked Pepper - 1/2 tsp
  • Salt - as per taste
  • Oregano - 1 tsp
  • Cooking Oil/ Olive Oil - 2 tbsp

Equipment:
  • Oven
  • Blender
  • Pot

Method

1. Preheat oven to 200 C or 425 F

2. Place the tomatoes (cut side up), onion, and garlic cloves in a single layer on a baking tray. Drizzle olive oil on everything. Season with a little salt, cracked pepper and 1 tsp of dried oregano. Roast for 20-25 minutes until the tomatoes are blistered and bubbling.

Note: Do not overcrowd the tray or else the roasting wont be uniform.

3. Let the vegetables cool down and then place all the roasted vegetables in a blender . Add a little water if required. Blend it till you get a creamy texture. 

Tip: At this point you can add some milk as well if you want added creaminess. I don't like milk in my tomato soup so I didn't add it.

4. Pour this mixture into a pan. Bring it to a simmer. 

Serve hot with a garnish of oregano, chilli flakes and a dollop of butter.

Bonus Recipe

2 minute Bread Croutons: 

I made a batch of crispy croutons from some old bread in flat 2 minutes. Just cut some breads into small sqaures. Drizzle it with melted butter or oil. Add seasoning of salt, red chilly powder and herbs of your choice. Place it in a microwave safe plate in a single layer and microwave for 1 minute. After 1 minute flip all teh bread cubes and microwave again for 1 minute. Let them slightly cool down. The perfect quick and easy croutons to go with your tomato soup is ready in a jiffy.


Share
Tweet
Share
No comments

Mirchi Thecha


 26 July

Though I have been staying in Maharashtra for over a decade now, it was just a couple of years ago I started exploring the local or traditional delicacies of this state beyond vada pavs and misal pavs. And I was surprised to see that many of the dishes felt really interesting to my Bengali palate. Especially the non vegetarian preparations. They have such a unique flavored spice mixes which varies from region to region even within the borders of Maharashtra. The one dish which I have perfected is Kaleji Masala. We Bengalis usually don't like chicken liver that much because of the smell it has. But the Marathi preparation of Kaleji fry has such a rustic flavor profile due to the addition of roasted coconut and a bunch of other ground spices. I will talk about this recipe some day which is now my absolute favorite. 

On my birthday, I had ordered Maharashtrian delicacies and with them came the freshly made mirchi thecha. Mirchi Thecha is a classic Maharashtrian accompaniment which pairs up best with different Bhakhri (wheat , jowar, ragi etc.) or even with normal rotis.  It is a fiery delectable combo made up of pounded green chillies, toasted garlic, peanuts and fresh coriander leaves.  

When we were having office before the pandemic hit, I used to look forward to the various kinds of thecha my colleagues used to bring. But the pandemic put an end to invading other's lunchboxes. But the maharashtrian meal I ordered after all this time rekindled my memories of having thecha. I thought of trying to make it at home. My maid gave a few tips and my mom tried to make it, and I must say it was a hit even the first time it was made. My mom doesn't usually have fondness for other cuisines but she literally went ga-ga over this. We found it so good that the first batch of Thecha only lasted 2 days and it was about 150 gm! 

Personally I feel this goes best with different Maharashtrian non vegetarian recipes to accompany your flatbread. They are best consumed fresh so people make small batches of Thecha and store it in the fridge for no more than 2-3 days. After that, the color and the taste of the thecha starts to change.

Traditionally thecha is made by pounding everything in a mortal pestle. The final texture should be somewhat course and not like a paste.  You can make this in a mixer grinder but then you cannot control the texture of the thecha. And in addition thecha tastes best when you make it the traditional way. But the effort it taskes that way is a put off for many.

So there is an easy tip to get the best taste without putting in too much effort of pounding. If you have a vegetable chopper then you can use it to chop the ingredients till its 50-60% done. Then transfer it to the mortar pestle and pound it to give the finial finish. I have tried and tested this method multiple times and now its my go to method of making thecha at home.

Checkout other accompaniment recipes on my blog:

  • Bengali Tomato Chutney
  • Pickled Onions - Sirke Wala Peyaz
  • Lebanese Toum - Garlic Sauce

Mirchi Thecha


Preparation Time : 10 minutes
Cooking Time: 15 minutes

Ingredients :
  • Whole Jeera - 1/4th tsp
  • Green chilies (non spicy ones) - 1 cup, chopped
  • Whole Garlic Cloves - 1/4 cup
  • Peanuts - 1/4 cup - ground
  • Fresh Coriander leaves - 1/2 cup, chopped
  • Salt to taste -
  • Oil to fry - 1 tbsp

Equipment:
  • Non stick pan
  • Vegetable chopper
  • Mortal Pestle / Mixer grinder

Recipe Video:


Some tips before you start

Tip 1: If you like or for extending the shelf life of Thecha you can also fry it again in a tbsp of oil on low heat for around 5-6 minutes. Now you can store the Thecha in a clean- dry airtight container and keep it in the fridge for 2-3 weeks easily.

Tip 2: To easily de-skin peanuts, dry roast them on a skillet for about 3-4 minutes stirring continuously. Let it cool down and then transfer them to a bowl and give a good shake. The skin will come off. 

Tip 3: This one is a killer tip. It is recommended to always pound the thecha in a mortar pestle the traditional way for the best taste instead of a mixer. But it is a lot of work that way. So as a hack you can use a hand held chopper to chop the thecha into smaller pieces and then transfer it to a mortar and pestle and pound it to the desired consistency. This helps in drastically reducing the effort to pound the ingredients and the taste still remains in tact as chopping the ingredients don't generate much heat unlike the grinder method.

Tip 4:  In a mixer grinder coarsely pulse the roasted peanuts and store it. You can use this coarsely ground peanut in your thecha or sabudana khichadi. This saves you a little effort in hand pounding the peanuts.

Method:

Mirchi Thecha


1. Dry roast the peanuts in a non stick pan for 3 to 4 minutes till black spots appear and the peanuts are fragrant. Keep stirring them continuously on medium flame. Keep aside and let it cool. Once cool rub the peanuts between your fingers and the skin will come off.

2. Heat oil in a non stick pan. Once hot temper the oil with whole jeera. Now add the whole garlic to the pan and sauté it for another 1 minute

3. Add the chopped green chilies and on medium flame sauté the green chilies for about 2 minutes. Keep stirring in between.

Note: If you are not a fan of spicy things, then go for the light green chilies which are less spicy by equally tasty. And if you want a really spicy thecha you can go for the dark green small ones. 

4. Add the deskinned whole peanuts, sauté for about 1 minute. Add salt as per taste.

Mirchi Thecha


5. Transfer the mixture to a mortar pestle or a chopper. Add chopped fresh coriander. If you are using a chopper, chop them till 3/4th chopped and then transfer to the mortar pestle for the final finish. Or from scratch, you can pound it to the desired texture in a mortar and pestle.

Note: You can also pulse them in a mixer grinder but the taste wont be as good.

Serve it with roti or bhakhri and your favorite vegetarian or non vegetarian dish.


Share
Tweet
Share
No comments
Older Posts

About me

I am a software engineer by profession and a writer at heart. Born and brought up in Kharagpur, I moved to the city of dreams Mumbai when I got my first job. Till then I had not cooked a single dish in my life. Not even Maggi or tea. My dad had a strong belief that his little princess never will be in a situation where she had to cook for herself. Hence I was not allowed to spend time in the kitchen till I was studying.


So when I faced the daunting task of living alone, dabbas came to initial rescue. After that I managed a whole year on just boiled vegetables and rice. And then I landed in US. The bounty of fresh produce and cooking ingredients available in the super marts eventually lured me into making my very first meal ever. There was no turning back after that. I finally discovered how much I was in love with cooking and being creative in the kitchen.


This blog is a humble attempt to present our culinary heritage to one and all and document some of the very traditional recipes which gets passed on through generations just by word of mouth.


So just sit back with a cup of tea or coffee and enjoy the curries and the stories related to each.


Follow Us

Footprints

Blog Archive

  • ▼  2025 (2)
    • ▼  June (1)
      • Why I’ll Choose an Airbnb Over a Hotel—Every Singl...
    • ►  February (1)
  • ►  2024 (21)
    • ►  December (2)
    • ►  September (1)
    • ►  August (3)
    • ►  July (4)
    • ►  May (2)
    • ►  April (5)
    • ►  March (3)
    • ►  January (1)
  • ►  2023 (7)
    • ►  December (2)
    • ►  November (1)
    • ►  October (1)
    • ►  May (1)
    • ►  March (1)
    • ►  January (1)
  • ►  2022 (18)
    • ►  September (1)
    • ►  August (2)
    • ►  July (2)
    • ►  June (3)
    • ►  April (1)
    • ►  March (3)
    • ►  February (2)
    • ►  January (4)
  • ►  2021 (60)
    • ►  December (5)
    • ►  October (5)
    • ►  September (5)
    • ►  August (7)
    • ►  July (6)
    • ►  June (5)
    • ►  May (3)
    • ►  April (4)
    • ►  March (6)
    • ►  February (6)
    • ►  January (8)
  • ►  2020 (55)
    • ►  December (5)
    • ►  November (3)
    • ►  October (10)
    • ►  September (7)
    • ►  August (7)
    • ►  July (9)
    • ►  June (3)
    • ►  May (9)
    • ►  March (1)
    • ►  January (1)
  • ►  2019 (3)
    • ►  November (1)
    • ►  April (1)
    • ►  January (1)
  • ►  2018 (1)
    • ►  December (1)
  • ►  2017 (4)
    • ►  December (2)
    • ►  November (1)
    • ►  September (1)
  • ►  2016 (10)
    • ►  August (1)
    • ►  July (2)
    • ►  June (5)
    • ►  April (1)
    • ►  March (1)
  • ►  2015 (10)
    • ►  December (1)
    • ►  August (1)
    • ►  June (1)
    • ►  May (2)
    • ►  April (4)
    • ►  March (1)
  • ►  2014 (22)
    • ►  November (2)
    • ►  August (2)
    • ►  July (3)
    • ►  June (2)
    • ►  May (4)
    • ►  April (3)
    • ►  January (6)
  • ►  2013 (22)
    • ►  November (2)
    • ►  October (4)
    • ►  September (5)
    • ►  August (2)
    • ►  July (1)
    • ►  June (1)
    • ►  May (2)
    • ►  April (1)
    • ►  March (1)
    • ►  February (2)
    • ►  January (1)
  • ►  2012 (31)
    • ►  December (4)
    • ►  October (3)
    • ►  September (7)
    • ►  August (1)
    • ►  July (1)
    • ►  June (1)
    • ►  May (14)
  • ►  2010 (8)
    • ►  July (2)
    • ►  June (2)
    • ►  April (1)
    • ►  March (2)
    • ►  February (1)
  • ►  2009 (4)
    • ►  February (2)
    • ►  January (2)

recent posts

Pinterest Board

Popular Posts

  • Champaran Mutton / Ahuna Mutton - A Bihari Delicacy
      When I finish a long week of work, self doubt, frustration of dealing with people and finally when the weekend comes, I feel cooking somet...
  • Golda Chingri Malaikari (Giant River prawns in coconut milk gravy)
    One of the main reasons I love Kolkata is because of the fish we get here. Its so fresh and one can get restaurant grade fish quality even i...
  • Khandeshi Kala Masala - Kala Mutton Masala
      25 September Maharashtra is a land of unique local flavours. And still it is mainly known for its Vada Pavs, poha, pav bhaji and modaks. I...
  • Kochur Dum / Kochur Dalna / Arbi Masala/ Taro or Colocasia Curry
    August 19 Kochu or taro is one of my favorite vegetables. It is as versatile as potato only much more tasty. It is equally starchy an...
  • About Slow Travel | Spice2Nuts - a spice initiative by Harish Bali (Visa2Explore)
    Moments from my travels - 1. Forest in Meghalaya 2. An old boat in Shnongpdeng 3. Fish Mint 4. Local Cinnamon  Traveling has always been a p...
  • Macher Bhorta | Fish Bharta | Mach Makha| Bengali Style Mashed Fish
      October 18 Bhortas or bharta as we call it in pan India, are the quintessential Bengali food, a staple in Bangladeshi cuisine. They are th...
  • Varhadi Mutton - A Traditional Vidharba Cuisine
    Varhadi is a dialect of Marathi typically spoken in Vidarbha region of Maharashtra. Vidarbha is the north-eastern region of Maharashtra ...
  • Green Chilli Thecha || Maharashtrian Hirvi Mirchi Thecha || Green Chilli Salsa
     26 July Though I have been staying in Maharashtra for over a decade now, it was just a couple of years ago I started exploring the local or...
  • Baked Basa in Butter Garlic Lemon Sauce
      January 18 It doesn't feel like winter anymore. While I type, the blinds are drawn in the room, the fan is running on its maximum and ...
  • Dim Toast | Egg Toast | Dim Pauruti | Savoury French Toast
      April 25 Calcutta or Kolkata. A city known for its food and culture, where hospitality and love are synonymous with lip-smacking grub. Cho...

Liebster Award

Liebster Award

Very Good Recipes

Very Good Recipes

You can find my recipes on Very Good Recipes

Contact Us

Name

Email *

Message *

Pages

  • Travelogue Index
  • VEGETARIAN RECIPE
  • CHICKEN RECIPES
  • SEAFOOD RECIPES
  • MUTTON RECIPES
  • RICE RECIPES
  • EGG RECIPES
  • DAAL RECIPES
  • ROTI & PARATHA RECIPES
  • BAKING RECIPES
  • SWEET RECIPES
  • SNACKS RECIPES
  • SIDES RECIPES
  • SOUP RECIPES
  • SALAD & BOWLS RECIPES
  • ROASTED RECIPIES
  • JAM & PRESERVE RECIPES
  • BEVERAGE RECIPES
  • SAUCES, SPICES & CURRY BASE RECIPES
  • CHUTNEY & DIPS RECIPES
  • FESTIVE RECIPES
  • Contact Us
  • TRAVELOGUES OF EAST INDIA
  • TRAVELOGUES OF WEST INDIA
  • TRAVELOGUES OF SOUTH INDIA
  • TRAVELOGUES OF NORTH INDIA
  • TRAVELOGUES of ASIA
  • North East Recipe

This Blog is protected by DMCA.com

DMCA.com for Blogger blogs
FOLLOW ME @INSTAGRAM

Curries n Stories © 2020 All rights reserved.
Created with by BeautyTemplates