
• Home
  • Recipes
    • Vegetarian
    • Seafood
    • Snacks
    • Chicken
    • Mutton
    • Egg
    • Roti & Parathas
    • Dessert
    • Sides
    • Soups
    • Salad & Bowls
    • Rice
    • Daal
    • Bakes
    • Roasted
    • Beverages
    • Sauces, Spices & Curry Base
    • Chutney & Dips
    • Festive Recipes
  • Cuisine
    • Bengali
    • Maharashtrian
    • Rajasthan
    • Punjab
    • Chennai
    • Andhra
    • Mangalore
    • Mughlai
    • Kashmiri
    • Chinese
    • Singapore
    • Mexican
    • Continental
    • Italian
    • French
    • American
    • Thai
    • Bangladeshi
    • Arab & Persia
    • North East
  • Meal Type
    • Breakfast
    • Lunch
    • Dinner
    • Snacks
    • Dessert
    • Appetizer
    • Accompaniments
  • How To
    • Preservation Techniques
  • Travel
    • East India
    • West India
    • North India
    • South India
    • Asia
    • America
  • Lifestyle
    • Craft & Creation
    • Experiences
  • Musing
  • Contact
  • Bengali Blogs

Curries & Stories

pinterest facebook twitter instagram tumblr linkedin


Day 37 of Unlock 1.0

A storm is raging outside as I type this recipe now. The weather is really really windy outside and occasional bursts of rain. Doesn't quite feel like monsoon still. Everything is a little weird this year. So no doubt the weather is also playing games with us.

If someone had told me even a few days ago that a vegetable preparation can be made by combining parwal and raw mangoes I would have not believed. They sound too much of a mismatch to go together. One is a tender vegetable without any significant flavor profile and another having a signature aroma  and strong taste of its own.

So it happened I came across a recipe posted by Moumita from experiencesofagastronomad and read about a recipe she posted on parwal with raw mango. I got really inquisitive about it though some of the elements she used in her recipe didn't quite strike a chord with my taste buds. I played along with the idea in my mind. Now the first obstacle was to procure parwal. So I am talking about a couple of weeks back when I was not getting any parwal in my area or any of the online stores due to lockdown. I am such a huge parwal lover that I can have parwal in any form and shape all round the year - boiled, sauteed, in subzi, fish curry - you name it and I love it. At times my mom jokes and asks me how did I pick up on this crazy love for this vegetable. Even I do not know the answer but that is how it is.

So coming back to the topic. As I was deliberating with the combination of parwal and aam, I saw parwal showing up on the list of vegetables in bigbasket. Without a moments delay I ordered them. Now the second thing was bouncing off this idea with my most credible recipe critic - my mom. When I explained the recipe to her, she didn't sound too impressed. In fact she suggested that this sounded like a very weird combination. So I was back to the drawing board. The idea was still ringing in my mind. So after much deliberation I decided not to follow the recipe mentioned in her blog but to innovate and align the flavors as per my taste.


I was still not sure of what I am doing or how the end result was going to be. But the moment I added the grated raw mangoes in the oil which was tempered with fenugreek seeds, i loved the aroma it gave off. And that is where I felt I was doing something right.

At the end I am pretty happy with the result. And when I posted about this in my facebook groups, I saw many folks getting excited about this combo and asking me to share the recipe. So for all of them and also for you dear readers who might have stumbled on my blog, the recipe is given below. Adjust the level of mango as per your liking. I wanted the end result to be a little sour, sweet and savory and with a whole lot of bold flavors.

For non-bengali folks who are at time apprehensive of adding mustard paste in their food, let me tell you, in this recipe it is not at all overpowering, but in fact it compliments the comfort of poppy seeds.

Modification: Modified the recipe a bit to add a note about adding fresh coconut. My bad, I had forgot to mention it earlier. So if anyone of you had referred to it earlier make a note of this change.

Soaking Time : 30 min to 1 hour
Preparation Time : 15 minutes
Cooking Time: 20 minutes approx
Serving : 4-5 people

Ingredients :
  • Potol/Parwal/ Pointed Gourd - 1/2 kg (10-12, tender ones)
  • Potato (*Optional) - 2 medium or 1 big
  • Raw Mango - 1/2
  • Fresh Coconut - 1/4th cup, cut into medium pieces
  • Fenugreek Seeds - 1 tsp
  • Green chilli - 3 - 4, slitted
  • Dry Red Chilli - 2
  • Poppy seeds -  3 tbsp
  • Black Mustard seeds - 1 tsp
  • Turmeric Powder - 1/2 tsp
  • Salt  - as per taste
  • Sugar - 2 tsp minimum
  • Mustard Oil - as required
  • Water - 1 cup approx

1.  In a grinder take the poppy seeds, mustard seeds, fresh coconut pieces, red chilli, 1 green chilli and add about 5 tbsp of water. The intention is to soak the poppy seeds so that they can be ground into a fine paste. Adjust the level of the water so that the poppy seeds are wet but not submerged. Let it rest for 30 minutes to 1 hour. 

Tip: The addition of fresh coconut to any kind of Poshto, gives it an added texture and flavour. And it goes amazingly well. Now i add a little fresh coconut everytime I make any kind of poshto. So please do not skip this if possible.

2. In the meantime, scrape the skin of the parwal in alternate bands and cut them into halves longitudinally. Cut the potato in a similar shape. 

Note: Adding potato is totally optional here. But I love potatoes in Poshto hence I added it.

3. Take a wok and heat some mustard oil. When the oil is hot fry the parwals and potatoes in batches.  We need to shallow fry them till they get a soft browning around the edges. Take out with a slotted spoon and keep aside.

4. Now it is time to prepare the poppy-mustard paste. Grind the soaked seeds into a fine paste. Do a test by taking some paste between your fingers and you should not feel any particles. If its not smooth yet, add a little more water till it becomes a nice, smooth and thick paste like consistency.

Note: You can also use sil-batta for the same. It gives better results and smoothness if sil-batta is used. But I cannot handle a sil batta hence I use grinder and pulse it multiple times to get the texture.

5. Take half a raw mango and peel off the skin. Grate the mango finely using a grater and keep it aside.

Note: you can increase the amount of mangoes if you want more tanginess, but for me half a mango worked fine.


5. Now in the same wok, add some more mustard oil. When the oil is hot, add the fenugreek seeds. Once fragrant, tip in the grated mango. Keep the flame low while you stir the mango in the oil. Add a little salt to help the mangoes breakdown faster. Cook for about 2-3 minutes.

6. The mango will start releasing its aroma, add the poppy-mustard paste at this point. Add the sugar, salt and turmeric. Give it a nice stir and keep frying in the oil. Add a little water and cook till the paste looses all its water and starts to get dry. 

Note: Make sure you are stirring frequently, otherwise the poshto paste might stick to teh wok and get burnt.

Tip: frying the poshto paste for a while in oil helps getting rid of the raw smell.

7. At this point, add the fried parwals and potato and green chilli. Fold everything in. The masala should now stick to the vegetables. Add about 1/2 cup water and give it a nice stir. Cook on medium flame for about 5-10 minutes, till the parwal and potato gets soft. Add more water if required. Finally the consistency should be such that the masala is sticking to the vegetables and without any runniness of water.

Tip: Try not to cover and cook, so that the parwal retains its green color.

Once done serve it with steamed rice and dal of your choice. Usually urad daal or bhaja moong daal are the favorite choices to go with Poshto.

Do try this out and tag me (@curriesnstories07) on Instagram on your photos whenever you try the recipe and I will give a shout out to you.


Share
Tweet
Share
No comments
Madras Curry Powder

July 5

Day 35 of unlock 1.0

We are already into July and still monsoons are not here. Just form last two days the skies are a bit overcast and occasional rains, but still it doesn't look like monsoon rains. Met department says we will get a lot of rain this week. I heard that Mumbai is already getting a whole lot of rain from past two days. However I do not want to witness anything like last time - the horrible cloudburst over Pune which had thrown life out of normalcy.

The crop harvesting is in full swing in the fields in front of my home. Everyday I start my day with a cup of chai and watching the farmers cut the crops. Its a real visual treat to get the feel of farms right in front of my home that too in a city like Pune. When people need to go to some hill station to detox, I am fortunate enough to have a horizon of detoxifying view right in front of my home. This weather calls for some unique food experiments. And that has become the norm for me during this lock down. One such experiments resulted in me making Madras curry powder at home from scratch.

Frankly speaking, I had never explored the prospect of cooking with Curry powder. I had a kind of notion that curry powder was supposed to be used for making sambar or some south Indian flavored vegetarian curry. It never occurred to me that curry powder can also be used for non vegetarian preparations.

But one day while looking for some change in terms of chicken curry recipe I came across the Singaporean chicken curry recipe. And the core ingredient mentioned under the ingredient list was the madras curry powder. I was pretty surprised at the fact that Singaporean curry uses a curry made in India as their primary ingredient. But nonetheless I had a task cut out for me - either try and get this fabled madras curry powder somewhere from any online store, or try to recreate it at home. With the lock down still continuing in full vigor half of things are not available for delivery in my area and those that are are charging exorbitant delivery charges.


Thus I decided to take a shot at making this spice mix myself. After all how difficult can it be to make an Indian origin spice mix, considering the fact that I myself is also and Indian and I was assuming, most of the ingredients would be handy in my pantry.

Thus began a quick search on Madras curry powder. It so happens that this apparently simple curry mix has several variations, even regionally.Now when you try to make something which is from a different cuisine culture than your own, you kind of stumble a bit in figuring out what would be the authentic aroma and taste profile be like. So then I did what I could do best in this situation. I read up the various recipes, tried to associate them with the signature curry powder aromatics and then finally arrive at a conclusion as to which combination I was going to use.

This is the final recipe that I decided to go with. Its fragrant, earthy and with a kick of chilli that adds a heady note to any dish which has this spice mix. Not only in curries but they can also be used for stir fries. And let me tell you it worked wonderfully well with the Singaporean chicken preparation. I am going to publish two more post in this series talking about the Singaporean curry paste and the Singaporean chicken curry. So stay tuned.


Preparation Time : 15 minutes
Cooking Time: NA
Serving : 1 serving of curry powder good to make a dish for 4- 5 people

Ingredients :
  • Cumin Seeds - 1 tsp
  • Coriander Seeds - 2 tsp
  • Dried Red Chilli - 12
  • Fennel Seeds - 1 tsp
  • Fenugreek Seeds - 1/2 ts
  • Black Peppercorn - 1/2 tsp
  • Dried Ginger Powder (Sonth) - 1 tsp
  • Cinnamon - 1 inch piece
  • Cardamom - 5 whole
  • Curry leaves - 10, dried and crushed (about 1 tsp)
  • Turmeric Powder - 1 tsp

1.  Dry roast the cumin, coriander, cinnamon, black peppercorn, cardamom, fenugreek seeds, fennel seeds, whole red chilli over low to medium heat in a skillet until fragrant. Cool down the spices before proceeding to next step.

2. Take a grinder jar and add the toasted spices. Crush the dried curry leaves and add it to the spices. Add the dried ginger powder and turmeric.

3. Grind the spices to a powder like consistency

4. Store in an airtight jar


Easier Recipe:

For people who want to further bring down the preparation time of this spice mix, may replace the whole spices with the store bought powdered ones. 

Like I have tried - coriander powder. cumin powder, turmeric, kashmiri red chilli powder, dry ginger powder and cinnamon powder to replace the whole spices and the result was not bad. 

But I would recommend, that if you are choosing to follow the easier method, then do a mix and match, like 80% of the spices can be store bought powders while 20% of them can be things which you add fresh. For an example, dried curry leaves, crushed black pepper or powdered fennel. This will balance the freshness even if you are using store bought powders.


Some Tips:

1. While toasting the whole spices, keep stirring them to avoid them getting burnt

2. Medium heat is the key to bring out the oils in the spices to their optimum level

3. Make in small batches so that you can always get a fresh batch for your preparations and the flavors are strong.

4. For making the spice mix, I would recommend to use organic spices. The normal ones now a days are derived of their essential oils hence may yield a lesser fragrant spice mix. Organic spices are a bit expensive, but they still have some of the essential oils retailed. 

5. Preserve the spice mix in an airtight jar. I keep mine in the fridge and it stays nice and fresh for quite some time. But still I recommend to make as much required only.

6. Dry ginger powder is a key element in transforming the aromatics. If you do not have the ginger powder, make sure you are not skipping the fenugreek seeds. It will kind of compensate for the ginger powder, though not fully.

Do try this out and tag me (@curriesnstories07) on Instagram on your photos whenever you try the recipe and I will give a shout out to you.


Share
Tweet
Share
No comments


Thai Green Curry Paste
June 29

Day 97 of Lockdown 5.0 and Day Day 29 of Unlock 1.0

First of all let me tell you I was not aware of the existence of Thai curries in India until some 8 years ago. The first time I tasted this in Pune, though I do not remember the restaurant name now. But what I do remember is the smooth, rich texture of the beautiful aromatic pale green curry along with a plateful of fragrant jasmine rice. Till then probably the only south east Asian cuisine I was used to was Chinese and a little Japanese. After having the green curry I started looking up for Thai cuisines. And the more and more I looked at the culture and cuisines I got fascinated. Whenever I used to see Thai green curry mentioned on the menu, the default selection would be it for me. This became such a practice that my colleagues and friends even started complaining that I was stuck up with it. But I didn't mind! In this regards the two places where I absolutely loved the green curry was - Eddie's Kitchen in Camp, Cafe Peter on Apte Road and of course Wok Asia, the takeaway restaurant - out of which the curry from the last one fascinated me most. All the three variants - fish, chicken, prawns were like super awesome.

Then there was this time when I traveled to Thailand for vacation. I was super pepped up not only for the holiday but that I was going to the birth place of the curry I loved so much. I could already see myself having green curry even before I boarded the plane.

But when I ordered my first prawns Thai green curry in Krabi, I was in for a rude shock. What I had on my plate did look somewhat like the curry I was used to have in India, but it didnt taste like the one I was used to. This was not as sweet, not did it have the usual selection of vegetables. Instead it had some small round things - which I later came to know as Thai brinjals but I didn't like their taste. The curry over there was not loaded with vegetables by default unless you specifically ordered a vegetarian variant. I ended up believing that just like the way we have Indianized Chinese cuisine to suit our Indian palate, Thai dishes might also have undergone transformation to suit our taste buds. So that was the end of my green curry eating in Thailand, but once back I resumed having it here.

The very obvious question for those who are unfamiliar with this name is what is a Thai green curry?

The classic Thai curries are named after the color of the paste used to make the curry. Hence the names - red curry, yellow curry and green curry. Traditionally they are cooked with some protein and seasonal greens and are served along with a bed of fragrant Jasmine rice. Green Curry tends to be one of the milder curries of Thai cuisine. The name Gaeng Kiaw Wan literally means 'sweet green curry', where wan means sweet. It is a smooth and rich coconut milk sweet curry with a lemony aroma and a soft hint of chilli.

Green Curry Paste
You will find many pre-made options of the Thai curry recipe in the market. But nothing beats the aroma and texture of freshly made curry paste. I always feel the green paste is the tastiest out of all three variants - red, yellow and green. For the longest time I wanted to make the green curry at home. I used pre-made curry pastes, powders and what not, but they tasted nothing like the original one. I even tried making the paste at home once but it was not a successful try. And mostly the failure attributed to the unavailability of most of the herbs and spices. So lets be honest, making thai green curry can become a little tricky if you do not happen to have the core ingredients at least - lemongrass, galangal, basil, thai chilli and coriander roots. If I must add also the shrimp paste, but still for our palate it can be made optional. I have mentioned all the substitute ingredients below, but then if you use only the substitute elements, then you may as well end up with a Coriander chutney at best instead of a green curry paste. So take a note of it.

The list of ingredients may look long but don't get intimidated by it. Now a days mostly in all super markets or even online grocery markets have all of the below mentioned ingredients. So if you plan in advance you can easily make a big batch of this paste and store it for later use.

Ingredients
A brief about the ingredients:

1. Lemongrass - Its the most classical ingredient in South East Asian cuisine. Peel the tough green outer layers and use the white softer part.The parts which can be chopped by knife.
Substitute: Kaffir Lime leaves 

2. Galangal - It looks like ginger but is more citrusy and harder. The flavor notes are much stronger and sweeter (I would say it somewhat resembles the smell of camphor!). Galangal, also known as Siamese ginger, is indeed a member of the ginger family.
Substitute : Ginger + the zest of 1 lime

3. Shallot - They are a type of onion but have a sweet and mild flavor, and lack the bite. You can use the onions underneath the spring onion for the same effect.
Substitute : Onion

4. Kaffir Lime Leaves - This is indispensable part of Thai cuisine. Both leaves and fruit rind emit an intense citrusy aroma. If you are using frozen or dried leaves, run them under hot water for a few seconds to thaw them and release those delectable aromas
Substitute : Lime zest / Gondhoraj Lemon leaves


Coriander Leaves , Ginger, Peppercorn & Bird's eye Chilli
5. Thai Chilli / Bird's eye chilli - Small and spicy, bird's eye chilies (also known as Thai chilies) are popular in Southeast Asian cuisine and they truly pack a punch, apart from the beautiful red color body.
Substitute: Any spicy chilli

6. Shrimp Paste - The flavor of shrimp is the backbone of South East Asian cuisine and Thai Green Curry is no exception. It is primarily made from finely crushed shrimp mixed with salt, and then fermented for several weeks.
Substitute : Soy Sauce + fish sauce

7. Coriander roots - It adds a beautiful earthy flavor of the cilantro and much sharper flavors than the leaves. Cut off the white roots from the stem and clean them properly off all the dirt. Then scrape the skin off before using it for the paste.
Substitute : Coriander stem


Coriander Roots
8. Thai Basil Leaves - A stronger-flavored basil than sweet basil, Thai Basil also has a hint of licorice flavor.
Substitute: Sweet Basil leaves

9. Coriander/Cilantro - The coriander leaves add to the beautiful green color of the paste.
Substitute: None

10. The spices - The toasted and ground spices add to the flavor profile. Toasting helps in releasing the aromas better. Don't skip the turmeric, it adds to the nice warm color and also enhances the flavors.
Substitute: None


Please note: while all of the substitute ingredients would still give you a green paste, but it might be little less authentic in terms of the flavors.

Coriander seeds, Lemongrass and Garlic

A few things to Keep in mind:

1. Do not make the paste too smooth. it should have a little coarseness for the body in the curries.

2. Always try to use fresh ingredients while making this paste. Especially the herbs, because the more they age, the flavors and color will be impacted.

3. For making the vegetarian version of the paste, skip adding the shrimp paste

4. When you fry the paste in oil to make curry, the aromas will be much more pronounced

Preparation Time : 30 minutes
Cooking Time: NA
Serving : 1 serving of green curry for 4 people

Ingredients :
  • Caynne Pepper/ Green chillies (less spicy variant, seeds removed ) - 4
  • Thai chilli / Bird's eye chilli  (seeds removed)- 4
  • Garlic Cloves - 5
  • Small Red Shallots - 3
  • Galangal / Ginger - 1 thumb size chunk
  • Cilantro/Coriander Root - 5
  • Lemongrass - 2 stalks
  • Kaffir Lime leaves - 4 - 5
  • Thai Basil Leaves - 8 to 10
  • White / Block pepper corn - 1/2 tsp
  • Coriander seeds - 2 tsp
  • Cumin Seed - 1/2 tsp
  • Salt - 1 tsp
  • Shrimp Paste  (Optional) - 1 tbsp
  • Turmeric - 1/4 tsp
  • Chopped Cilantro - 1/4 cup loosely packed
  • Fish Sauce (optional) - 1tsp
  • Refined oil - 1 tsp
  • Palm Sugar / Normal sugar - 1 tsp

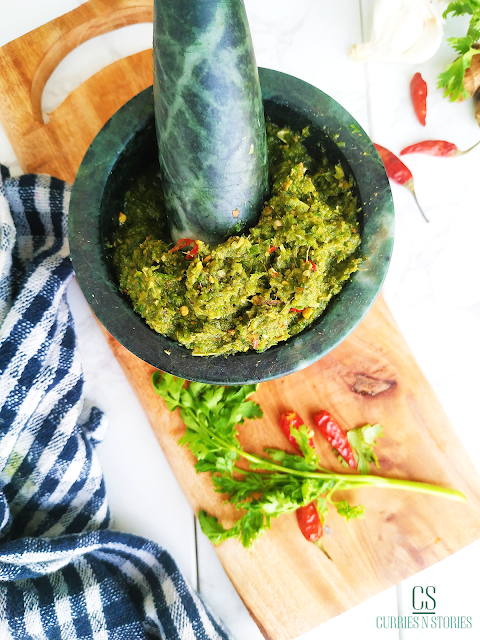
Green Curry Paste
Procedure: 

1.  Dry toast the spices - coriander, black pepper corns and cumin seeds on medium heat in a pan. Be sure to keep them moving around the pan continuously or they will start to brown. Once they are nice and fragrant grind them using a grinder or a mortar pestle. But the grinder is going to breakup the fibrous bits better. Add turmeric to the ground spice mix.

2.  Mince all the herbs finely - lemon grass, kaffir lime leaves, basil, coriander leaves, shallots, chillies, galangal, garlic, coriander roots. The smaller you mince them the easier it is going to be when you make the paste and incorporate everything. It might seem time consuming but it will help you later.

Make sure you remove all the seeds off your chillies, unless you want to end up with a fiery hot curry paste. Adjust the quantities of the chillies depending on how spicy they are.

Chopped Ingredients

3. It is recommended you use mortar and pestle or sil batta to make the paste. Because that way it doesn't loose its oils and aromas. Also you can control the texture.  Just make sure you incorporate the ingredients in batches so that you get an even texture.

But if you do not have either of them handy go ahead and use your grinder. Incorporate all the ingredients and give it a few pulses until you get a nice and thick paste. Avoid using too much of extra water and the herbs and spices will give off some moisture while breaking down.

Grind the Ingredients

4. First add all the chopped herbs to the mortar along with the salt. The salt will help in breaking down the ingredients quicker.

Next add the ground spices. So this order will help in starting with the most fibrous ingredients first and then to the softer juicier ones which has a lot of moisture. Add the shrimp paste and combine everything well into a nice paste. Add the sugar at this point too.

Add the ground spice mix
5. You can either add the fish sauce now, or you can add it to the curry when you make it directly. In this recipe I did not add the fish sauce to the paste, but added it to the curry.

Green Curry Paste

How to Store it

This paste is best to be used fresh. But it can also be refrigerated for 2 days or frozen for a week in an air tight box. Beyond that I would not recommend storing it as it might loose its aromatics.

Some ways to use green curry paste

1. Make Thai green curry - that is the most obvious option. You can make it with just vegetables or add a protein of your choice or even add both.

2. Sir Fry - Fry the paste in the oil and then add all your favorite ingredients for a Thai flavored stir fry.

3. Soup - Fry a little of the paste in refined oil first and then go on and make your favorite soup with chicken or vegetables.

4. Fried Rice - Fry a little of the paste in oil and add add the ingredients you would use to make the fried rice. It will give a nice Thai aroma to the dish.

Do try this out and tag me (@curriesnstories07) on Instagram on your photos whenever you try the recipe and I will give a shout out to you.


Share
Tweet
Share
No comments

June 26

Day 94 of Lockdown 5.0 and Day 26 of Unlock 1.0

Mangoes are in season. And living in Maharashtra, a place famous for its signature Ratnagiri Alphonso mangoes, how is it possible that we do not mention a recipe with it this season.

Well it is very much possible. I will tell you why. I have been staying in Maharashtra for close to about 15 years now. Fifteen long years in this part of India where people go absolutely crazy just at the mention of Alphonso. This variant is also known as Hapus, Hapoos, Bombay variety, etc., and often considered to be a king even amongst the King of fruits. If we talk about the origin, the Alphonso mango was created by the Portugese with grafting technique in such a way that they could be cut and served on the table and was named after the Portuguese Viceroy, Alfonso de Albuquerque, who conquered Goa from the Bijapur Sultanet. The Alphonso mangoes are so specific to a particular region in terms of taste, cost and popularity that it has now gained the Geographical Indication (GI) tag for the produce from Ratnagiri, Sindhugurg and adjoining Konkan region.

In all these years of stay I have noticed one thing, just the way we Bengalis are upbeat about the Roshogolla, similarly every Marathi is euphoric when they talk about Hapus. I kept wondering is all the hoopla around Alphonsos really worth? Obvious reaction as an outside to the state was to go and checkout myself. When I inquired about the price of Alphonso I was really taken aback. This was some 10 years ago. I got to know that Hapus unlike other mango variants are not sold in loose pieces but you need to at least buy half a dozen or dozen. And the cost for that was on an average of Rs 400 -Rs 600. So if you had a plan to do a trial before you purchased a whole box that is not possible.


Here let me mention during the summers (mango season) you would find many street side hawkers sitting with big wooden boxes (peti) of mangoes with Alphonso written on them. At times the skin of the mangoes had so many wrinkles because they were sitting under the Pune heat for days that you feel pity for the mangoes themselves. So there was a lingering question in the mind whether the mangoes being sold at every nook and corner was authentic or not. And I never had the heart to spend 600 odd bucks just to find out that I had been duped. So I kept my mango cravings limited to the Badami version which were easier to find and cheaper.

This thought had kept my Alphonso dreams at bay for all of these fifteen years. Unbelievable but true. I did try mango shakes which had Alphonso flavoring, but never tried the real fruit. Until the lock down started.

As I look back to the lock down period, I again and again feel that though the initial phase was very very troublesome for everyone of us trying to cope, slowly the new normal made us experience a lot of things in organic ways. Just like the mangoes. The housing society I stay in, is pretty close by to many farm lands. With the lockdown imposed farmers were suffering because they could not sell their produce. Thus they started contacting societies like ours and source directly from their farms to us. During one such occasion, someone posted on the group that farm fresh Alphonsos are available at Rs 400 per dozen. It was really cheap, so I checked with the person if I could get half a dozen and he was generous enough to say yes.


I was waiting in eager anticipation for the day when I would get the mangoes. And finally they arrived - the cardboard box with picture of ripe Alphonso mango on the cover. The box also had 'breathing holes' for the mangoes and the fruits were placed on a bed of straws. They were still green on the surface, but the person informed they were ready to be eaten.  I took one of the mangoes and took a deep whiff around the top, the aroma itself was quite tempting. As I cut open the first mango, the first thing that caught my eye was the vibrant orange color. It was dark and smooth. I mean really smooth. I was used to mangoes which had a lot of fibers and Alphonso does not have any such harsh fibers. The first bite of the fruit filled me with happiness, I could feel the deep aroma and smoothness twirl on my tongue - this definitely was worth every penny and more! The craze around Alphonso was absolutely justified.

But having said that, I would also add that in order to not fall prey to any phony mango sellers, make sure that the Alphonso mangoes you order are organic ones, preferably fresh from farm. The ones which are cultivated without any chemicals and pesticides, retaining all of their natural sweetness, richness and flavor.

With so many mangoes at my disposal I decided to try out some new recipes with mangoes. Since this was the first time I would be incorporating ripe mangoes in any dish, I wanted something easy. And when I looked for various options, jams and preserves were the recipes which came with the least number of steps and complexity. I could never believe Jams can be made such easily and quickly until the day I tried it on my own for the very first time.


This is possibly the easiest and least ingredient heavy recipe that I have ever prepared with such amazing results. And now I regret buying jams from the store. Home made jams are so very delicious than the preservative loaded store bought ones. I really really recommend everyone reading this to try the recipe. Do note I used a little overripe mangoes, but normal ones are also fine for this recipe.

Do try out this recipe and let me know how was your experience. I would love to hear your comments and suggestions.

Preparation Time : 10 minutes
Cooking Time: 10 minutes
Serving : 150 gm

Ingredients :
  • Ripe Alphonso Mango - 4 (small/medium sized, any variety can be used)
  • Sugar - 3/4th cup (adjust as per sweetness of mango)
  • Salt - 1 pinch
  • Lemon Juice (or vinegar) - 1 tbsp 

Procedure: 

1.  First of all wash the mangoes well and get any dirt off the skin.

2. Start by slicing off 2 fat cheeks about half an inch from the center on either side.Repeat the wedge technique for the remaining sides.Hold one of the cheeks in your palm and use a knife to make horizontal and vertical cuts. Then use a spoon to scoop out the flesh into a bowl. Squeeze out remaining flesh and juice off the seed into the same bowl.

Signature Rich Color of the Alphonsos 

3. You can choose to grind the mangoes into a smooth pulp if you want your jam to have a very smooth and even texture. Grinding is usually a good idea if you are working with a fibrous variety of mango.

But for Alphonso my recommendation would be to just use a fork and smash the pieces into rough pulp so that we have a pulpy texture to the jam. believe me it tastes far better than a smooth textured jam.

4.  Now there are three ways to go with the sugar. I followed 3rd method.

a) Take normal sugar, grind it in the grinder to make powdered sugar. This will reduce the time for sugar to melt

b) Take normal sugar mix it with the mango pulp and let it rest till the sugars are almost dissolved

c) Add normal sugar directly to the pan while cooking. By the time the jam starts to take shape both sugar and mango with be perfectly cooked.

5.  Typically Maintain a ratio of 3:1 for mangoes to sugar. And then you can adjust the sugar levels as per the sweetness of the mangoes you are using.  

Ratnagiri Alphonsos, which are the original Alphonsos, are usually very sweet. If you are using any other variety of mango be sure to check the sugar while preparing the jam.


6.  Take the mango  pulp, sugar, salt and lemon juice in a non stick pan and heat it on medium flame while continuously stirring it. Mash the mangoes with the spatula to further break them down uniformly. Don't worry about it being uniform.

Note: The salt and lemon juice will act as a preservative and add to the flavour. This is why we do not need pectin in this recipe.

Tip: Alphonsos are naturally vibrant, so no additional coloring is required. however if you are using any other variant, the color might appear a little pale. In that case you can opt for natural food coloring agents.

7.  Keep stirring the contents while it cooks on medium flame otherwise it may stick to the pan. As mentioned, the cooking process will breakdown the mangoes and the sugar simultaneously.

Tip: You can spruce up the jam by adding additional flavoring agents like cardamom, spices, saffron etc. But I would recommend if you are suing Alphonsos just make the vanilla version of it and don't go for an overkill with additional flavors as it will mess up with the beautiful earthy aroma of the mangoes.


8. Meanwhile keep a steel plate in the fridge for about 10 minutes. We will use this to test the jam consistency later.

9. Once the sugar has incorporated into the jam, it will start to splutter a bit, keep the lid handy in that case. Keep stirring as the jam starts to thicken.

10. I cooked for about 10 minutes (since quantity of ingredients were less. If the amount of mangoes is more you need to increase the time accordingly to reach the right consistency) and then took a consistency test. Take out the cooled plate, add a spoon of the jam on the plate, wait for like 20 seconds and then tilt the plate. If the jam is not dripping, then the jam is ready.

11. It is recommended to keep the consistency a bit runny when in the pan, because as it cools down it will thicken to the right consistency. If you make the jam dry in the pan itself, it will be too thick by the time you bottle it.


12. Sterilize a glass jar and spoon in boiling water (jar should be heat proof). If you are not sure just have some warm water and dip in the open jar for a while. Take out the jar let the steam go off and it cools down a bit

13. You can now pour in the jam into the jar. Jam doesn't need to be cooled down. Let it sit in the jar for sometime till all the steam escapes and jam cools down. Put a lid on only after the jam has cooled down.

14. Store it in the refrigerator for longer shelf life. You can use it for about 6 months or more depending on how efficient the sterilization process was.

Tip: Never use a wet spoon/knife or your fingers to take out the jam, this will lessen the shelf life

Use it over toasts, baguettes, crackers, fillings, toppings, deserts or just have it as it is!

Do try this out and tag me (@curriesnstories07) on Instagram on your photos whenever you try the recipe and I will give a shout out to you.


Share
Tweet
Share
No comments


Day 77 of Lockdown 5.0 and Day 9 of Unlock 1.0

The weather has turned very monsoony. I know that is not a genuine word, but when you see these lovely rain laden clouds float by your balcony, you don't feel like sticking by any grammar rules. Your heart just kind of gets into a romantic mood.

The vista in front of my home is getting surreal by the day. Though  officially monsoon is stated to enter Maharashtra by weekend, the sky feels like monsoon is already here. See the below images and you will know what I am talking about. I am one of those still fortunate to have this view from my balcony even after living in the city, or I may say fringes of the city. So it may be a bit far away form the heart of Pune, but each day when I used to come back home from office before lockdown I used to feel like this view is every bit worth the travel time.

I wake up to birds chirping outside my window. I hear the breeze blowing through the mango grooves below. I can see the clouds making different formations all the time. And yeah on a clear full moon night I stand in the balcony for hours admiring the play of the moon and the clouds. I cant tell you how surreal it feels at that moment. You need to be here to witness and experience it, only then you might get an idea of what I am talking about.


The base recipe is that of my mom's. She used to make this all the time with prawns. And believe me when you make this with prawns or any freshly caught fish, the aromatics in this simple dish elevates the flavor of the fish by hundred times. When you read the recipe you will know why I am calling this a simple dish. Practically there is no ginger, garlic any of those stuffs which we often use to enhance a good spicy curry. But still whenever mom makes this, I feel it is just out of the world yummy. The trick is in how patiently you fry the onions, to give it a nice color and flavor.

After a long long time I had chanced upon some pumpkin in my neighborhood market and I was too eager to add it to my curry. So I thought why not combine the base recipe and pumpkins. I faintly remembered mom also made this combination recipe, so I was confident on the outcome.


This is the first time I was cooking Aar fish by myself. So as they say whenever you try a new fish, make it with spicy gravy so that even if the fish tastes not so good, the curry will save the day. I got the Aar fish from Fresh To Home. FTH has been such a great savior in this lockdown, and i think I am going to stick with it even in the long term because the products they give are really fresh and awesome.

Though this was the first time I was about to work with Aar, it being from the catfish family made me at easy. I am practically a pro with anything to do with the regular magur or catfish curry. It is one of my favorite foods and I love it to the core. When you put magur in any dish you barely need to do any heavy lifting in the curry. The freshness and flavor of Magur itself changes the entire dynamics of the dish.


This recipe goes well with any fish - Magur, Aar, Shoal, Rohu, Catla even prawns and other sea fishes.

Marination Time : 30 minutes
Preparation Time : 10 minutes
Cooking Time: 20 minutes
Serving : 3-4 people

Ingredients :
  • Aar Mach - 500 gm (5-6 pieces)
  • Onion - 2 medium, sliced thinly
  • Green Chilli - 3-4
  • Pumpkin - 100 gm, diced (optional)
  • Coriander powder - 1 1/2 tbsp
  • Red chilli powder (Kashmiri lal mirch)- 1 1/2 tsp
  • Turmeric - 1 tsp
  • Cardamom - 1
  • Cinnamon - 1 inch
  • Jeera (Cumin) - 1 tsp
  • Bay Leaf - 1
  • Salt and sugar to taste
  • Mustard Oil

Procedure: 

1.  First of all wash and clean the fish. Sprinkle salt,turmeric and 1 tsp of mustard oil and coat them well. Let it marinate for about 30 minutes.

Tip: Add oil to the marinade when marinating catfish family of fish. They have a tendency to splutter a lot otherwise while frying. This will reduce the spluttering to a great extent

2. Take mustard oil in a wok. When oil is steaming, fry the fish pieces in batches till they are lightly browned on the sides. Take them out and keep it aside.

3. In the same oil saute the diced pumpkins. Please note this is completely an optional step. But since I love having regular catfish with pumpkins I decided to add some in this gravy as well. Slightly brown the edges of the pumpkin and take them out.


4. Check the oil level in the wok, if it is less add extra mustard oil and let it heat up. Add enough oil to fry two onions. When the oil is hot, temper it with a bruised cardamom, cinnamon, bay leaf and jeera. 

5. Toss in the thinly sliced onions. Add a pinch of salt to the onions to cook it faster. Give it a good toss and let the onion cook

6. Meanwhile in a bowl, take about half a cup of warm water. Add all the dry powdered spices to create a spice mix - turmeric, coriander, red chilli powder. Give it a good stir and let it sit till the onions are done

7. Onions should get cooked and slightly browned along the edges. Add the spice mixture and give it all a good stir. Keep the flame at medium-high. Add the salt and sugar at this stage. 

Tip: I like this particular gravy a little sweet and spicy. So the amount of sugar is more than other fish gravies, like i almost added 2 and 1/2 tsp of sugar to this. But if you don't like a sweeter curry then adjust the taste accordingly. 

Also, pumpkin gravies go well with a little sweetness, so that's another reason for adding sugar.


7. When it starts to release oil, add about two cups of warm water and fold in. Add the fried fish pieces and slitted green chillis.


8. Let it cook for about 5 minutes with lid on. Then add the fried pumpkins and cook for 5 more minutes giving it a slight stir.


The quick and easy fish curry is ready in a jiffy. Serve it with white rice and enjoy!

Do try this out and tag me (@curriesnstories07) on Instagram on your photos whenever you try the recipe and I will give a shout out to you.


 Barnali Biswas (curriesnstories07)


Share
Tweet
Share
No comments
Newer Posts
Older Posts

About me

I am a software engineer by profession and a writer at heart. Born and brought up in Kharagpur, I moved to the city of dreams Mumbai when I got my first job. Till then I had not cooked a single dish in my life. Not even Maggi or tea. My dad had a strong belief that his little princess never will be in a situation where she had to cook for herself. Hence I was not allowed to spend time in the kitchen till I was studying.


So when I faced the daunting task of living alone, dabbas came to initial rescue. After that I managed a whole year on just boiled vegetables and rice. And then I landed in US. The bounty of fresh produce and cooking ingredients available in the super marts eventually lured me into making my very first meal ever. There was no turning back after that. I finally discovered how much I was in love with cooking and being creative in the kitchen.


This blog is a humble attempt to present our culinary heritage to one and all and document some of the very traditional recipes which gets passed on through generations just by word of mouth.


So just sit back with a cup of tea or coffee and enjoy the curries and the stories related to each.


Follow Us

Footprints

Blog Archive

  • ▼  2026 (4)
    • ▼  May (1)
      • A Suitcase Full of Stories: My Heartfelt Shopping ...
    • ►  January (3)
  • ►  2025 (3)
    • ►  December (1)
    • ►  June (1)
    • ►  February (1)
  • ►  2024 (21)
    • ►  December (2)
    • ►  September (1)
    • ►  August (3)
    • ►  July (4)
    • ►  May (2)
    • ►  April (5)
    • ►  March (3)
    • ►  January (1)
  • ►  2023 (7)
    • ►  December (2)
    • ►  November (1)
    • ►  October (1)
    • ►  May (1)
    • ►  March (1)
    • ►  January (1)
  • ►  2022 (18)
    • ►  September (1)
    • ►  August (2)
    • ►  July (2)
    • ►  June (3)
    • ►  April (1)
    • ►  March (3)
    • ►  February (2)
    • ►  January (4)
  • ►  2021 (60)
    • ►  December (5)
    • ►  October (5)
    • ►  September (5)
    • ►  August (7)
    • ►  July (6)
    • ►  June (5)
    • ►  May (3)
    • ►  April (4)
    • ►  March (6)
    • ►  February (6)
    • ►  January (8)
  • ►  2020 (55)
    • ►  December (5)
    • ►  November (3)
    • ►  October (10)
    • ►  September (7)
    • ►  August (7)
    • ►  July (9)
    • ►  June (3)
    • ►  May (9)
    • ►  March (1)
    • ►  January (1)
  • ►  2019 (3)
    • ►  November (1)
    • ►  April (1)
    • ►  January (1)
  • ►  2018 (1)
    • ►  December (1)
  • ►  2017 (4)
    • ►  December (2)
    • ►  November (1)
    • ►  September (1)
  • ►  2016 (10)
    • ►  August (1)
    • ►  July (2)
    • ►  June (5)
    • ►  April (1)
    • ►  March (1)
  • ►  2015 (10)
    • ►  December (1)
    • ►  August (1)
    • ►  June (1)
    • ►  May (2)
    • ►  April (4)
    • ►  March (1)
  • ►  2014 (22)
    • ►  November (2)
    • ►  August (2)
    • ►  July (3)
    • ►  June (2)
    • ►  May (4)
    • ►  April (3)
    • ►  January (6)
  • ►  2013 (22)
    • ►  November (2)
    • ►  October (4)
    • ►  September (5)
    • ►  August (2)
    • ►  July (1)
    • ►  June (1)
    • ►  May (2)
    • ►  April (1)
    • ►  March (1)
    • ►  February (2)
    • ►  January (1)
  • ►  2012 (31)
    • ►  December (4)
    • ►  October (3)
    • ►  September (8)
    • ►  July (1)
    • ►  June (1)
    • ►  May (14)
  • ►  2010 (9)
    • ►  July (3)
    • ►  June (2)
    • ►  April (1)
    • ►  March (2)
    • ►  February (1)
  • ►  2009 (4)
    • ►  February (2)
    • ►  January (2)

recent posts

Pinterest Board

Popular Posts

  • Champaran Mutton / Ahuna Mutton - A Bihari Delicacy
      When I finish a long week of work, self doubt, frustration of dealing with people and finally when the weekend comes, I feel cooking somet...
  • Kochur Dum / Kochur Dalna / Arbi Masala/ Taro or Colocasia Curry
    August 19 Kochu or taro is one of my favorite vegetables. It is as versatile as potato only much more tasty. It is equally starchy an...
  • Tetor Macher Jhol (Bitter Gourd Fish Curry)
    Anything Bitter hardly finds takers. Same applies for Bitter Gourd. As a kid I hated bitter gourd in any form. Grown ups around me would...
  • Khandeshi Kala Masala - Kala Mutton Masala
      25 September Maharashtra is a land of unique local flavours. And still it is mainly known for its Vada Pavs, poha, pav bhaji and modaks. I...
  • Macher Bhorta | Fish Bharta | Mach Makha| Bengali Style Mashed Fish
      October 18 Bhortas or bharta as we call it in pan India, are the quintessential Bengali food, a staple in Bangladeshi cuisine. They are th...
  • Complete Details to plan your ISKON Mayapur Visit
    Radha Madhav during Pushya Abhishek on 6th Jan 2023 First of all wish you a very happy new year. I have been away from blogging for a while ...
  • Varhadi Mutton - A Traditional Vidharba Cuisine
    Varhadi is a dialect of Marathi typically spoken in Vidarbha region of Maharashtra. Vidarbha is the north-eastern region of Maharashtra ...
  • Dim Toast | Egg Toast | Dim Pauruti | Savoury French Toast
      April 25 Calcutta or Kolkata. A city known for its food and culture, where hospitality and love are synonymous with lip-smacking grub. Cho...
  • Golda Chingri Malaikari (Giant River prawns in coconut milk gravy)
    One of the main reasons I love Kolkata is because of the fish we get here. Its so fresh and one can get restaurant grade fish quality even i...
  • Tangy Sweet Mint Fish | Fish Pudina Recipe | Fish Hariyali
    February 20 I am a hardcore fishiterian..if that's a word. There has been hardly any occurrence where I have tasted a fish and not liked...

Liebster Award

Liebster Award

Very Good Recipes

Very Good Recipes

You can find my recipes on Very Good Recipes

Contact Us

Name

Email *

Message *

Pages

  • Travelogue Index
  • VEGETARIAN RECIPE
  • CHICKEN RECIPES
  • SEAFOOD RECIPES
  • MUTTON RECIPES
  • RICE RECIPES
  • EGG RECIPES
  • DAAL RECIPES
  • ROTI & PARATHA RECIPES
  • BAKING RECIPES
  • SWEET RECIPES
  • SNACKS RECIPES
  • SIDES RECIPES
  • SOUP RECIPES
  • SALAD & BOWLS RECIPES
  • ROASTED RECIPIES
  • JAM & PRESERVE RECIPES
  • BEVERAGE RECIPES
  • SAUCES, SPICES & CURRY BASE RECIPES
  • CHUTNEY & DIPS RECIPES
  • FESTIVE RECIPES
  • Contact Us
  • TRAVELOGUES OF EAST INDIA
  • TRAVELOGUES OF WEST INDIA
  • TRAVELOGUES OF SOUTH INDIA
  • TRAVELOGUES OF NORTH INDIA
  • TRAVELOGUES of ASIA
  • North East Recipe

This Blog is protected by DMCA.com

DMCA.com for Blogger blogs
FOLLOW ME @INSTAGRAM

Curries n Stories © 2020 All rights reserved.
Created with by BeautyTemplates