• Home
  • Recipes
    • Vegetarian
    • Seafood
    • Snacks
    • Chicken
    • Mutton
    • Egg
    • Roti & Parathas
    • Dessert
    • Sides
    • Soups
    • Salad & Bowls
    • Rice
    • Daal
    • Bakes
    • Roasted
    • Beverages
    • Sauces, Spices & Curry Base
    • Chutney & Dips
    • Festive Recipes
  • Cuisine
    • Bengali
    • Maharashtrian
    • Rajasthan
    • Punjab
    • Chennai
    • Andhra
    • Mangalore
    • Mughlai
    • Kashmiri
    • Chinese
    • Singapore
    • Mexican
    • Continental
    • Italian
    • French
    • American
    • Thai
    • Bangladeshi
    • Arab & Persia
    • North East
  • Meal Type
    • Breakfast
    • Lunch
    • Dinner
    • Snacks
    • Dessert
    • Appetizer
    • Accompaniments
  • How To
    • Preservation Techniques
  • Travel
    • East India
    • West India
    • North India
    • South India
    • Asia
    • America
  • Lifestyle
    • Craft & Creation
    • Experiences
  • Musing
  • Contact
  • Bengali Blogs

Curries & Stories

pinterest facebook twitter instagram tumblr linkedin

Chicken Bharta
 Hi All, how have you been, again after a break I am back with one more popular Kolkata recipe. You must be wondering why such random spells of no posts. Blame it on my zodiac but this is how a Gemini works. There are long spells when I feel very passionate about certain things like social media activity, frequent editing posting interacting and then come a spell when I happily give up all these and just enjoy some not rushed time for myself. Just to clarify I am still very much in love with eating and cooking and I quite often experiment with new dishes too, its just that not always I plan to take a picture of it and create a post out of it. Today's post would also not have materialized had it not been for a special person asking me to do so. Having said that when you have to setup the entire backdrop, food prop, food thing after such a long spell of no activity, it seems overwhelming. Especially after slogging in the kitchen for half of my precious Saturday morning in the intense summer heat, when I have to push myself to be creative in food photography too I wondered how I used to put up with this on a regular basis a year back.  But I still do it - the whole 9 yards - adjusting ambient light, setting up backdrops, rummaging through my utensil box for the perfect bowl, fishing out some napkin props from the corner of my cupboard and finally taking 50-60 odd pictures so that I can find one decent photo to edit and post. Phew! And in the middle of all this chaos, I forgot to place the meticulously cut slices of boiled egg on top of my bowl of chicken bharta before taking the shots. The realization came when I was cleaning up everything - I saw those two slices of eggs sitting there like orphans in a bowl I had put aside. For a fleeting second I did think whether I should setup everything again, but then I convinced myself out of it as I was already tired with all the running around. So readers please don't judge the photos based on the missing garnish, it tasted good actually. 

Now coming to the recipe. Kolkata loves all kind of Mughlai food. There is a plethora of Mughlai dishes tailored to the palate of Bengali food connoisseurs which you can find in all small and big restaurants across the city. Chicken Bharta is a one such Mughlai delicacy prepared with shredded chicken and hard boiled eggs cooked in selected aromatics. Usually it is considered as a dhaba style dish which pairs perfectly with roomali rotis or naans. If you are in Kolkata just step out in your neighborhood in the late evenings and you will see a beeline of people waiting outside on the road in front of small food shacks for getting the chicken bharta, chowmein or biryani packed for dinnertime. Especially if its around the weekend the crowd is more. It has almost become part of the culture there to get these delicacies packed for home on the way back to office to start off the weekend food frenzy. And when you get it so cheap in the local restaurant why would anyone slog at home to make it. 

But people like us who are miles away form the city, if we want to enjoy these we have to slog in the kitchen - there is hardly any choice there. What I have understood is that everyone has their own little formula of success for a good chicken bharta. And there are mild variations of the recipe you will find all over the net. Most of the time you will see cashew paste or  poppy seed paste being added to the dish to up the creamy quotient, but since I am making this on a hot summer afternoon, I skipped it to make it a little lighter for the tummy. Taste wise it didn't compromise anything I can say. Also at time I have seen restaurants adding Kewra scent to this dish just to make it more 'Mughlai' but I really don't like it at all. The natural aroma of the spices with the chicken feels much more authentic to me rather than loading it up with unnecessary things. I hope you like this recipe. Do comment if you have nay suggestions to make it better. I had it with homemade naan which my mother made. Maybe i will also talk about the naan recipe sometime, its an absolute hit. 

Chicken Bharta

Preparation Time : 15 minutes
Cooking Time : 60 minutes

Serves - 2 adult

Ingredients :
  • Egg - 2
  • Onion - 2 large 
  • Tomato - 1 
  • Ginger - 1 inch
  • Clove - 1
  • Cardamom - 2
  • Cinnamon - 1/2 inch
  • Nutmeg powder - 1/4 tsp
  • Turmeric - 1/2 tsp
  • Kashmiri red chili powder - 1 tsp
  • Cumin Powder - 1 tsp
  • Coriander Powder - 1 tsp
  • Tandoori Chicken Masala - 1/2 tsp
  • Refined Oil + Butter- as needed
  • Cream - 2 tbsp
  • Curd - 2 tbsp
  • Salt - as per taste
  • Sugar - as per taste
  • Chicken Stock - 1.5 cups
  • Warm water - as needed
Ingredients for Chicken Stock:
  • Chicken - 400-500 gm
  • Black peppercorn (crushed) - 5
  • Ginger (roughly sliced) - 1 inch piece
  • Garlic cloves - 5-6
  • Onion (roughly sliced) - 1/2 

Procedure:

1. Start by cleaning the chicken pieces. Take a stock pot or a deep kadai and add 3 cups of water. Place all the ingredients for Chicken Stock in the pot over medium-high heat. Bring it to a gentle simmer. Reduce heat to low heat and simmer for 30 minutes or until the chicken is just cooked. You can check the doneness of the chicken by piercing near any of the bone area and if the juices run clear or just light pink, then the chicken is cooked. Strain the stock and keep it aside. Separate the chicken from the spices and vegetables. Now transfer the chicken into the stock and keep it covered till you are ready to cook with it. Discard the vegetables and spices.

Tip : The key to a juicy succulent chicken is the slow simmer for extended time. If you cook your chicken in a rolling boil water then the chicken tends to dry out.
Tip: Always use chicken with bones, the bones have a lot of flavor which gets added to the stock
Tip : Keeping the chicken submerged in the stock prevents it from drying out till you are ready to cook. You can reserve the stock and use it for making fragrant pulao or soups.

2. Boil two eggs and keep aside.

2. Now get the masala ready. In a small bowl add the turmeric, coriander power, cumin powder, tandoori chicken powder, red chili powder. Now mix a little water and make a masala paste.

3. Make a paste of 1 onion, 1 tomato and 1 inch ginger. Keep it aside

4. In a kadai, heat 50/50 refined oil and butter. Now temper it with cinnamon , cloves and cardamom. When the spices are fragrant add 1 onion (finely chopped). Fry till the onions are a light shade of brown. 

5. Add the onion paste from Step 3. Adjust salt and cook this till the raw smell goes off. 

6. Now add the masala paste from Step 2. Fold in and cook till the oil separates from the masala.

7. Now add about 1.5 cups ( or as needed) of the reserved chicken stock. Add about 1/4 tsp of nutmeg powder. Adjust the salt and sugar. Mix well with the masala and let it simmer for about 5-7 minutes. Occasionally give it a stir to prevent the masalas from sticking.

Tip: If you want to add cashew paste you can add at this step. I didn't add it.
Tip : In Kolkata chicken Bharta is made a little sweet, if you want to skip the sugar you can.

8. I wanted a little tanginess in the bharta so at this point I switched off the gas and added 2 tbsp of whisked curd. Switching off the gas and then only mixing the curd will prevent it from curdling. Once its well incorporated turn the gas on and let it simmer. 

9. While the gravy is simmering, shred the boiled chicken with two forks. Discard the bones. Once the gravy has cooked for about 7 minutes add the shredded chicken and fold in. Let it cook covered till oil floats up.

10. Now chop the hard boiled eggs and add it to the gravy. By this time the gravy would have thickened up a bit. When you add the boiled eggs it will further thicken the gravy. 

11. Add 2 tbsp of fresh cream ( you can add more if you want) and stir in. Let everything simmer for about 5 more minutes. 

12. As a last step you can add some Kasuri methi or just garnish it with some fresh coriander leaves and slices of boiled egg.

Serve it with your choice of Indian flatbread like roomali roti or naan and fresh salad and enjoy!

Chicken Bharta


Share
Tweet
Share
No comments


Kachki Macher Bora


14 June

The monsoon is here and so is the craving for garma garam fritters with chai. Another good news is that the un-lockdown process has started. Fingers crossed that we do not have to see a third wave.

This time since mom is here with me, I have been trying out different kind of fritters which I always wanted to make - vegetable chop, daler bora, macher chop, chicken popcorn, beguni and the list goes on. It is so much fun to experiment with fritters because they don't usually go wrong even if you miss on a few ingredients. 

Before lockdown I used to buy fresh fish from a place enroute to my home form office. There was a fixed fish vendor from which I usually got my fishes. From the time lockdown started I have been getting my fish supply either from Fresh2Home or from Licious. While I left Licious provides more quality products, Fresh2Home has better variety. And due to which I had tried out all different varieties of fish which I probably had not tried in past decade. Some of the fishes like Koi was really amazing. Having Koi mach sitting in Pune was like an impossible dream before. 

Kachki Macher Bora, Fish cake

For a couple of days I was seeing Kachki fish on the Fresh2Home seafood section. I deliberated whether I should get them but then parked the idea as I didn't know what to make with them. Then one day I came across this recipe on Sandeepa's (Bong Mom's Cookbook)  Instagram post. She had posted about Kachki Macher bora and I was really piqued. The immediate next step was to order the fishes ( which miraculously I got the very next day in their listing) and gather the ingredients.

These tiny  silver fishes are really delicate. I mean I have never worked with such delicate fishes in my life before. It was a breeze to clean them unlike other fishes. The boras itself got made within 30 minutes and I couldn't stop eating them right off the wok, they turned out that delicious!

While making bora or fritters at times we face a challenge that the ingredients don't bind well. Here is a quick tip for it, if it is a fish fritter especially, add an egg to it. Egg is a wonderful binder and also enhances the taste. This was the main difference in me and Sandeepa's recipe. 

Kachki Macher Bora, Fish Fritter


You can also try the other fritter recipes

  • Moringa Pakoda|| Drumstick Leaves Fritter
  • Macher Dimer Bora || Fish Roe Fritters
  • Bok Ful Bhaja || Hummingbird Flower Fritters

Check out a few of the dal recipes you can try this with

  • Lau Data Diye Motor Daal
  • Moong Daal Kalo Jire Diye
  • Tetor Daal
  • Aam Daal
  • Kolai Daal 
  • Masoor Daal
For DIY Backdrop Tutorial check out the blog
  • DIY Photography backdrop
There is a fun challenge #yourfoodmagazinecover hosted by @anna_janecka and @mariamhamdy going on in Instagram where we are supposed to convert one of our food pictures into a magazine cover and share it with the group. I was seeing a lot of my foodie friends sharing their pictures and could not resist myself in following the suite. I can not believe how transformed an image looks once you add a magazine template to it. While I would definitely love having my food shots on a Food Magazine cover, for now, this is just for a fun sake I am sharing here as well. Let me know what do you think?

Kachki Macher Bora


Preparation Time : 15 minutes
Cooking Time: 20 minutes

Ingredients :
  • Kachki Fish / Freshwater Anchovy - 250 gm
  • Potato - 1 medium, boiled
  • Egg- 1
  • Ginger paste - 1 tsp
  • Garlic Paste -  1 tsp
  • Corriander Powder - 1 tsp
  • Red Chilli Powder - 1 tsp + 1 tsp
  • Spring Onion - 1/2 cup, chopped
  • Onion - 1 medium, chopped
  • Garlic - 9-10 cloves, finely minced
  • Fresh Coriander Leaves - 1/2 cup, chopped
  • Green Chilli - 2, chopped
  • Rice Flour -  1/4 cup
  • Water - for boiling the fish
  • Salt as per taste
  • Mustard Oil - as required
  • Spring onion (for garnish) - 1/2 cup, chopped

Ingredients :
  • Wok
  • Skillet
  • Mixing Bowl

Procedure: 


1.  Clean the fish well in water. Keep in mind that these fishes are very delicate. Keep it in a strainer for all the water to drain off. Or you can also pat them dry gently with a kitchen towel. 

2. In a wok take the cleaned fish, 1 tsp of ginger paste, 1 tsp of garlic paste, 1 tsp of coriander powder and 1 tsp of red chili powder. Add about 1-2 cups of water, enough for the fish to get cooked. The fish will take about 10 minutes to cook covered. Open the lid and dry off any excess water. Now let the fish cool down a bit. 

Note: Do not add too much water. We only need to add enough water for the fish to get cooked in 10 minutes and dry off excess. 

3. Boil 1 potato and keep aside.

4. Take a mixing bowl. Take the boiled potato and mash it up completely. To the mashed potato add the minced garlic, chopped onion, spring onion, coriander, chopped green chili, red chili powder and give it a mix. 

5. Now add the cooked fish. Add rice flour, salt and break in one egg. Now with gently hands bring everything together. These fishes are very tender hence they would break easily so do not knead with force. Just press with the tip of your fingers to break them up while there are still some big pieces.

Tip: The rice flour would give it a crunch and the egg acts as a wonderful binder as well as taste enhancer. 

Note: Spring onions is optional here but very much recommended. I have seen Spring onion goes nicely with any kind of fish bhortas ( fish mash) or fish pakodas. 

6. Now with your hands make small balls or flat discs.

7. Heat Oil in a skillet and shallow fry the discs for about 3-4 minutes on each side or until they are done.

Serve it with rice and daal or have it like snacks with tea.

Kachki Macher Bora


Share
Tweet
Share
No comments


peyajkoli
DIY Hand Painted Backdrop 


7 December

I had this blog from like a decade and had never actually thought of having some kind of a formal or semi formal setup for taking my food pictures before the lockdown started. During lockdown I stumbled upon many fantastic home chefs who created magic in their food pictures too by the virtue of amazing props and backdrops. That was the start of the inspiration and I had finally decided after much deliberation to invest in a good backdrop. 

The first backdrop I got was in the month of April and now I own about 10+ professional backdrops. After using them for over 8 months I could understand which backdrops work for me and what kind of texture I love to work with. I thought of trying my hand at making some DIY backdrops myself because - I could end up saving some bucks, have the customizations I want in color and textures and also because the whole process of creating a backdrop from scratch is super fun!

So I thought before diving into the DIY process here are a few tips for the beginners who are just starting on their formal food photography journey. Now when you start looking for food photography backdrops you always face a couple of basic questions like-

- Where to start looking for a backdrop?

- Which are the reliable and cost effective backdrop providers?

- What kind of backdrops should I buy material wise?

- Which color/texture should I go for.

- Which size would be the best

1. Where 

While there are zillion more questions I had, these were some of the generic ones I feel. The answer to the first question is obviously Google. Pre-lockdown (in India) when I started my search there and there were these two names I got against which there were glowing reviews and a host of celebrity patrons - The Madras Prop Store and the Varai Prop Store.  This was way back in the month of April. After a little R&D I chose Madras over Varai as the former had an online order option back then.  But let me put a disclaimer, both of them are pretty pricy. No doubt about the quality they offer but when you are just starting out on your journey of investing on good backdrops you don't want to burn right through your pockets before you are convinced that your photography skills can justify the investment.

During the lockdown a plethora of businesses came up which offers quality backdrops at more affordable prices. A few of my personal favorites are India Prop Store and Bla Bla Props. I have used their professional backdrops in many of my food photos which you can checkout on my Instagram page. 

2. Material

A good food photography background can be made out of anything even some craft paper that you have lying in some corner of your home, cushion covers, any fabric or even your home floors and furniture. However, if you are planning on using the backdrop over and over again then I would recommend to stick to surfaces that are durable, stain-proof and waterproof at least.

Avoid reflective surfaces for food photography, as it may lead to bright spots or ugly reflections on your photograph. 

Now when I looked up the backdrops it had various categorizations as in - Painted, printed and wooden backdrops. That is basically the broad segmentation of backdrop categories. 

  • Hand Painted : Each of these backdrops are painted by hand to give the textures. Something like what we are going to do in this blog later. They have the best textures and colors and feel really premium. Quite pricy.
  • Printed : These are high quality printed backdrops. They come in canvas, vinyl and poly fabric. These are the ones which beginners can use, usually are much cheaper than the hand painted and wooden ones. Canvas printed ones have best quality while poly fabrics are not that great but does the job.
  • Wooden Backdrops : Wooden food photography backdrops are a great choice as they provide pleasing colors, grain, texture and could be either rustic or chic. You can barely go wrong with a wooden backdrop. But they are the most pricy ones. 

3. Size

For food photography, one doesn't really need huge backdrops like portrait photography. Anywhere around 2ft x 3ft is a good size for a good food photography premise. Both flatlay (using with camera angles from above the food) or when the camera is level with the food can be handled well. 

4. Color

The background should always compliment your food and not overpower it.  Background colors that are neutral, desaturated and not very flashy goes very well with any kind of food. So the first few colors you could try and add to your kitty are black/grey, white and maybe a warm shade of blue. Shades like yellow, red, pink are a little more difficult to contrast with the food and props than the neutral colors. At times instead of plain black color, you can go for shaded black color or one that has a vignette look (decreased brightness around its edges). 

Now coming to the process of making a DIY hand painted backdrop at home. This is a project which is very close to my heart and I would like to share with all you folks.

Materials Required:

Base 

  • A cardboard/ MDF board - 2 ft x 3 ft
  • Scissor / sharp cutter - 1 (only needed if using cardboard)
  • Wide Masking tape - 1

Base Texture

  • White cement /Plaster of Paris - 1 cup
  • Fevicol - 1 tbsp to 2 tbsp
  • Mixing bowl - 1
  • Mixing spoon - 1 (I used an old butter knife)
  • Jointing Spatula - 1 ( I used a square cut out of same cardboard)
  • Water 
  • Paint Brush - 1
  • Newspapers - a whole bunch of newspapers to prevent staining your workplace
  • Tissue paper / old cloth - 1 ( for wiping off any unwanted splotches)
First Coat
  • White primer/ Enamel paint - 200 ml tin
  • Paint brush - 1
  • Gloves - a pair
  • Newspapers - a whole bunch of newspapers to prevent staining your workplace
  • Tissue paper / old cloth - 1 ( for wiping off any unwanted splotches)
Final Coat
  • Acrylic color - Black and white
  • A palate/ mixing bowl 2 (for colours) - 1
  • Kitchen sponge - 1
  • Newspapers - a whole bunch of newspapers to prevent staining your workplace
  • Tissue paper / old cloth - 1 ( for wiping off any unwanted splotches)
  • Transparent Artists fixative spray/ transparent varnish (Optional) - 1 bottle

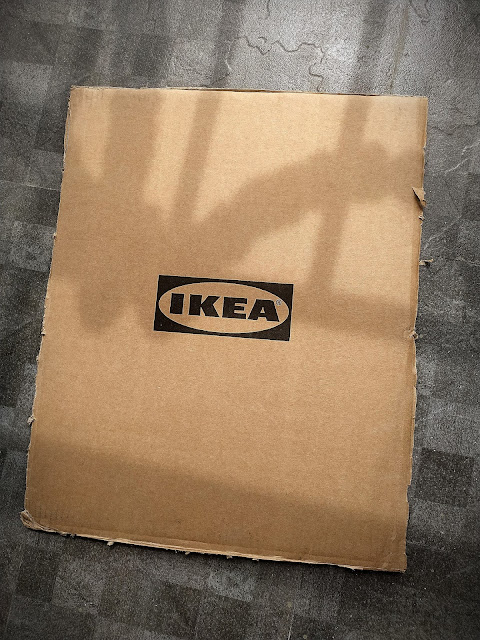
1. Start by cutting the cardboard/MDF board in a size of 2 ft x 3ft

Tip: You can go for MDF board if you get them, it will ensure a more durable backdrop. However cardboards also work well. In the photograph you cannot understand the difference of the material.

Note: I used one side of a IKEA packing box for this background


2. To prevent an irregular edge, especially when you are using cardboard, I used a wide masking tape around the edges to make them smooth.

DIY Photography Backdrop

3. Now to create the texture base on the backdrop.  Take a mixing bowl and add about a cup of white cement, 1 tbsp of fevicol and a little water. We need a dense consistency just like the picture below. It should not be too dry otherwise it will fall off easily post drying.

Tip 1: Keep adding water little by little, so that the mixture doesn't become too liquid. If it becomes too runny then add more white cement to balance it.

Tip 2: You can use gesso if you want to avoid the hassle of creating a base mixture from scratch.

DIY Photography Backdrop

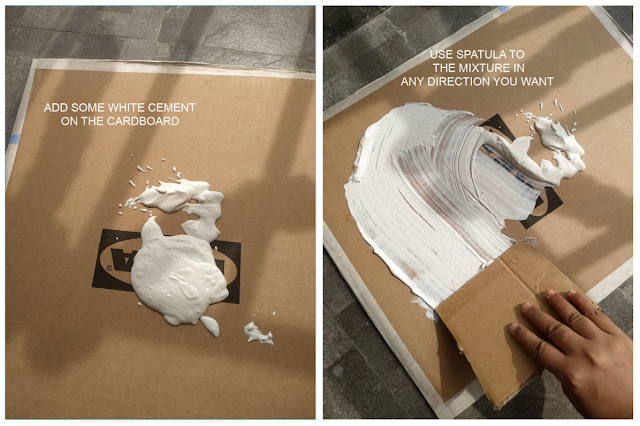
4. Once you have the base texture ready you need to work fast as it will start to dry very fast. First you spread newspaper on the work area ( you don't want the white cement to mess up with your working surface, I forgot to put the paper hence ended up messing my floor!). Place the prepared cardboard on top of the newspaper.  Now put a little mixture on the cardboard and start spreading it with the spatula. You can go any direction as we want an uneven texture on the backdrop. Let those edges and bumps be there as they give a very nice textured look to the cardboard.

Keep repeating the process - take a little mixture and spread on the board. You need to cover the board once and then if you have any mixture left you can keep touching up all the areas you want.

Tip: Work fast with white cement! Don't worry about the spatula strokes, we do not need a uniform surface.

Note : Since I didn't have a steel spatula I just cut off a square of the cardboard and used it as a spatula.

DIY Photography Backdrop


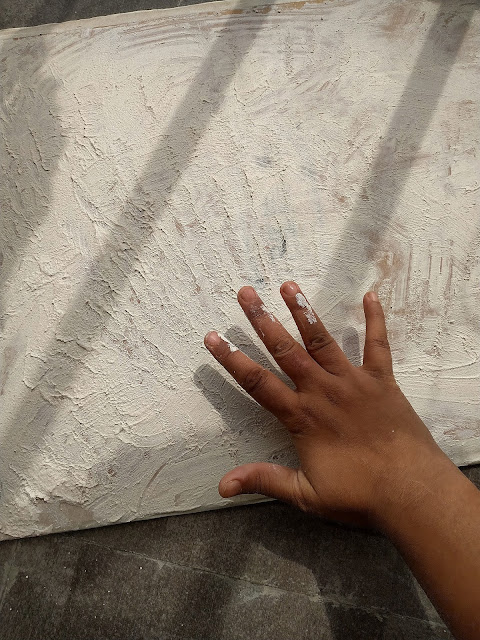
5. Once you have covered the cardboard completely, now you need to add the final texture. For this its best advised yo use your fingers. I wanted to give an uneven peak look all over the surface. Hence I spread all 5 fingers and just kept roughly tapping all over the surface. Refer to the picture below. However at this stage you can practically give any kind of shape to the surface. 

Tip: Work fast with your fingers, as the white cement will start to dry out 

DIY Photography Backdrop


6. Now let the white cement mixture dry off completely. Preferably keep it outside in the sun to dry. Depending on the outside temperature and humidity, the surface will take anything between 2 hr to 3 hr to dry out completely under the sun. 

Tip: Keep checking at regular intervals for its readiness. When the surface turns completely white and you can not feel any dampness, the base is ready.


7. Now its the turn to put the first coat.  Spread a lot of newspaper below and put the cardboard on it. Many people directly put the acrylic colors at this stage. But I wanted to ensure the surface is waterproof so at this stage I recommend you use a primer/ enamel paint to coat the whole surface. I used a white primer. Use a paint brush with big rough bristles to coat the surface. Again you don't need to paint meticulously. It is okay to do random brush strokes as long as you cover the surface. 

I gave like a two layer coat of paint. And then again let it dry under the sun. This will take a lot of time. So be patient. It took about 5-6 hours for me.

Tip : The paint takes time to dry, so don't hurry with the next step.

Note: Please have a gloves on if you want to avoid getting your hands messy. Primers are not that easy to get off your hands. But if you still accidently put primer on your hand use a nail polish remover to wipe off the paint from your hands. Please note soap and water would not take the primer off. So nail polish remover it is!


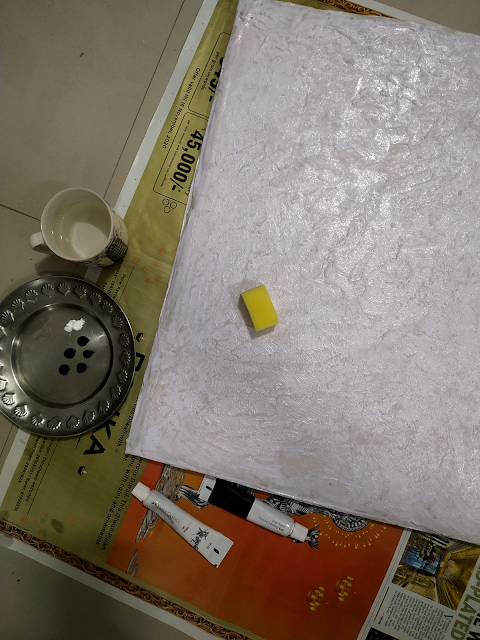
8. Now it is the time to apply the second coat that is the acrylic paint coat. Spread newspapers below the cardboard. Now on a paint palate or a plate add 5 drops of black + 1 drop of white paint. Mix it with a painting brush. We will consider this as color 1 : and it will be a dark gray shade.  


Cut the kitchen sponge into a square. Now dip the sponge into the color one half way through and then start dabbing it on the cardboard. Dip the sponge into the color and repeat till entire cardboard is covered.

Give two to three coating of the color to have a good coverage.


9. Once the complete cardboard is covered with color 1, keep it to dry overnight.

10. Now next morning we start with the next color shade. This will become the accent colour. So now take about 4 drops of white + 2 drops of black and make color 2: a light grey variation of color 1. Now take a sponge square again and dab the color 2 more around the center of the cardboard and a little towards the edges. 

DIY Photography Backdrop

11. Now again make color 1 (as mentioned above) and dab it with a sponge around the corners and the edges of the board to create a vignette effect. After this you can go on improvising depending on how you want the final look to be.

Let it dry out completely for a couple of hours.

Tip : You can also dab a little gold color here and there to create a rusted metallic look

12. As a final step to secure the colors of the backdrop coat or spray it with transparent varnish. I used camlin Artist's fixative spray. This acts as a weathercoat on the colors and keeps them lively for long.

This is an optional but recommended step. Store the backdrops in a place away from direct sun light.

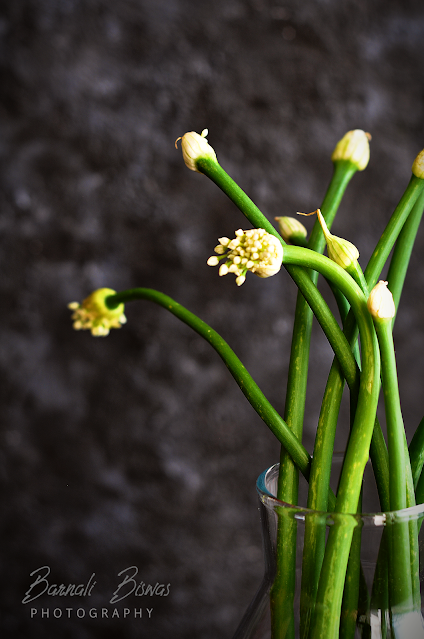
I have used the background in the first picture in this post ( Onion stem). And also in the Tea infused Crème caramel post background. So you can see the same background works wonderfully well vertically or horizontally.

DIY Photography Backdrop


Just to give you an idea of how much this would cost approximately.  -

  1. Cardboard - Rs 0 / MDF - depends on size 
  2. White cement / POP - Rs 20/ kg (Available at hardware store)
  3. Fevicol - 45 gm - Rs. 20
  4. Enamel paint - 200 ml - Rs 75 (Available at hardware store)
  5. Enamel paint brush - Rs 10 (Available at hardware store)
  6. Flat Brush - Set of 4 - Rs 140 (Available at stationary store/ online stores like Amazon)
  7. White & Black paint - Rs 200 - Rs 300 ( a full set of 12 colors would come at this price)
  8. Kitchen Sponge - Rs 0 - Rs 12
  9. Masking tape - Rs 20
  10. Cardboard spatula - Rs 0
This whole project would cost something around Rs 500-600 if you are starting from scratch. But it cost me only the price of the sponge Rs 12 as I had all the other things handy at home. Compared to about Rs.1000 to Rs 2000 that you pay for any professional background (mdf) this is way cheaper and you can definitely do the comparative math yourself.

And remember apart from the cardboard/MDF everything is reusable! So basically once you get these stuffs you can make more than one backdrops. 


DIY Photography Backdrop


Follow me on Instagram for more creative ideas and food photography : @curriesnstories07


Share
Tweet
Share
3 comments
Older Posts

About me

I am a software engineer by profession and a writer at heart. Born and brought up in Kharagpur, I moved to the city of dreams Mumbai when I got my first job. Till then I had not cooked a single dish in my life. Not even Maggi or tea. My dad had a strong belief that his little princess never will be in a situation where she had to cook for herself. Hence I was not allowed to spend time in the kitchen till I was studying.


So when I faced the daunting task of living alone, dabbas came to initial rescue. After that I managed a whole year on just boiled vegetables and rice. And then I landed in US. The bounty of fresh produce and cooking ingredients available in the super marts eventually lured me into making my very first meal ever. There was no turning back after that. I finally discovered how much I was in love with cooking and being creative in the kitchen.


This blog is a humble attempt to present our culinary heritage to one and all and document some of the very traditional recipes which gets passed on through generations just by word of mouth.


So just sit back with a cup of tea or coffee and enjoy the curries and the stories related to each.


Follow Us

Footprints

Blog Archive

  • ▼  2026 (4)
    • ▼  May (1)
      • A Suitcase Full of Stories: My Heartfelt Shopping ...
    • ►  January (3)
  • ►  2025 (3)
    • ►  December (1)
    • ►  June (1)
    • ►  February (1)
  • ►  2024 (21)
    • ►  December (2)
    • ►  September (1)
    • ►  August (3)
    • ►  July (4)
    • ►  May (2)
    • ►  April (5)
    • ►  March (3)
    • ►  January (1)
  • ►  2023 (7)
    • ►  December (2)
    • ►  November (1)
    • ►  October (1)
    • ►  May (1)
    • ►  March (1)
    • ►  January (1)
  • ►  2022 (18)
    • ►  September (1)
    • ►  August (2)
    • ►  July (2)
    • ►  June (3)
    • ►  April (1)
    • ►  March (3)
    • ►  February (2)
    • ►  January (4)
  • ►  2021 (60)
    • ►  December (5)
    • ►  October (5)
    • ►  September (5)
    • ►  August (7)
    • ►  July (6)
    • ►  June (5)
    • ►  May (3)
    • ►  April (4)
    • ►  March (6)
    • ►  February (6)
    • ►  January (8)
  • ►  2020 (55)
    • ►  December (5)
    • ►  November (3)
    • ►  October (10)
    • ►  September (7)
    • ►  August (7)
    • ►  July (9)
    • ►  June (3)
    • ►  May (9)
    • ►  March (1)
    • ►  January (1)
  • ►  2019 (3)
    • ►  November (1)
    • ►  April (1)
    • ►  January (1)
  • ►  2018 (1)
    • ►  December (1)
  • ►  2017 (4)
    • ►  December (2)
    • ►  November (1)
    • ►  September (1)
  • ►  2016 (10)
    • ►  August (1)
    • ►  July (2)
    • ►  June (5)
    • ►  April (1)
    • ►  March (1)
  • ►  2015 (10)
    • ►  December (1)
    • ►  August (1)
    • ►  June (1)
    • ►  May (2)
    • ►  April (4)
    • ►  March (1)
  • ►  2014 (22)
    • ►  November (2)
    • ►  August (2)
    • ►  July (3)
    • ►  June (2)
    • ►  May (4)
    • ►  April (3)
    • ►  January (6)
  • ►  2013 (22)
    • ►  November (2)
    • ►  October (4)
    • ►  September (5)
    • ►  August (2)
    • ►  July (1)
    • ►  June (1)
    • ►  May (2)
    • ►  April (1)
    • ►  March (1)
    • ►  February (2)
    • ►  January (1)
  • ►  2012 (31)
    • ►  December (4)
    • ►  October (3)
    • ►  September (8)
    • ►  July (1)
    • ►  June (1)
    • ►  May (14)
  • ►  2010 (9)
    • ►  July (3)
    • ►  June (2)
    • ►  April (1)
    • ►  March (2)
    • ►  February (1)
  • ►  2009 (4)
    • ►  February (2)
    • ►  January (2)

recent posts

Pinterest Board

Popular Posts

  • Champaran Mutton / Ahuna Mutton - A Bihari Delicacy
      When I finish a long week of work, self doubt, frustration of dealing with people and finally when the weekend comes, I feel cooking somet...
  • Kochur Dum / Kochur Dalna / Arbi Masala/ Taro or Colocasia Curry
    August 19 Kochu or taro is one of my favorite vegetables. It is as versatile as potato only much more tasty. It is equally starchy an...
  • Tetor Macher Jhol (Bitter Gourd Fish Curry)
    Anything Bitter hardly finds takers. Same applies for Bitter Gourd. As a kid I hated bitter gourd in any form. Grown ups around me would...
  • Khandeshi Kala Masala - Kala Mutton Masala
      25 September Maharashtra is a land of unique local flavours. And still it is mainly known for its Vada Pavs, poha, pav bhaji and modaks. I...
  • Macher Bhorta | Fish Bharta | Mach Makha| Bengali Style Mashed Fish
      October 18 Bhortas or bharta as we call it in pan India, are the quintessential Bengali food, a staple in Bangladeshi cuisine. They are th...
  • Complete Details to plan your ISKON Mayapur Visit
    Radha Madhav during Pushya Abhishek on 6th Jan 2023 First of all wish you a very happy new year. I have been away from blogging for a while ...
  • Varhadi Mutton - A Traditional Vidharba Cuisine
    Varhadi is a dialect of Marathi typically spoken in Vidarbha region of Maharashtra. Vidarbha is the north-eastern region of Maharashtra ...
  • Dim Toast | Egg Toast | Dim Pauruti | Savoury French Toast
      April 25 Calcutta or Kolkata. A city known for its food and culture, where hospitality and love are synonymous with lip-smacking grub. Cho...
  • Golda Chingri Malaikari (Giant River prawns in coconut milk gravy)
    One of the main reasons I love Kolkata is because of the fish we get here. Its so fresh and one can get restaurant grade fish quality even i...
  • Tangy Sweet Mint Fish | Fish Pudina Recipe | Fish Hariyali
    February 20 I am a hardcore fishiterian..if that's a word. There has been hardly any occurrence where I have tasted a fish and not liked...

Liebster Award

Liebster Award

Very Good Recipes

Very Good Recipes

You can find my recipes on Very Good Recipes

Contact Us

Name

Email *

Message *

Pages

  • Travelogue Index
  • VEGETARIAN RECIPE
  • CHICKEN RECIPES
  • SEAFOOD RECIPES
  • MUTTON RECIPES
  • RICE RECIPES
  • EGG RECIPES
  • DAAL RECIPES
  • ROTI & PARATHA RECIPES
  • BAKING RECIPES
  • SWEET RECIPES
  • SNACKS RECIPES
  • SIDES RECIPES
  • SOUP RECIPES
  • SALAD & BOWLS RECIPES
  • ROASTED RECIPIES
  • JAM & PRESERVE RECIPES
  • BEVERAGE RECIPES
  • SAUCES, SPICES & CURRY BASE RECIPES
  • CHUTNEY & DIPS RECIPES
  • FESTIVE RECIPES
  • Contact Us
  • TRAVELOGUES OF EAST INDIA
  • TRAVELOGUES OF WEST INDIA
  • TRAVELOGUES OF SOUTH INDIA
  • TRAVELOGUES OF NORTH INDIA
  • TRAVELOGUES of ASIA
  • North East Recipe

This Blog is protected by DMCA.com

DMCA.com for Blogger blogs
FOLLOW ME @INSTAGRAM

Curries n Stories © 2020 All rights reserved.
Created with by BeautyTemplates