• Home
  • Recipes
    • Vegetarian
    • Seafood
    • Snacks
    • Chicken
    • Mutton
    • Egg
    • Roti & Parathas
    • Dessert
    • Sides
    • Soups
    • Salad & Bowls
    • Rice
    • Daal
    • Bakes
    • Roasted
    • Beverages
    • Sauces, Spices & Curry Base
    • Chutney & Dips
    • Festive Recipes
  • Cuisine
    • Bengali
    • Maharashtrian
    • Rajasthan
    • Punjab
    • Chennai
    • Andhra
    • Mangalore
    • Mughlai
    • Kashmiri
    • Chinese
    • Singapore
    • Mexican
    • Continental
    • Italian
    • French
    • American
    • Thai
    • Bangladeshi
    • Arab & Persia
    • North East
  • Meal Type
    • Breakfast
    • Lunch
    • Dinner
    • Snacks
    • Dessert
    • Appetizer
    • Accompaniments
  • How To
    • Preservation Techniques
  • Travel
    • East India
    • West India
    • North India
    • South India
    • Asia
    • America
  • Lifestyle
    • Craft & Creation
    • Experiences
  • Musing
  • Contact
  • Bengali Blogs

Curries & Stories

pinterest facebook twitter instagram tumblr linkedin


6 June

My birthday month is here! And just one day to for for my birthday. I am excited for another lockdown birthday.

Meanwhile the unlock process has started in Pune. It feels like a Deja vu from last year. After a long time I heard kids playing in the garden of our society. I really really wish to travel somewhere this year, once the wave dies down. It has been too long since I have been on the road or on the mountain. 

A small health update, I got my first vaccine shot last week. And no it was not through the cowin portal. My company had setup the vaccination drive across all its centers and Pune was the first location. The process was super smooth as it was handled by the admin team of our company. Jehangir Hospital facilitated the drive in our Hinjawadi campus. They were administering Covishield to us.  One entire floor was kept for the drive and there was separate section for men and women. After the shot, the doctor gave me a strip of Dolo 650 and asked me to have one tab immediately and rest only if fever is there. I took the medicine and for the next 30 minutes we had to wait in an observation room for any adverse side effects. It had a doctor stationed, refreshments and some beds in case someone felt sick. I had no symptoms whatsoever in those 30 minutes. The certificate of inoculation was immediately available on the cowin site. 


Here comes the main part. I did not have any symptoms apart from some pain in the arm where I got the jab for next 8 hours. Around 8 PM I started feeling a little lethargic and tired. I didn't feel an appetite as well during dinner time. Therefore I ate moderately that day. Post dinner the feeling of lethargy increased and I felt sleepy and heavy headed. I went to bed early and around 12 AM I felt severe chills and body pain. In sleep also I was shivering badly. There was mild shortness of breath. I took the Dolo and went back to bed. As I tried to sleep I noticed I was developing shooting headache. After trying to lie uncomfortably for 10-15 minutes I got up and noticed the headache was better if I sat or walked instead of lying. But the problem was that I was super feverish and it was taxing to walk around. So I went back to bed and tried lying down once again. It was almost over an hour after which I felt the fever subside, but the headache was a constant even the next day. I had nausea, appetite loss, fever the whole of next day. Appetite was heavily impacted. So much so that I had to take a leave from office as I was unable to sit for long. The symptoms started subsiding towards the evening and by 8 PM I was feeling much better. I felt hungry too. No fever came during the night of the second day. 


Third day, the fatigue remained and I was getting tired with a little talking. I kept it as a working day but was resting frequently. The pain in my left hand remained the entire 3rd and 4th day. By the end of 4th day I felt getting back to normal again. I think mine is one of those rare cases where all the side effects of the vaccine manifested. Research says the side effects are more prominent in the below 55 age group of people and especially women. Later I got to know from one of my colleague who already was infected with covid sometime back, that the side effect of the vaccine was much worse than when he had actually contracted covid. A couple of other team members also confirmed they had similar symptoms. That is my experience of getting jabbed for the first time. I cant say that I am not scared for the side effects when I take the second jab, but then it has to be done. Will update my experience of second jab when the time comes.

Meanwhile to perk up my mood over the last weekend after such a terrible two days of bedrest, I thought of going back to baking something easy. When I was visiting my aunt in Mumbai on the new years eve during 2018, she took me to a pretty café and we bought some chicken quiche for ourselves. Actually it was my cousin brother who wanted to have quiche in the first place and that's why we went and got. I had never had quiche before that, and not even heard about it. It looked to me like a savory tart. The first bite into it took me to a different level of ecstacy. I was in love with the gooey creamy center oozing with deliciousness and succulent chicken chunks. They were mini quiches, of the size of my palm. That memory had been with me for the longest time now. Quiche was something on my checklist of to do recipes. 

This time, with the second wave of lockdown I stumbled upon a brand Unroll which had the answer to my pastry cravings. They have a wonderful selection of products ranging from Bake Puff pastry Sheets, Short Crust pie pastry Sheets, Cinnamon Swirls, Garlic Baguette, Cheese Garlic Baguette and more. Its a boon, if you want to bake a super delicious pie or a pastry puff in no time which is also failureproof! They were generous enough to share with me two of their products - the puff pastry sheet and the shortcrust pastry sheet. The delivery was smooth even in times of restrictions and the delivery guy gave precise instruction to me how to keep it frozen till ready to use. I loved the delivery experience. The products are available in Bigbasket or you can directly order from selected stores.


With the beautiful shortcrust pastry I decided to make a quiche. My dream of recreating that memory was just about to be true. And since I wanted a loaded quiche, I added spinach, mushroom and onions along with the chicken pieces. It turned delicious beyond my imagination. Both me and my mom were head over heels with the result. The short crust pastry was just too good as a base.

I didn't face any challenge even if it was the first time I was working with frozen shortcrust pastry sheets. I kept the pastry sheets at room temperature for approximately 60 minutes till the time when gently pressed with hand it left a dent and I could easily unroll it. After you do it for the first time you will be at ease. Though the packet instructions say not to freeze back the remaining sheet, but I did and it doesn't cause any issue when you use it again later.  

If while thawing you accidently break the sheet, don't fret, just bring the piece together and roll on them with a rolling pin gently to seal any breakage. I faced a minor challenge while removing the paper from the frozen sheet. It got stuck with the dough. So I rested the dough in the refrigerator for 5-7 minutes and after that the paper came out clean from the dough easily.


Preparation Time : 20 minutes
Baking Time: 50 minutes

Ingredients :
  • Shortcrust Pastry Sheet  - 1 
  • Chicken - 150 gm, cut into small pieces
  • Mushroom - 1/2 cup, cut
  • Onion- 1/2 medium onion, chopped
  • Garlic - 4 cloves, made into paste
  • Spinach - 200 gm, chopped
  • Red chilli Flakes - 1/4 tsp
  • Italian Seasoning - 1 tsp
  • Pepper powder - 1/2 tsp
  • Mozzarella Cheese - 1/2 cup grated
  • Egg - 2
  • Fresh Cream - 1.5 cup
  • Milk - 1/2 cup
  • Salt as per taste
  • Butter - 1 tbsp
  • Olive Oil / Refined Oil - as required
  • Flour - for dusting

Ingredients :
  • Skillet
  • Fork
  • Brush
  • Paring Knife
  • Rolling base and pin
  • Pie Mold

Recipe Video


Procedure: 

1.  Preheat oven to 180 Degree. 

Note: I made this in the convection mode of microwave at 200 degree.

2. If you have frozen pastry sheet then you need to thaw it as per the packet instructions. It can be thawed in the refrigerator overnight or in room temperature for minimum 40-50 minutes.

Tip: When you thaw it at room temperature, keep checking the pastry sheets every 15-20 minutes whether its ready or not. Gently press the ball of your finger in the middle of one of the sheets. f your finger leaves an indentation, the pastry is ready to be used. 

Note: To thaw in the microwave, remove 1 pastry sheet from the box and outer wrapping and wrap in a paper towel. Microwave on HIGH for 15 seconds.

3. Slice the mushrooms and onion.  Wash the spinach and drain the water. Chop the spinach into medium size. 

4. In a skillet, heat oil and butter. When hot, add chopped garlic and a pinch of salt . Sauté for a couple of minutes.

5. Add chopped onion and spinach. Sauté them till the spinach starts to sweat, for a about a couple of minutes. Squeeze the water from the spinach and keep aside. 

6. In the same pan add a knob of butter. Sauté the mushrooms till they sweat and caramelize a little. Take it off the flame and keep aside.

7. Slide the butter cube into the same pan. Once hot add the chicken pieces. Add salt and pepper powder. Fry on medium flame, till the chicken is done. Keep aside.

8.  Now in a large mixing bowl crack open two eggs and add 1.5 cups of fresh cream, 1/2 cup milk, salt and Italian seasoning. Whisk it to prepare a smooth sauce.

Prepare the tart base:
1. Roll the shortcrust pastry dough out on a well-floured work surface until it’s approximately 12-inches in diameter. Transfer it to a 9-inch glass deep pie dish. 

2. Using your fingers, press it firmly into the bottom and sides of the pie plate. Then fold/crimp/ roll over the overhanging dough. Prick the bottom and sides of the pie crust all over with a fork to prevent the crust from bubbling. Place a parchment paper on top of the pie base. Add some pie weights ( beans, rice, sugar etc.) on top. 

3. Transfer the pie crust to the pre-heated oven and bake for 15- 20 minutes, until par-baked.

Assembling the Quiche
1. Now add a layer of mozerella cheese on the par baked quiche shell. 

Note: It is recommended to use mozzarella to get the gooey texture, but if you do not have mozzarella use any cheese of your liking. You can also vary the amount of cheese.

2. Evenly add the sautéed spinach, chicken, mushrooms and onion on top of the cheese layer. 

3. Now pour the egg mixture to fill out all the gaps

4.  Now cover it with aluminum foil and bake in the pre-heated oven at 180 degrees for 20-25 minutes until the eggs are set and a knife inserted in center comes out clean. 

Let it cool before serving. Sprinkle a little more Italian seasoning and serve with a crisp green salad on the side or some wine.


Share
Tweet
Share
No comments


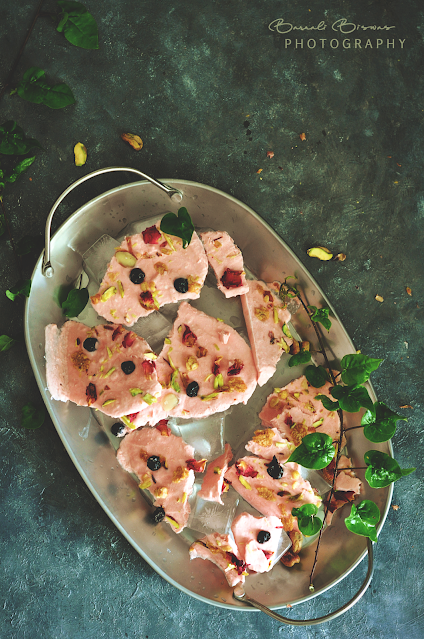
Red Velvet Yoghurt Bark

2nd June

Yesterday we received a communication from office that the status quo of Work from Home will continue till September, which essentially means we need to stay put where we are. That actually made me happy. I never cribbed about not being able to go to office, work from home suited me so much better. I could sped time in between work looking at the mango orchard or the hills from my balcony, I could read about something interesting while taking breaks, plus being able to share all meals with the family - which I couldn't in the past 15 years. 

Staying at home also means you keep getting hungry in between. While in office, the cafeteria would be visited only during the stipulated hours but at home, you feel like snacking on something or the other. So during the past one year I had to try out different in between snacking options which were light and yet interesting. I developed a liking for raw peanuts, which were filling and healthy. Even 4-5 peanuts would hold me up for a good amount of time. Then there was the option of frozen desserts, at times when I felt like grabbing something sweet. Instead of polishing off a bar of dark chocolate. I trained myself to snack on these relatively less calorie sweet delights. Once you get used to them, you will start liking them a lot. Especially during the summertime, nothing beats a quick frozen snack.

Yoghurt Bark
 

On the occasion of World Milk Day I decided to make a super easy and interesting recipe. This frozen yogurt bark studded with fruit is a fun treat for kids and adults alike. It takes minutes to prepare and is ready within 2-4 hours of freezing. You can then break into pieces and store in a ziplock bag for an instant frozen snack.

You can experiment with different flavor combination. The best thing about these barks is that any flavor combination tastes good.  The recipe is so easy, you can even let your kids make these.

Checkout some other sweets and frozen dessert from my page

  • Frozen Yoghurt Granola Cups
  • Mojito Poscicle
  • Tea Infused Caramel Custard


Yoghurt Bark


Preparation Time : 15 minutes
Freezing Time: Overnight or until yoghurt is firm

Ingredients :
  • Yoghurt / Hung Curd - 1 & 1/2 cup
  • Red Velvet Emulco  - 1 drop
  • Chopped Pistachios - 2 tsp
  • Granola - 1 tsp
  • Honey - 2 tbsp
  • Dried Rose Petal (optional) - 1/2 tsp

Ingredients :
  • Rimmed Baking sheet or freezer safe tray
  • Parchment Paper
  • Spatula
  • Mixing Bowl
Procedure: 

1.  In a medium bowl, add yogurt, red velvet emulco/flavoring and honey. Mix together to combine.

Note: Emulco is concentrated flavoring in paste form which often comes with food coloring too. It is my go to method of adding color of flavor these days. If you do not have an Emulco use flavor and color separately. You can use any flavoring of your choice in this recipe.

2. Line a rimmed baking sheet with Parchment paper.

3. Pour the yoghurt mixture on the parchment paper. Using a spatula or knife to spread the yogurt as thin as possible over the entire paper. 

4. Now sprinkle chopped pistachios, dried blueberry, granola and rose petals.

Tip: Experiment with your choice of toppings. It is always fun that way.

Cut or break into pieces and serve immediately.


How to make hung curd?

Even if you do not have a muslin cloth you can make hung curd easily with a strainer with tiny holes. Just place the strainer on a deep bowl. Now pour the curd on it and let it sit undisturbed for at least 30 minutes. The whey will collect in the bowl and the strainer will now contain the creamy thick curd devoid of any extra water.

Yoghurt Bark


Share
Tweet
Share
No comments


Aloo Dim Bhorta

30th May

Yesterday I made a fancy chicken tart and my whole Saturday morning went towards preparation of the tart. That's how my usual weekends go. When I start with Monday, I promise myself that the next weekend is going to be a no-fancy-dish-weekend but by the time it is Thursday, I am already planning out what new thing to cook over the weekend. Which eventually translates to slogging all day long in the kitchen on the only two days I get off. I guess my love of food outweighs my love of loafing. 

But with much resolve form past two weeks I have started practicing no-fancy-food Sundays. This approach actually worked better than the resolution for no-fancy-food-weekends. Now I slog only on Saturdays to make a lavish spread, and Sundays are meant for rustic, easy peasy and healthy homely affair. Things which can be made in 30 minutes to maximum 1 hour. We have been having different khichudis or seddho bhat or maggi tossed with assorted vegetables and so on. I wanted to aimlessly look at the monsoonish sky and smell the flowers in the remaining time. Not to mention clearing the backlogs of photo editing, blogging, instagramming, reading, working on a novel, watching series and a gazillion stuffs which does make me feel like I need another weekend just to recuperate from all that!

Aloo Dim Bhorta
 

The point is, that weekends do not look like weekends we used to have as kids. Now we are doing 'something' 24x7. Pure unwinding is never possible. So at least on a cooking front I managed to save some time. Since today is a Sunday, I woke up leisurely, had a cup of tea, leafed through the newspaper, fed the stray pigeons and then only I stepped into the kitchen. I had my plan straight - its going to be the super easy and super delicious Aloo Bhorta and Kolai Daal with Ilish Mach Bhaja. Hasselfree fare which everyone would relish. 

But once in kitchen I kept feeling guilty of just cooking something as simple as a aloor bhorta, so I decided to add a couple of hard boiled eggs to it. Why not glam up the regular bhorta a little? The doctors are anyway recommending everyone to consume eggs for natural zinc intake. 

Aloo Dim Makha


I have mentioned earlier as well, that bhorta is a quintessential accompaniment in the Bangladeshi cuisine, but in the western side of bengal (in India) not so much. But still folks who have their roots in east Bengal love making bhortas even if they might not be as varied as their counterparts. Aloor bhorta is the most basic bhorta. In plain english, it is mashed potato sans the butter and cream. The mashed potato we have is a zesty counterpart with spiciness from chili and zing from mustard oil. 

The dish itself can be customized based on personal tastes—with or without the egg, raw or roasted onions, fresh chilies in place of dried, more or less garlic and so on. But one ingredient that remains a constant in any Bhorta recipe is the mustard oil. Its like the core taste profile of a bhorta and has no other substitute whatsoever.   


Check out a few of the dal recipes you can try this with

  • Lau Data Diye Motor Daal
  • Moong Daal Kalo Jire Diye
  • Tetor Daal
  • Aam Daal
  • Kolai Daal 
  • Masoor Daal

You can also try the other bhorta recipe

  • Chingri Bhorta

Dim Aloo Bhorta


Preparation Time : 10 minutes
Cooking Time: 15 minutes
Serves - 2

Ingredients :
  • Potato - 2 medium
  • Egg - 2 medium, hard boiled
  • Onion - 1 medium, sliced
  • Dried Red Chili - 2
  • Garlic Cloves - 5-6 
  • Salt as per taste
  • Mustard Oil - 1 tbsp
  • Fresh Coriander Leaves ( optional) - chopped (for garnish)

Ingredients :
  • Fork
  • Boiling pot / pressure cooker
  • Mixing bowl
  • Knife

Procedure: 

1.  Boil the eggs. I used a pressure cooker for the same. Fill some water in the cooker. Keep a bowl in between and place the eggs inside the bowl. Pressure cook for 2 whistles. Let it rest till the pressure dies out. Open the cooker and place the egg in an ice bath. 

Tip: Coat the raw eggs in mustard oil before placing in the cooker. This prevents the egg from cracking while boiling. The ice water will help in easy removal of the egg shell.

2. Now prepare the seasoning . Chop the onions in thin slices, halve the garlic cloves. In a non stick pan, on medium heat dry roast the garlic. Keep aside. Then dry roast the onion slices. When they start browning and you get a charring smell, add 1/4 tsp of oil and sauté the onions. Keep them aside.

Note: Instead of dry roasting the onions you can use raw onions in this bhorta as well. It will give a different flavor which also tastes lovely.

3. On medium flame roast the dried red chilies, till the skin is charred. This gives a nice smoky flavor to the bhorta.

4. Wash the potato well to remove any dirt from the skin. Make wide slits in the potato (like hasselback potato). Boil for about 2-3 whistles in a pressure cooker.

Tip: You can keep the skin on or off as per your liking. I like both ways.

Tip: To prevent getting extra moisture into the potato there are 2 simple tricks. Either boil the potato with skin on. Or in the pressure cooker take water and then place a bowl in the middle with the peeled potato. Both the techniques prevent excess moisture in the potato.


5. The key to having a buttery smooth bhorta is mashing the potato when they are still hot. Take out the potato from the pressure cooker once cooked and with a fork mash them up quickly. Once its nearly mash, use your hands to give it the final smooth texture by kneading it.

6. Now add the charred chillies, roasted garlic, onions, mustard oil and salt. Give it a good knead with hands, breaking down all the big pieces of garlic or chilli.

Note: Vary all these ingredients as per your taste.

Note: Don't substitute Mustard oil with refined oil or olive oil. Mustard Oil gives the much needed zing to the bhorta which cannot be recreated by any oil Oil or substitute.

7. Cut the boiled egg into quarters and now add it to the mixing bowl. Mash everything together. 

Tip: If you want some texture of the egg, then don't mash the white portion of the egg too much, so you get a little bite when you eat.

To add a little freshness, you can add about 1/2 tsp of chopped coriander leaves. This is completely optional.

Serve hot with rice and Kolai Daal (Urad daal).

Aloo Dim Bhorta


Share
Tweet
Share
No comments


Mushroom Tart


28 May

I know I have been away for quite a while this month. There were a few losses across friends and people I knew, so it kind of impacted a little mentally. With so much happening around, it feels like a redundant task to be socializing on the social media. Though I didn't post, I had been cooking a few new recipes this month inspired by things I read or saw on different platforms. My posts are languishing as drafts, I will need all my energy to get them out one by one. So lets start with this one today.

Instagram can be addictive and can become an evil too often but at times it is a good evil. In the past one year I have learned a lot many things on this platform. came to know about so many new brands, go to work with people who were already there for a long and shared their experience and got exposed to so many unique things in the food world alone. Once in a while you do need a detoxification from it, but overall the journey has been good one.

I really started exploring baking from the lockdown period last year. While cakes were the easier things to start with, baking a bread turned out to be quite an ordeal for me. Going by that experience I never even tried making a pastry base myself, for the fear that I might end up with something which would be a total disaster. But then again I missed those fluffy, golden crusts and the beautiful crunchy pastry puffs I used to eat when there was no lockdown. 

This time, with the second wave of lockdown I stumbled upon a brand Unroll which had the answer to my pastry cravings. They have a wonderful selection of products ranging from Bake Puff pastry Sheets, Short Crust pie pastry Sheets, Cinnamon Swirls, Garlic Baguette, Cheese Garlic Baguette and more. Its a boon, if you want to bake a super delicious pie or a pastry puff in no time which is also failureproof! They were generous enough to share with me two of their products - the puff pastry sheet and the shortcrust pastry sheet. The delivery was smooth even in times of restrictions and the delivery guy gave precise instruction to me how to keep it frozen till ready to use. I loved the delivery experience. The products are available in Bigbasket or you can directly order from selected stores.

Mushroom Tart


Since this was my first time working with frozen pastry sheets I thought of starting small. I used half of the pastry sheet to make this beautiful mushroom tart. To start with the thawing process seemed a little confusing as different websites gave different options - thaw in the refrigerator, thaw in room temperature etc. So I tried to go with my own gut feeling. I kept the pastry sheets at room temperature for approximately 60 minutes till the time when gently pressed with hand it left a dent and I could easily unroll it. After you do it for the first time you will be at ease.

Working with the readymade sheets is really a hassle-free process. The outcome was better than what I was expecting as a first timer at this. In flat 20 minutes I had a crispy beautiful Puff pastry which was melt in the mouth good! I would definitely recommend this brand. Even my mom, who is a very picky eater when it comes to non traditional dishes, remarked that this was one of the best puff pastry she ever had. The sesame added a delicious nutty flavour to the buttery mushroom core and it became a match made in heaven!

You can use any pastry sheet you want for this recipe or even bake your own. Be sure to refer to packet instructions if you are using frozen sheets, for the best result.

Mushroom Puff Pastry


Preparation Time : 15 minutes
Baking Time: 20 minutes

Ingredients :
  • Puff Pastry Sheet  - 1 sheet, cut into half
  • Mushroom - 1 cup, cut
  • Shallot - 3, sliced
  • Garlic - 4 cloves, made into paste
  • Pepper powder - 1/4 tsp
  • Thyme - 1/4th tsp
  • Cheese - 1 small cube
  • Egg - 1
  • Sesame (black and white) - 1/2 tsp combined
  • Salt as per taste
  • Butter - 1 tbsp
  • Olive Oil / Refined Oil 
  • Flour - for dusting
  • Scallion - 1/4th cup, chopped (for garnish)

Ingredients :
  • Skillet
  • Fork
  • Brush
  • Paring Knife
  • rolling base and pin

Savoury Tart


Procedure: 

1.  Preheat oven to 200 Degree. 

Note: I made this in the convection mode of microwave at 200 degree.

2. If you have frozen pastry sheet then you need to thaw it as per the packet instructions. It can be thawed in the refrigerator overnight or in room temperature for minimum 40-50 minutes.

Tip: When you thaw it at room temperature, keep checking the pastry sheets every 15-20 minutes whether its ready or not. Gently press the ball of your finger in the middle of one of the sheets. f your finger leaves an indentation, the pastry is ready to be used. 

Note: To thaw in the microwave, remove 1 pastry sheet from the box and outer wrapping and wrap in a paper towel. Microwave on HIGH for 15 seconds.

3. Slice the mushrooms and shallot. Beat the egg and prepare the egg wash.

4. In a skillet, heat oil. Sauté the shallots and mushroom. Add garlic paste, salt and pepper powder.

5. Slide the butter cube and add thyme. Sauté till the mushrooms sweat and caramelize a little. Take it off the flame and keep aside.

6. Prepare the tart base:
Take 1/2 of the pastry sheet. Dust the rolling surface with a little flour and place the pastry sheet. Roll it out once gently with a rolling pin to even out the surface. Now taking a sharp knife make a 1/2 inch border by scoring the pastry surface. Using a fork prick the pastry inside the scored edge. 

Note: The scoring should not cut through till the bottom. it should just be a surficial scoring.

7. Now spread a layer of grated cheese on the middle section. Take care not to go past the scored edge.

8. Evenly spread the mushroom mixture on top of the cheese.

9. Brush egg wash on the border generously, this will give the edge a nice browning effect and shine.

10. Sprinkle the white and black sesame on the border. Sesame will add a beautiful nuttiness to the pastry.

11. Now bake in the pre-heated oven at 200 degrees for 20-24 minutes depending on the oven you have. At 18 minutes start keeping an eye on the tart for doneness. Remove from the oven when the pastry is golden brown and puffed up.

12. Sprinkle the chopped parsley over the tart then cut into squares and serve immediately.


Mushroom Tart


Share
Tweet
Share
No comments


Chemmeen Curry , Kerala Prawn Curry

5 May

I was visiting my aunt in Mumbai in 2018 during the winters. My mesho(aunt's husband) was working in Nabard and fortunately just during the weekend I was visiting, Nabard had setup Nabard Haat, a fair-cum-exhibition of local handicraft where Local and rural artisans from different states showcase and sell their products in more than 100 stalls.  It was spread out in a very big ground and was a big crowd puller. Things like Madhubani painting, sattu, pickle, papad, khadi clothes, Sambalpuri saris, Kerala clay utensils, pulse etc. were selling like hot cakes. It reminded me of the Krishi Mela (agricultural fair) we used to have in IIT Kharagpur annually.  Since back in my childhood days, there weren't many entertainment zones around, we would really wait for this fair where people from the area would showcase any agricultural products. And my main motive to visit the fair was to have the lovely food it would have. It was also the first place I had tasted the Butter fried fish of the famous Benfish brand (Bengalis would surely understand the nostalgia in this!). 

It was in this Nabard Haat that I saw a little shop selling Kerala pots and pans. Immediately my eye hovered on the Meen Chatty sitting on one of the corner of the shop. I so badly wanted to purchase it. While my aunt deliberated whether it was an authentic Meen chatty, my mesho said since it was a Nabard organized event, these were authentic local artisans. Even though the price seemed a little expensive I got the desired Meen Chatty finally. 

The Meen Chatti or Kerala Clay pot has always sounded fascinating to me. The first time I had seen anyone cooking in it was Peter Kuruvita in "My Sri Lanka" Series. He would effortlessly cook fabulous dishes on these clay pots in stunning locations and I used to keep imagining how amazing the food might taste because it was getting slow cooked on a clay pot. The earthy aromas would surely infuse and create a magic in the dish. 

Chemmeen Curry , Kerala Prawn Curry


Due to its numerous health benefits, Ayurveda suggests cooking in a clay pot. The food being cooked in an earthen cookware makes it aromatic and retaining the nutrition, minerals that include calcium, magnesium, iron and phosphorus. Clay being alkaline in nature helps in neutralizing the PH balance of the food by interacting with the acid present in the food and hence acts as a natural detox. The porous nature of earthenware allows for slow and even cooking, while retaining the natural juices in food.

Now, every time I thought about cooking in that chatty I was like, I don't want to blacken or harm to pot and kept pushing using it. Eventually I completely forgot about it. And very recently while housekeeping I 'discovered' it. This time around I decided I had to use it, so I followed the standard seasoning steps for the pot and got the pot ready in a week. Since it was a Kerala pot, it was only justified that the first thing I tried had to be a Kerala preparation.

I fell in love with Kerala cuisine when I was staying in Navi Mumbai. I stayed there for many years but only at the fag end of my stay I realized there was a Kerala House in Vashi, which was not very far from where I lived. The anonymity of the place was attributed to the fact that it was tucked away in an  obscure corner behind the Raghuleela mall in Vashi. It basically is the Culture center of the Kerala state Government that has a canteen within the premises.  A no frill place, they serve authentic Kerala Sadhya and you can order a side of chicken or fried fish. But the meal is just outstanding. Even if you are not a Malyali you will definitely end up loving the simple food. I remember it would get crowded fast, hence if you wanted to have a meal you needed to be at the place soon. 

The next time I had Kerala food was in Kerala itself. We dissed the gourmet restaurants and would always wander to the local cafes serving fish curry rice and appalam (papad). The ambience might not be great, but the food would be really finger licking good. Kerala food also has some similarity with the Bengali food culture hence I loved it even more. Any cuisine which has a heavy fish influence is close to my heart. Just like the Malvani cuisine of Maharashtra.


Chemmeen Curry , Kerala Prawn Curry

So the first dish I wanted to cook in this chatty was the Chemmeen curry or the Kerala prawn curry. I had got some scampis in my fridge which were perfect for the rich tangy curry. The combination is not unique to Kerala. In Thai and Jamaican cuisine, usage of shrimps with raw mango is present. And each one has a unique taste profile which is interesting and delicious. Marinated prawns slowcooked in a tart raw mango curry in a clay pot and simmered with coconut milk to perfection that's what Chemmeem curry is to me. This is a delightful recipe to enjoy in the hot summer months.

Preparation Time: 15  minutes
Marination Time: 10 minutes
Cooking Time: 20  minutes
Serves - 2 adult 

Ingredients for curry:
  • Scampi - 4, medium size, cleaned (250 gm)
  • Onions - 1 medium, thinly sliced
  • Green Chilli - 4, slitted
  • Raw Mango - 1 , medium, sliced
  • Curry Leaves - 10-15
  • Ginger Paste - 1/2 tsp
  • Garlic Paste - 1/2 tsp
  • Pepper powder - 1/2 tsp
  • Turmeric Powder - 1 tsp
  • Red Chilli Powder - 11/2 tsp + /2 tsp
  • Coconut Milk - 1/2 cup
  • Lime Juice - 1/2 tsp
  • Salt as per taste
  • Coconut Oil/ Refined Oil
Ingredients for tempering:
  • Mustard Seeds - 1/2 tsp
  • Curry Leaves - 10-12 leaves
  • Cooking Oil - 1 tbsp
Equipment:
  • Seasoned Earthen Pot


Preparation
Clean the Scampi/ shrimps, slice the raw mangoes and onions. Make a paste of ginger and garlic. Have the coconut milk ready. Or if you are using coconut milk powder, then mix equal portions of coconut milk powder and water for a thick milk. Or 2 part water and 1 part coconut milk powder for a thinner consistency.

Procedure: 

1.  Marinate the cleaned Scampi with red pepper powder and lime juice for 10 minutes.

Tip: I used scampi with head for a richer flavor, as the head of a prawn or shrimp contains a lot of flavors. If you don't like prawn heads then you can discard them.

Note: You can use any type of prawn for this recipe.

Chemmeen Curry preparation


2. Take the seasoned pot and heat it on medium flame. Add cooking oil and let it heat for 2-3 minutes on medium flame.

Note: The earthen pot you use for cooking needs to be completely seasoned before use. The process I followed was - Keep the earthen vessel fully immersed in a water bath for 3 days. On 4th day take it out and let it dry completely ( approx. 2 days). When fully dry apply a generous coat of mustard oil. The earthen pot will soak up all the oil and be ready for cooking. This ensures it would not crack on exposure to heat.

3. To the oil add the slitted green chilli, ginger and garlic paste and a pinch of salt. Sauté for a minute till raw smell is gone.

4. Add the sliced onions. Fry till they are translucent.

5. Add the turmeric, salt and red chilli powder. Sauté for a few seconds.

Kerala prawn curry preparation


6. Add about 1/2 cup water. Add the sliced raw mango. Add pepper powder. Adjust the salt and sugar. Fold in. Cook for a few minutes.

7. Now add water as per the desired curry consistency. Cover the pot and let it simmer on low heat till the mangoes and onions are softened.

Kerala prawn curry preparation


8. Add the scampi/prawn/shrimp at this point and increase the heat. Cook for about 4-5 minutes until the scampi turns opaque.

Note: Since I had large sized scampi, hence I let them cook on each side for 3-4 minutes in the gravy, turning them over at half the time.

9. Now reduce the heat and add the coconut milk. Mix well and let it simmer on low heat for a couple of minutes. Adjust the water for consistency and adjust the seasoning as well.


Seasoning :

In a separate pan heat some coconut oil or any cooking oil. Temper it with mustard seeds and curry leaves. Now pour this tempering over the curry. Let it sit covered for the flavors to infuse. Stir it before serving. For the perfect company, serve it with matta rice.

Chemmeen Curry , Kerala Prawn Curry


Share
Tweet
Share
No comments
Newer Posts
Older Posts

About me

I am a software engineer by profession and a writer at heart. Born and brought up in Kharagpur, I moved to the city of dreams Mumbai when I got my first job. Till then I had not cooked a single dish in my life. Not even Maggi or tea. My dad had a strong belief that his little princess never will be in a situation where she had to cook for herself. Hence I was not allowed to spend time in the kitchen till I was studying.


So when I faced the daunting task of living alone, dabbas came to initial rescue. After that I managed a whole year on just boiled vegetables and rice. And then I landed in US. The bounty of fresh produce and cooking ingredients available in the super marts eventually lured me into making my very first meal ever. There was no turning back after that. I finally discovered how much I was in love with cooking and being creative in the kitchen.


This blog is a humble attempt to present our culinary heritage to one and all and document some of the very traditional recipes which gets passed on through generations just by word of mouth.


So just sit back with a cup of tea or coffee and enjoy the curries and the stories related to each.


Follow Us

Footprints

Blog Archive

  • ▼  2026 (4)
    • ▼  May (1)
      • A Suitcase Full of Stories: My Heartfelt Shopping ...
    • ►  January (3)
  • ►  2025 (3)
    • ►  December (1)
    • ►  June (1)
    • ►  February (1)
  • ►  2024 (21)
    • ►  December (2)
    • ►  September (1)
    • ►  August (3)
    • ►  July (4)
    • ►  May (2)
    • ►  April (5)
    • ►  March (3)
    • ►  January (1)
  • ►  2023 (7)
    • ►  December (2)
    • ►  November (1)
    • ►  October (1)
    • ►  May (1)
    • ►  March (1)
    • ►  January (1)
  • ►  2022 (18)
    • ►  September (1)
    • ►  August (2)
    • ►  July (2)
    • ►  June (3)
    • ►  April (1)
    • ►  March (3)
    • ►  February (2)
    • ►  January (4)
  • ►  2021 (60)
    • ►  December (5)
    • ►  October (5)
    • ►  September (5)
    • ►  August (7)
    • ►  July (6)
    • ►  June (5)
    • ►  May (3)
    • ►  April (4)
    • ►  March (6)
    • ►  February (6)
    • ►  January (8)
  • ►  2020 (55)
    • ►  December (5)
    • ►  November (3)
    • ►  October (10)
    • ►  September (7)
    • ►  August (7)
    • ►  July (9)
    • ►  June (3)
    • ►  May (9)
    • ►  March (1)
    • ►  January (1)
  • ►  2019 (3)
    • ►  November (1)
    • ►  April (1)
    • ►  January (1)
  • ►  2018 (1)
    • ►  December (1)
  • ►  2017 (4)
    • ►  December (2)
    • ►  November (1)
    • ►  September (1)
  • ►  2016 (10)
    • ►  August (1)
    • ►  July (2)
    • ►  June (5)
    • ►  April (1)
    • ►  March (1)
  • ►  2015 (10)
    • ►  December (1)
    • ►  August (1)
    • ►  June (1)
    • ►  May (2)
    • ►  April (4)
    • ►  March (1)
  • ►  2014 (22)
    • ►  November (2)
    • ►  August (2)
    • ►  July (3)
    • ►  June (2)
    • ►  May (4)
    • ►  April (3)
    • ►  January (6)
  • ►  2013 (22)
    • ►  November (2)
    • ►  October (4)
    • ►  September (5)
    • ►  August (2)
    • ►  July (1)
    • ►  June (1)
    • ►  May (2)
    • ►  April (1)
    • ►  March (1)
    • ►  February (2)
    • ►  January (1)
  • ►  2012 (31)
    • ►  December (4)
    • ►  October (3)
    • ►  September (8)
    • ►  July (1)
    • ►  June (1)
    • ►  May (14)
  • ►  2010 (9)
    • ►  July (3)
    • ►  June (2)
    • ►  April (1)
    • ►  March (2)
    • ►  February (1)
  • ►  2009 (4)
    • ►  February (2)
    • ►  January (2)

recent posts

Pinterest Board

Popular Posts

  • Champaran Mutton / Ahuna Mutton - A Bihari Delicacy
      When I finish a long week of work, self doubt, frustration of dealing with people and finally when the weekend comes, I feel cooking somet...
  • Khandeshi Kala Masala - Kala Mutton Masala
      25 September Maharashtra is a land of unique local flavours. And still it is mainly known for its Vada Pavs, poha, pav bhaji and modaks. I...
  • Kochur Dum / Kochur Dalna / Arbi Masala/ Taro or Colocasia Curry
    August 19 Kochu or taro is one of my favorite vegetables. It is as versatile as potato only much more tasty. It is equally starchy an...
  • Tetor Macher Jhol (Bitter Gourd Fish Curry)
    Anything Bitter hardly finds takers. Same applies for Bitter Gourd. As a kid I hated bitter gourd in any form. Grown ups around me would...
  • Macher Bhorta | Fish Bharta | Mach Makha| Bengali Style Mashed Fish
      October 18 Bhortas or bharta as we call it in pan India, are the quintessential Bengali food, a staple in Bangladeshi cuisine. They are th...
  • Complete Details to plan your ISKON Mayapur Visit
    Radha Madhav during Pushya Abhishek on 6th Jan 2023 First of all wish you a very happy new year. I have been away from blogging for a while ...
  • Kumro Phool bhaja (Pumpkin Blossom fritter) and a Jade trip of Konkan in rains
    Rains , Lush green forest laden mountains, Cascading milky white waterfalls, cloud filled valleys, Turbulent coastlines,...
  • Varhadi Mutton - A Traditional Vidharba Cuisine
    Varhadi is a dialect of Marathi typically spoken in Vidarbha region of Maharashtra. Vidarbha is the north-eastern region of Maharashtra ...
  • Golda Chingri Malaikari (Giant River prawns in coconut milk gravy)
    One of the main reasons I love Kolkata is because of the fish we get here. Its so fresh and one can get restaurant grade fish quality even i...
  • About Slow Travel | Spice2Nuts - a spice initiative by Harish Bali (Visa2Explore)
    Moments from my travels - 1. Forest in Meghalaya 2. An old boat in Shnongpdeng 3. Fish Mint 4. Local Cinnamon  Traveling has always been a p...

Liebster Award

Liebster Award

Very Good Recipes

Very Good Recipes

You can find my recipes on Very Good Recipes

Contact Us

Name

Email *

Message *

Pages

  • Travelogue Index
  • VEGETARIAN RECIPE
  • CHICKEN RECIPES
  • SEAFOOD RECIPES
  • MUTTON RECIPES
  • RICE RECIPES
  • EGG RECIPES
  • DAAL RECIPES
  • ROTI & PARATHA RECIPES
  • BAKING RECIPES
  • SWEET RECIPES
  • SNACKS RECIPES
  • SIDES RECIPES
  • SOUP RECIPES
  • SALAD & BOWLS RECIPES
  • ROASTED RECIPIES
  • JAM & PRESERVE RECIPES
  • BEVERAGE RECIPES
  • SAUCES, SPICES & CURRY BASE RECIPES
  • CHUTNEY & DIPS RECIPES
  • FESTIVE RECIPES
  • Contact Us
  • TRAVELOGUES OF EAST INDIA
  • TRAVELOGUES OF WEST INDIA
  • TRAVELOGUES OF SOUTH INDIA
  • TRAVELOGUES OF NORTH INDIA
  • TRAVELOGUES of ASIA
  • North East Recipe

This Blog is protected by DMCA.com

DMCA.com for Blogger blogs
FOLLOW ME @INSTAGRAM

Curries n Stories © 2020 All rights reserved.
Created with by BeautyTemplates