• Home
  • Recipes
    • Vegetarian
    • Seafood
    • Snacks
    • Chicken
    • Mutton
    • Egg
    • Roti & Parathas
    • Dessert
    • Sides
    • Soups
    • Salad & Bowls
    • Rice
    • Daal
    • Bakes
    • Roasted
    • Beverages
    • Sauces, Spices & Curry Base
    • Chutney & Dips
    • Festive Recipes
  • Cuisine
    • Bengali
    • Maharashtrian
    • Rajasthan
    • Punjab
    • Chennai
    • Andhra
    • Mangalore
    • Mughlai
    • Kashmiri
    • Chinese
    • Singapore
    • Mexican
    • Continental
    • Italian
    • French
    • American
    • Thai
    • Bangladeshi
    • Arab & Persia
    • North East
  • Meal Type
    • Breakfast
    • Lunch
    • Dinner
    • Snacks
    • Dessert
    • Appetizer
    • Accompaniments
  • How To
    • Preservation Techniques
  • Travel
    • East India
    • West India
    • North India
    • South India
    • Asia
    • America
  • Lifestyle
    • Craft & Creation
    • Experiences
  • Musing
  • Contact
  • Bengali Blogs

Curries & Stories

pinterest facebook twitter instagram tumblr linkedin


peyajkoli
DIY Hand Painted Backdrop 


7 December

I had this blog from like a decade and had never actually thought of having some kind of a formal or semi formal setup for taking my food pictures before the lockdown started. During lockdown I stumbled upon many fantastic home chefs who created magic in their food pictures too by the virtue of amazing props and backdrops. That was the start of the inspiration and I had finally decided after much deliberation to invest in a good backdrop. 

The first backdrop I got was in the month of April and now I own about 10+ professional backdrops. After using them for over 8 months I could understand which backdrops work for me and what kind of texture I love to work with. I thought of trying my hand at making some DIY backdrops myself because - I could end up saving some bucks, have the customizations I want in color and textures and also because the whole process of creating a backdrop from scratch is super fun!

So I thought before diving into the DIY process here are a few tips for the beginners who are just starting on their formal food photography journey. Now when you start looking for food photography backdrops you always face a couple of basic questions like-

- Where to start looking for a backdrop?

- Which are the reliable and cost effective backdrop providers?

- What kind of backdrops should I buy material wise?

- Which color/texture should I go for.

- Which size would be the best

1. Where 

While there are zillion more questions I had, these were some of the generic ones I feel. The answer to the first question is obviously Google. Pre-lockdown (in India) when I started my search there and there were these two names I got against which there were glowing reviews and a host of celebrity patrons - The Madras Prop Store and the Varai Prop Store.  This was way back in the month of April. After a little R&D I chose Madras over Varai as the former had an online order option back then.  But let me put a disclaimer, both of them are pretty pricy. No doubt about the quality they offer but when you are just starting out on your journey of investing on good backdrops you don't want to burn right through your pockets before you are convinced that your photography skills can justify the investment.

During the lockdown a plethora of businesses came up which offers quality backdrops at more affordable prices. A few of my personal favorites are India Prop Store and Bla Bla Props. I have used their professional backdrops in many of my food photos which you can checkout on my Instagram page. 

2. Material

A good food photography background can be made out of anything even some craft paper that you have lying in some corner of your home, cushion covers, any fabric or even your home floors and furniture. However, if you are planning on using the backdrop over and over again then I would recommend to stick to surfaces that are durable, stain-proof and waterproof at least.

Avoid reflective surfaces for food photography, as it may lead to bright spots or ugly reflections on your photograph. 

Now when I looked up the backdrops it had various categorizations as in - Painted, printed and wooden backdrops. That is basically the broad segmentation of backdrop categories. 

  • Hand Painted : Each of these backdrops are painted by hand to give the textures. Something like what we are going to do in this blog later. They have the best textures and colors and feel really premium. Quite pricy.
  • Printed : These are high quality printed backdrops. They come in canvas, vinyl and poly fabric. These are the ones which beginners can use, usually are much cheaper than the hand painted and wooden ones. Canvas printed ones have best quality while poly fabrics are not that great but does the job.
  • Wooden Backdrops : Wooden food photography backdrops are a great choice as they provide pleasing colors, grain, texture and could be either rustic or chic. You can barely go wrong with a wooden backdrop. But they are the most pricy ones. 

3. Size

For food photography, one doesn't really need huge backdrops like portrait photography. Anywhere around 2ft x 3ft is a good size for a good food photography premise. Both flatlay (using with camera angles from above the food) or when the camera is level with the food can be handled well. 

4. Color

The background should always compliment your food and not overpower it.  Background colors that are neutral, desaturated and not very flashy goes very well with any kind of food. So the first few colors you could try and add to your kitty are black/grey, white and maybe a warm shade of blue. Shades like yellow, red, pink are a little more difficult to contrast with the food and props than the neutral colors. At times instead of plain black color, you can go for shaded black color or one that has a vignette look (decreased brightness around its edges). 

Now coming to the process of making a DIY hand painted backdrop at home. This is a project which is very close to my heart and I would like to share with all you folks.

Materials Required:

Base 

  • A cardboard/ MDF board - 2 ft x 3 ft
  • Scissor / sharp cutter - 1 (only needed if using cardboard)
  • Wide Masking tape - 1

Base Texture

  • White cement /Plaster of Paris - 1 cup
  • Fevicol - 1 tbsp to 2 tbsp
  • Mixing bowl - 1
  • Mixing spoon - 1 (I used an old butter knife)
  • Jointing Spatula - 1 ( I used a square cut out of same cardboard)
  • Water 
  • Paint Brush - 1
  • Newspapers - a whole bunch of newspapers to prevent staining your workplace
  • Tissue paper / old cloth - 1 ( for wiping off any unwanted splotches)
First Coat
  • White primer/ Enamel paint - 200 ml tin
  • Paint brush - 1
  • Gloves - a pair
  • Newspapers - a whole bunch of newspapers to prevent staining your workplace
  • Tissue paper / old cloth - 1 ( for wiping off any unwanted splotches)
Final Coat
  • Acrylic color - Black and white
  • A palate/ mixing bowl 2 (for colours) - 1
  • Kitchen sponge - 1
  • Newspapers - a whole bunch of newspapers to prevent staining your workplace
  • Tissue paper / old cloth - 1 ( for wiping off any unwanted splotches)
  • Transparent Artists fixative spray/ transparent varnish (Optional) - 1 bottle
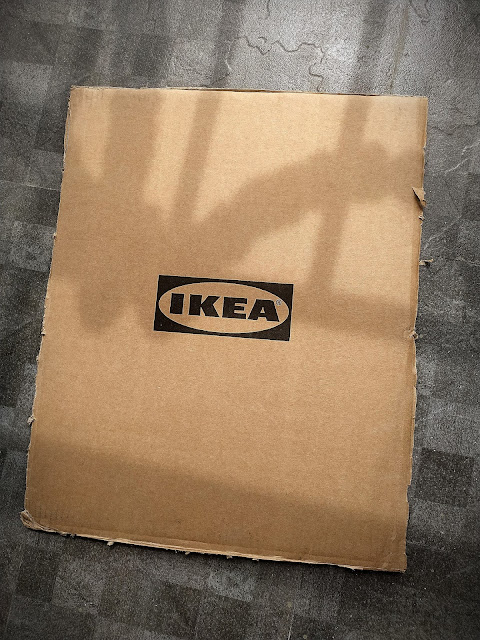
1. Start by cutting the cardboard/MDF board in a size of 2 ft x 3ft

Tip: You can go for MDF board if you get them, it will ensure a more durable backdrop. However cardboards also work well. In the photograph you cannot understand the difference of the material.

Note: I used one side of a IKEA packing box for this background


2. To prevent an irregular edge, especially when you are using cardboard, I used a wide masking tape around the edges to make them smooth.

DIY Photography Backdrop

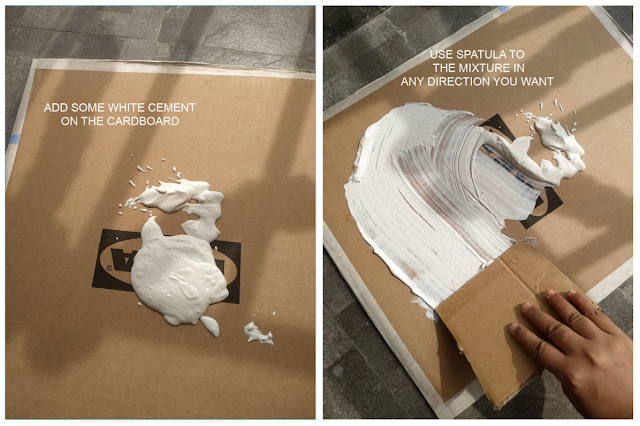
3. Now to create the texture base on the backdrop.  Take a mixing bowl and add about a cup of white cement, 1 tbsp of fevicol and a little water. We need a dense consistency just like the picture below. It should not be too dry otherwise it will fall off easily post drying.

Tip 1: Keep adding water little by little, so that the mixture doesn't become too liquid. If it becomes too runny then add more white cement to balance it.

Tip 2: You can use gesso if you want to avoid the hassle of creating a base mixture from scratch.

DIY Photography Backdrop

4. Once you have the base texture ready you need to work fast as it will start to dry very fast. First you spread newspaper on the work area ( you don't want the white cement to mess up with your working surface, I forgot to put the paper hence ended up messing my floor!). Place the prepared cardboard on top of the newspaper.  Now put a little mixture on the cardboard and start spreading it with the spatula. You can go any direction as we want an uneven texture on the backdrop. Let those edges and bumps be there as they give a very nice textured look to the cardboard.

Keep repeating the process - take a little mixture and spread on the board. You need to cover the board once and then if you have any mixture left you can keep touching up all the areas you want.

Tip: Work fast with white cement! Don't worry about the spatula strokes, we do not need a uniform surface.

Note : Since I didn't have a steel spatula I just cut off a square of the cardboard and used it as a spatula.

DIY Photography Backdrop


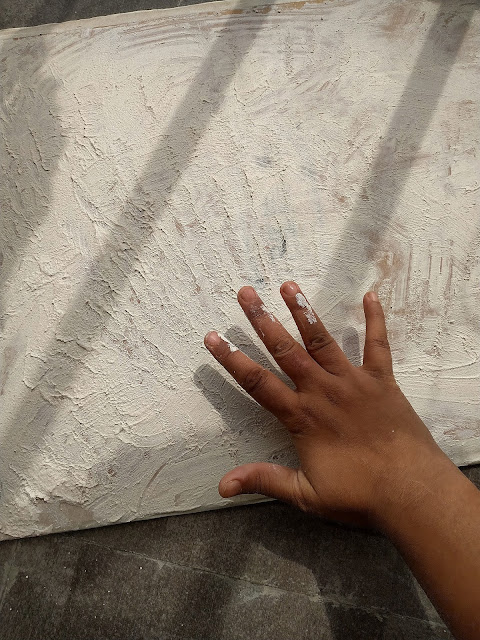
5. Once you have covered the cardboard completely, now you need to add the final texture. For this its best advised yo use your fingers. I wanted to give an uneven peak look all over the surface. Hence I spread all 5 fingers and just kept roughly tapping all over the surface. Refer to the picture below. However at this stage you can practically give any kind of shape to the surface. 

Tip: Work fast with your fingers, as the white cement will start to dry out 

DIY Photography Backdrop


6. Now let the white cement mixture dry off completely. Preferably keep it outside in the sun to dry. Depending on the outside temperature and humidity, the surface will take anything between 2 hr to 3 hr to dry out completely under the sun. 

Tip: Keep checking at regular intervals for its readiness. When the surface turns completely white and you can not feel any dampness, the base is ready.


7. Now its the turn to put the first coat.  Spread a lot of newspaper below and put the cardboard on it. Many people directly put the acrylic colors at this stage. But I wanted to ensure the surface is waterproof so at this stage I recommend you use a primer/ enamel paint to coat the whole surface. I used a white primer. Use a paint brush with big rough bristles to coat the surface. Again you don't need to paint meticulously. It is okay to do random brush strokes as long as you cover the surface. 

I gave like a two layer coat of paint. And then again let it dry under the sun. This will take a lot of time. So be patient. It took about 5-6 hours for me.

Tip : The paint takes time to dry, so don't hurry with the next step.

Note: Please have a gloves on if you want to avoid getting your hands messy. Primers are not that easy to get off your hands. But if you still accidently put primer on your hand use a nail polish remover to wipe off the paint from your hands. Please note soap and water would not take the primer off. So nail polish remover it is!


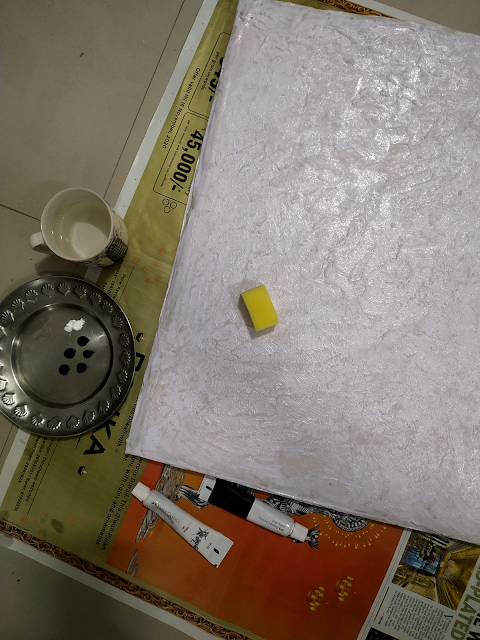
8. Now it is the time to apply the second coat that is the acrylic paint coat. Spread newspapers below the cardboard. Now on a paint palate or a plate add 5 drops of black + 1 drop of white paint. Mix it with a painting brush. We will consider this as color 1 : and it will be a dark gray shade.  


Cut the kitchen sponge into a square. Now dip the sponge into the color one half way through and then start dabbing it on the cardboard. Dip the sponge into the color and repeat till entire cardboard is covered.

Give two to three coating of the color to have a good coverage.


9. Once the complete cardboard is covered with color 1, keep it to dry overnight.

10. Now next morning we start with the next color shade. This will become the accent colour. So now take about 4 drops of white + 2 drops of black and make color 2: a light grey variation of color 1. Now take a sponge square again and dab the color 2 more around the center of the cardboard and a little towards the edges. 

DIY Photography Backdrop

11. Now again make color 1 (as mentioned above) and dab it with a sponge around the corners and the edges of the board to create a vignette effect. After this you can go on improvising depending on how you want the final look to be.

Let it dry out completely for a couple of hours.

Tip : You can also dab a little gold color here and there to create a rusted metallic look

12. As a final step to secure the colors of the backdrop coat or spray it with transparent varnish. I used camlin Artist's fixative spray. This acts as a weathercoat on the colors and keeps them lively for long.

This is an optional but recommended step. Store the backdrops in a place away from direct sun light.
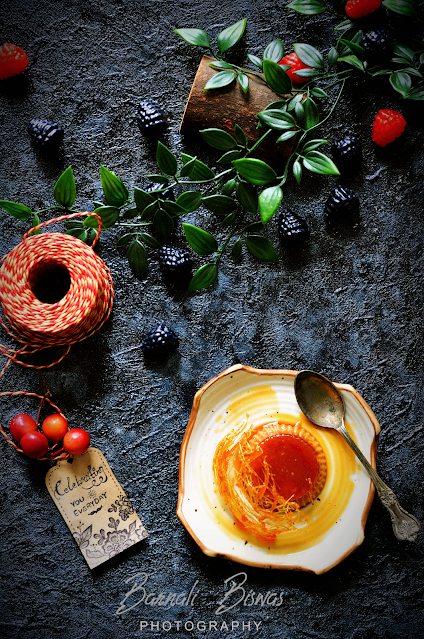
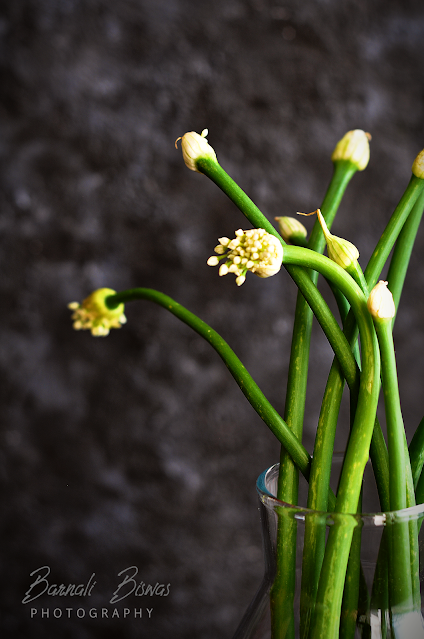
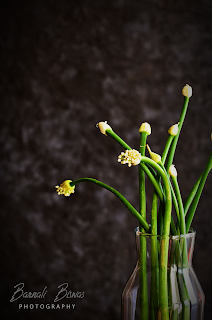
I have used the background in the first picture in this post ( Onion stem). And also in the Tea infused Crème caramel post background. So you can see the same background works wonderfully well vertically or horizontally.

DIY Photography Backdrop


Just to give you an idea of how much this would cost approximately.  -

  1. Cardboard - Rs 0 / MDF - depends on size 
  2. White cement / POP - Rs 20/ kg (Available at hardware store)
  3. Fevicol - 45 gm - Rs. 20
  4. Enamel paint - 200 ml - Rs 75 (Available at hardware store)
  5. Enamel paint brush - Rs 10 (Available at hardware store)
  6. Flat Brush - Set of 4 - Rs 140 (Available at stationary store/ online stores like Amazon)
  7. White & Black paint - Rs 200 - Rs 300 ( a full set of 12 colors would come at this price)
  8. Kitchen Sponge - Rs 0 - Rs 12
  9. Masking tape - Rs 20
  10. Cardboard spatula - Rs 0
This whole project would cost something around Rs 500-600 if you are starting from scratch. But it cost me only the price of the sponge Rs 12 as I had all the other things handy at home. Compared to about Rs.1000 to Rs 2000 that you pay for any professional background (mdf) this is way cheaper and you can definitely do the comparative math yourself.

And remember apart from the cardboard/MDF everything is reusable! So basically once you get these stuffs you can make more than one backdrops. 


DIY Photography Backdrop


Follow me on Instagram for more creative ideas and food photography : @curriesnstories07


Share
Tweet
Share
3 comments


19 November

Happy Men's Day to all the wonderful men out there!

I know it is not as hyped as Women's day but nonetheless there are times when we want to cheer for all the men in our lives who have been a great source of support and love in our journey of life.

And I don't think it should just be limited to specific defined relationships we share with men but also beyond that. It maybe just a colleague who is very supportive or even a house help. It can be your male pet who is your emotional lifeline or the server at your favorite food joint, who cares for your choices and customizes the food accordingly. Thus the choices to express your gratitude are infinite, it is just a matter of perspective.

For today I would like to express my gratitude to a dear friend of mine who had always been a constant source of encouragement and support even during the darkest hours. 

He is a certified chef and a successful entrepreneur and thus whenever I make any dish thinking about him it stresses me a lot because I know somewhere his chef instincts might kick in, especially if its something different I am trying my hands at and I might not be up to his expectation. But then again he has always been encouraging in everything I made so that assurance makes me become more adventurous at times.

We had a collaboration planned this week to make something special for the men in our lives to celebrate Men's day. While thinking about what to make I started to think about the dishes we had most number of times and what were the common favorites. There is this one soup - lemon coriander soup made by a restaurant on the F.C Road which would be our unanimous choice if I were to state one favorite dish. But if I went by the numbers of which dish we had most of the times in the past couple of years - it would be tea hands down! 

You would say what is so great about tea, it is just an everyday beverage. But not when you are not a tea lover. Funnily both of us were not tea lovers in the beginning. But for all the adda sessions we used to have, our default location would be this newly opened tea café again in the F C road - the Wagh Bakhri tea lounge. A beautiful cozy café with the most affordable and lovely teas. Since it was a tea joint obviously we always ended up ordering teas and eventually over the time each of us had a favorite tea of our own! Thus I guess tea is one of the most elemental thing in the whole journey we had together. And it was not just us, who ever we recommended the place to fell in love with the flavorful and creamy tea they served.

Check Out the DIY Background I made for this shoot.


Since tea is the one thing that we possibly had a zillion times at least over these years it was only fair that I tried to create something which would celebrate its essence and the association it has with us. Thus I decided to give a twist to the conventional Crème Caramel which is commonly referred to as the Caramel Custard.

Crème Caramel is one of the oldest and classic desserts known and it continues to be on the favorite list for many people across the globe. I had it first, when I came to Pune. The toffee like flavor of the caramel had intrigued me when I bit into the soft dessert. There was nothing in there which one wouldn't love - gooey caramel, creamy custard and vanilla overtones. To give it a twist, I decided to infuse the age old recipe with milk tea and cinnamon. Cinnamon was mostly to give it a nice wintery vibe because why not! 


This turned out very unique and I loved the new creation. To make it a perfect fit for the occasion I decided to create a complete story of our journey on the plate. I placed the custard on a black background to signify the dark times, the custard itself is a reflection of my friend who is a very sweet person and had become like the brightest star in my horizon when I needed it most, the caramel nest signifies a protective shield that the person had conferred over me but its in half because that protectiveness is not suffocating but more liberating and gives me wings to fly. As a matter of fact, its all due to his constant inspiration that I started exploring my creative side like never before - writing, cooking, photography, crafts, reading and the list keeps growing each day. He has made me a better version of myself and I hope this justifies the kind of gratitude I feel for him.  

I hope all of you enjoy this simple recipe. And once again a very happy Men's day to all of you.

Check Out the DIY Background I made for this shoot.


Preparation Time: 30 minutes  
Cooking Time : 45 minutes
Serving : 4-6 servings

Ingredients:
  • Full fat Milk - 500 ml
  • Large eggs - 3
  • Egg yolks - 2
  • Castor Sugar - 100 gm
  • CTC Tea leaves - 3 tsp
  • Cinnamon powder (optional) - 1 pinch
  • Vanilla extract - a few drops 
 
Equipment:
  • Non Stick Skillet
  • Pan to make tea
  • Pan to make custard
  • Custard molds

Procedure: 

Before you start making the caramel keep your mold ready in which you are going to make the caramel custard.

1. We start by making the milk tea which is the core aromatics of this recipe. No rocket since here, we just make tea the normal way we do. So we heat the milk with sugar and also throw in the tea leaves right in the beginning when we start boiling the milk. This will help in getting more color to the milk. Once the milk starts frothing switch off the flame and keep the pan covered to let the tea flavors steep in completely into the milk.

Tip: You can throw in some kaffir lime leaves as well at this stage of making tea. It gives a nice citrusy floral tinge to the overall custard. Or you can add lemongrass too, just for the citrusy aroma.

2.  Next we make the caramel. Heat a non stick skillet in high heat [do not burn the pan though!]. When the pan is heated up,  lower the heat to medium and add the sugar as per the volume of caramel you want to make. The heated up pan will help in melting the sugar faster. Stir  gently with a metal tablespoon until the sugar has dissolved. The base of the pan will no longer feel gritty when you run the spoon over it. 

At this point stop stirring the mixture and let it start browning. It will take about 2-3 minutes on medium flame for the caramel to start getting a golden hue. Watch the syrup carefully and when it starts to turn golden at the edges, swirl the pan to ensure even coloring. 

Once caramel is a deep copper color, lower the heat to the lowest or you may turn it off for a bit too.

Tip: I am recommending to keep the skillet on low heat as that will keep the caramel liquid for you to work on it. But if you feel it may burn turn off the heat for a bit, use the caramel and when you find it getting hard, turn the heat on medium again to make it liquid.

Note: I have seen people recommend to add water when making caramel but I didn't add when I made the caramel and it turned out perfectly fine.

3. Now you have to quickly work on the next step as caramel tends to solidify very quickly. Place the molds on a tray and spoon in the caramel from the skillet into the molds carefully. Be very careful as the caramel would be super hot and can give you bad blisters! We fill about 1/5th of the mold with caramel. 

4. Now is the step to prepare the custard. Combine the milk, cream, sugar in a saucepan and bring to a simmer over medium-high heat, stirring occasionally. Remove the pan from the heat.

Whisk the eggs, yolks, cinnamon powder and vanilla in a medium bowl and then slowly add the hot milk mixture, whisking constantly. Strain the mixture through a fine sieve. Portion the custard among the molds. It should just about fill each one. 

Now take a big vessel with a flat bottom and place the molds at a distance from each other in the vessel. Fill the vessel with water until it comes one-third to halfway up the sides of the molds(be careful not to splash water into the custards). Cover the molds with a plate (steel).Now cover the vessel with another lid and put the flame to medium. Let it get cooked in the steam for about 30 to 35 minutes until the edges are set but the centers still jiggle slightly when gently shaken. If the centers are more wavy than jiggly, cook them for some more time.

Note: You can use custard premix also in this step.


5. Remove the main lid off the vessel and let things cool down a bit before fishing out the custard molds from the vessel. Now transfer the custards to the fridge to chill for about 3-4 hours or overnight.

Note: If you are going to serve it a day after, make sure you are keeping the custard molds covered else they might dry out in the fridge.

6. When you are ready to serve, just take out the molds form the refrigerator, place a plate on top of them and then turn it upside down. The molds will release the custard onto the plate and the gooey caramel will flow down all its side. You can serve it as is or can top it off with anything you like.

7. For the caramel half nest you can use the same caramel you made in step 2. Take a bowl and grease it with some oil. Now take a spoon of caramel, tilt it a bit to make the caramel start dripping and take it over the bowl and in cross cross motion keep moving your spoon over half of the bowl to create a mesh. Don't bother about the design of the mesh, it can be anything you can manage to make! The caramel will soon solidify. Now very carefully take out the bowl from under the nest and there you have your half nest. You can make a full nest too your choice. If you see some uneven shape just carefully break away those parts to create a uniform half dome.

Check Out the DIY Background I made for this shoot.


Share
Tweet
Share
No comments


14th November

Wish you all a very Happy Diwali! Stay blessed, stay healthy and stay happy.

Today it will just a quick 'mishti mukh' [sweet for the mouth literally] on the occasion of Diwali. Super hectic week and weekend due to all the ongoing Diwali preparations. 

Chaler payesh is the quintessential sweet recipe from Bengal. Payesh is prepared with rice and full fat milk and when it is made during the winter months, we always add the seasonal favorite nolen gud to add sweetness, flavor and color. Its a mandatory accompaniment with the meal during all the special days and festivals- Durga Puja, Diwali, birthdays, anniversaries etc.

Preparation Time: 5 minutes  
Cooking Time: 15 minutes
Serves: 2
Cuisine: Bengali

Ingredients:
  • Gobindo bhog chal / Indrayani Rice/ any fragrant rice- 5 tsp
  • Full cream milk - 400 gm
  • Bay Leaf - 1
  • Raisins (Black or normal) - handful
  • Nolen gur (optional) 2 tbsp
  • Sugar - 2 1/2 tsp

Procedure

1. Wash and keep the rice soaked in water for 30 minutes.

Note: I have used both gobindobhog rice or Indryani Rice (which we get in Maharashtra) for this kheer and both works amazingly well.

2. Heat a heavy bottomed kadhai and add the full cream milk. Add the bay leaf. Let it come to a rolling boil and then add the soaked rice. Reduce the flame to medium. Keep stirring it continuously so that layer doesn't form on the milk.

Tip: If you are using Indrayani Rice, by nature the rice is a little hard, so in that case add the rice and milk together in the kadhai to give the rice some extra time to cook.

3. When the milk is reduced to half add the sugar. Keep stirring frequently it till the rice is cooked completely.

Note 1: If you are not using gud then increase the amount of sugar to equal amount of rice. In this case 5 tsp.

The recipe for perfect sweetness is 1:1 rice to sugar.

Note 2: Please do not leave the kheer to cook and wander off, as it gets cooked it will quickly start sticking to the pan. Additionally you do not need malai to form on the top of the kheer which will mess with the final texture. So keep stirring every 1 or 2 minutes.


4. Add the raisins at this stage

5. Meanwhile grate the gud and make a paste of it with water and keep aside.

6. When the payesh is almost done, switch off the flame and add the gud to it. Fold in. Make sure you add the gur only after heat is switched off else the milk might curdle.

Let it rest for a while. Top it off with some chopped nuts fried in ghee, rose petals or liquid gud. Serve the payesh hot or cold.

Meanwhile some of the Diwali pictures from this year.


Share
Tweet
Share
No comments


8th November

I already feel the winter! Bright sunny days, chilled evenings, fresh winter vegetables in the produce market, the compulsory addition of ginger in the teas...finally this year feels good. 

The weekend has just whizzed past and now while I write this on a Sunday night I feel like I need another weekend immediately to offset these two days. It has been a mad crazy weekend due to ten thousand things that had to be done before the Diwali week. Cleaning, cleaning and more cleaning. Gawd where does this much dust come from on 10th floor!! I will never be able to fathom that. Then there was shopping to do for the pujas - both from the local market and from amazon and flipkart. You never can let go crazy deals na, even if you are on the edge of being bankrupt, sniff. As much as I resent spending so much, I really was tempted for a few things. 

Finally I am beginning to reap some benefit from the social media after all these years! Brands have been reaching out to me more frequently now for collaboration and even though it might be very small scale right now, but I was super excited when I received my first collaboration product. So that also adds to my already tall list of work. It is exhausting but it is rewarding as well. It feels good when someone appreciates what you do.

Then there was another person on Instagram who one day out of the blue told me that they were gonna try out one of my recipes from the blog. that was a pleasant surprise but I felt so humbled. People actually saw value in the contents I create. Its not that I am talking to the wall most of the times. This makes me motivated to push harder, make better contents and do more experiments in the kitchen.

Something nice is coming up in Instagram this week. I am going to announce a contest there. So all those who have an Instagram account check it out. It has lovely prizes for the winners and also special prizes for some of the special mentions.

Now coming to the recipe. Busy week means I end up spending a lot less time in the kitchen, especially for making lunch. This weekend I just wanted to clear my fridge and also make something real quick for lunch. I would have just made Maggi with vegetables as I do many a times when I don't have time. But I remembered a Ramen recipe I had recently seen and wanted to try. I scanned my pantry for the necessary stuffs. Coconut milk check, spring onions check. Surprised? yes that's about what you need to make this amazing recipe.  I did an egg check also as I wanted to add a sunny side up egg. And yes I had a few paneer cubes ready for some other subzi, so I thought to throw them in as well. But the last two things are totally optional. 

This would make a delicious and comforting meal when you’re craving something warm, light yet satisfying. The toppings and noodles are extremely versatile, so everyone can pick and choose how to style their bowls and add on practically anything you want.


Preparation Time: 15 minutes  
Cooking Time : 10 minutes
Serving : 1 bowl

Ingredients:
  • Maggi Noodle / Ramen - 1 Packet
  • Full fat Coconut Milk - 1 and a 1/2 cup
  • Spring onion - 1/2 cup chopped
  • Cracked Pepper - 1/2 tsp
  • Sugar - 1/2 tsp
  • Salt to taste
  • Oil - 1 tsp
 
Equipment:
  • Skillet


Procedure: 

1.  Cook the noodles as per instruction in water without adding the spice mix/ flavoring oil. Usually I bring the water in the pan to a rolling boil, add a pinch of salt and then drop in the noodles. With a fork I separate out the noodles and let them boil for about 5 minutes on high. Boil till the noodles are 3/4th cooked.

Tip: Do not cook the noodles till the end, else it will turn mushy. 3/4th cooked is what we are doing in this step because in next step we are again going to cook it. 

Note: You can basically use any brand's instant noodles for this recipe. So no stress there!

Note 1: We will add the spice mix/flavouring oils at a later stage.

2. Now drain the water from the noodles using a strainer. Put it under running water to stop further cooking. Drizzle about 1 tsp of oil and toss the noodles. Let the water drain totally.

3. Now in a skillet on medium heat, warm the coconut milk.  It will slowly start bubbling a bit. add the sugar and stir in. At this stage add the 3/4th cooked noodles. Keep the flame low to medium as it might stick to the pan. Fold everything in gently and let the noodles cook the remaining 1/4th. Which will roughly take 2-3 minutes. 

Tip: This recipe tastes nicer with a little sweetness. But if you are not a fan of it then you can skip it. The coconut milk will impart a little sweetness on its own.

Tip 2: If you do not have coconut milk, you can use coconut milk powder and mix it with warm full fat milk and it will give you similar outcome

Note: You can vary the amount of the coconut milk based on whether you want a normal noodles texture or a soupy noodles texture. For soupy noodles add more coconut milk and vise versa.

Note 2: Please don't ruin this recipe with skim milk. Full fat coconut milk is what you need for that super creamy texture.

4. Add the spice mix of the ramen/noodles and fold in while the noodles is still cooking.

5. Now add the chopped spring onions and fold in. Do not skip this step. This is what makes the recipe come together. 

6. Add cracked pepper, a pinch of salt and stir in. Once done top it off with more spring onion.

Serve warm with your favorite toppings - sunny side eggs, poached eggs, tofu, paneer cubes, more spring onions, chilli flakes, sprouts, mushroom, purple cabbage etc...the choices are infinite.


Share
Tweet
Share
No comments
Newer Posts
Older Posts

About me

I am a software engineer by profession and a writer at heart. Born and brought up in Kharagpur, I moved to the city of dreams Mumbai when I got my first job. Till then I had not cooked a single dish in my life. Not even Maggi or tea. My dad had a strong belief that his little princess never will be in a situation where she had to cook for herself. Hence I was not allowed to spend time in the kitchen till I was studying.


So when I faced the daunting task of living alone, dabbas came to initial rescue. After that I managed a whole year on just boiled vegetables and rice. And then I landed in US. The bounty of fresh produce and cooking ingredients available in the super marts eventually lured me into making my very first meal ever. There was no turning back after that. I finally discovered how much I was in love with cooking and being creative in the kitchen.


This blog is a humble attempt to present our culinary heritage to one and all and document some of the very traditional recipes which gets passed on through generations just by word of mouth.


So just sit back with a cup of tea or coffee and enjoy the curries and the stories related to each.


Follow Us

Footprints

Blog Archive

  • ▼  2026 (4)
    • ▼  May (1)
      • A Suitcase Full of Stories: My Heartfelt Shopping ...
    • ►  January (3)
  • ►  2025 (3)
    • ►  December (1)
    • ►  June (1)
    • ►  February (1)
  • ►  2024 (21)
    • ►  December (2)
    • ►  September (1)
    • ►  August (3)
    • ►  July (4)
    • ►  May (2)
    • ►  April (5)
    • ►  March (3)
    • ►  January (1)
  • ►  2023 (7)
    • ►  December (2)
    • ►  November (1)
    • ►  October (1)
    • ►  May (1)
    • ►  March (1)
    • ►  January (1)
  • ►  2022 (18)
    • ►  September (1)
    • ►  August (2)
    • ►  July (2)
    • ►  June (3)
    • ►  April (1)
    • ►  March (3)
    • ►  February (2)
    • ►  January (4)
  • ►  2021 (60)
    • ►  December (5)
    • ►  October (5)
    • ►  September (5)
    • ►  August (7)
    • ►  July (6)
    • ►  June (5)
    • ►  May (3)
    • ►  April (4)
    • ►  March (6)
    • ►  February (6)
    • ►  January (8)
  • ►  2020 (55)
    • ►  December (5)
    • ►  November (3)
    • ►  October (10)
    • ►  September (7)
    • ►  August (7)
    • ►  July (9)
    • ►  June (3)
    • ►  May (9)
    • ►  March (1)
    • ►  January (1)
  • ►  2019 (3)
    • ►  November (1)
    • ►  April (1)
    • ►  January (1)
  • ►  2018 (1)
    • ►  December (1)
  • ►  2017 (4)
    • ►  December (2)
    • ►  November (1)
    • ►  September (1)
  • ►  2016 (10)
    • ►  August (1)
    • ►  July (2)
    • ►  June (5)
    • ►  April (1)
    • ►  March (1)
  • ►  2015 (10)
    • ►  December (1)
    • ►  August (1)
    • ►  June (1)
    • ►  May (2)
    • ►  April (4)
    • ►  March (1)
  • ►  2014 (22)
    • ►  November (2)
    • ►  August (2)
    • ►  July (3)
    • ►  June (2)
    • ►  May (4)
    • ►  April (3)
    • ►  January (6)
  • ►  2013 (22)
    • ►  November (2)
    • ►  October (4)
    • ►  September (5)
    • ►  August (2)
    • ►  July (1)
    • ►  June (1)
    • ►  May (2)
    • ►  April (1)
    • ►  March (1)
    • ►  February (2)
    • ►  January (1)
  • ►  2012 (31)
    • ►  December (4)
    • ►  October (3)
    • ►  September (8)
    • ►  July (1)
    • ►  June (1)
    • ►  May (14)
  • ►  2010 (9)
    • ►  July (3)
    • ►  June (2)
    • ►  April (1)
    • ►  March (2)
    • ►  February (1)
  • ►  2009 (4)
    • ►  February (2)
    • ►  January (2)

recent posts

Pinterest Board

Popular Posts

  • Champaran Mutton / Ahuna Mutton - A Bihari Delicacy
      When I finish a long week of work, self doubt, frustration of dealing with people and finally when the weekend comes, I feel cooking somet...
  • Khandeshi Kala Masala - Kala Mutton Masala
      25 September Maharashtra is a land of unique local flavours. And still it is mainly known for its Vada Pavs, poha, pav bhaji and modaks. I...
  • Kochur Dum / Kochur Dalna / Arbi Masala/ Taro or Colocasia Curry
    August 19 Kochu or taro is one of my favorite vegetables. It is as versatile as potato only much more tasty. It is equally starchy an...
  • Tetor Macher Jhol (Bitter Gourd Fish Curry)
    Anything Bitter hardly finds takers. Same applies for Bitter Gourd. As a kid I hated bitter gourd in any form. Grown ups around me would...
  • Macher Bhorta | Fish Bharta | Mach Makha| Bengali Style Mashed Fish
      October 18 Bhortas or bharta as we call it in pan India, are the quintessential Bengali food, a staple in Bangladeshi cuisine. They are th...
  • Complete Details to plan your ISKON Mayapur Visit
    Radha Madhav during Pushya Abhishek on 6th Jan 2023 First of all wish you a very happy new year. I have been away from blogging for a while ...
  • Kumro Phool bhaja (Pumpkin Blossom fritter) and a Jade trip of Konkan in rains
    Rains , Lush green forest laden mountains, Cascading milky white waterfalls, cloud filled valleys, Turbulent coastlines,...
  • Varhadi Mutton - A Traditional Vidharba Cuisine
    Varhadi is a dialect of Marathi typically spoken in Vidarbha region of Maharashtra. Vidarbha is the north-eastern region of Maharashtra ...
  • Golda Chingri Malaikari (Giant River prawns in coconut milk gravy)
    One of the main reasons I love Kolkata is because of the fish we get here. Its so fresh and one can get restaurant grade fish quality even i...
  • About Slow Travel | Spice2Nuts - a spice initiative by Harish Bali (Visa2Explore)
    Moments from my travels - 1. Forest in Meghalaya 2. An old boat in Shnongpdeng 3. Fish Mint 4. Local Cinnamon  Traveling has always been a p...

Liebster Award

Liebster Award

Very Good Recipes

Very Good Recipes

You can find my recipes on Very Good Recipes

Contact Us

Name

Email *

Message *

Pages

  • Travelogue Index
  • VEGETARIAN RECIPE
  • CHICKEN RECIPES
  • SEAFOOD RECIPES
  • MUTTON RECIPES
  • RICE RECIPES
  • EGG RECIPES
  • DAAL RECIPES
  • ROTI & PARATHA RECIPES
  • BAKING RECIPES
  • SWEET RECIPES
  • SNACKS RECIPES
  • SIDES RECIPES
  • SOUP RECIPES
  • SALAD & BOWLS RECIPES
  • ROASTED RECIPIES
  • JAM & PRESERVE RECIPES
  • BEVERAGE RECIPES
  • SAUCES, SPICES & CURRY BASE RECIPES
  • CHUTNEY & DIPS RECIPES
  • FESTIVE RECIPES
  • Contact Us
  • TRAVELOGUES OF EAST INDIA
  • TRAVELOGUES OF WEST INDIA
  • TRAVELOGUES OF SOUTH INDIA
  • TRAVELOGUES OF NORTH INDIA
  • TRAVELOGUES of ASIA
  • North East Recipe

This Blog is protected by DMCA.com

DMCA.com for Blogger blogs
FOLLOW ME @INSTAGRAM

Curries n Stories © 2020 All rights reserved.
Created with by BeautyTemplates