• Home
  • Recipes
    • Vegetarian
    • Seafood
    • Snacks
    • Chicken
    • Mutton
    • Egg
    • Roti & Parathas
    • Dessert
    • Sides
    • Soups
    • Salad & Bowls
    • Rice
    • Daal
    • Bakes
    • Roasted
    • Beverages
    • Sauces, Spices & Curry Base
    • Chutney & Dips
    • Festive Recipes
  • Cuisine
    • Bengali
    • Maharashtrian
    • Rajasthan
    • Punjab
    • Chennai
    • Andhra
    • Mangalore
    • Mughlai
    • Kashmiri
    • Chinese
    • Singapore
    • Mexican
    • Continental
    • Italian
    • French
    • American
    • Thai
    • Bangladeshi
    • Arab & Persia
    • North East
  • Meal Type
    • Breakfast
    • Lunch
    • Dinner
    • Snacks
    • Dessert
    • Appetizer
    • Accompaniments
  • How To
    • Preservation Techniques
  • Travel
    • East India
    • West India
    • North India
    • South India
    • Asia
    • America
  • Lifestyle
    • Craft & Creation
    • Experiences
  • Musing
  • Contact
  • Bengali Blogs

Curries & Stories

pinterest facebook twitter instagram tumblr linkedin
Brazilian Lemonade

The mercury has already touched 43 Degrees in Pune from the last few days. It feels like we have been put inside a pressure cooker and getting cooked on dum. Now I know how the poor ingredients might feel when we cook them in a cooker! 

Now a days we are trying trying our hands at new recipes for summer coolers. One of the coolers which caught my fancy from quite sometime now is the Brazilian lemonade or Limeade. After watching about a trillion videos on it I thought of trying it out. It seemed such a easy peasy recipe - just throw in some lime, condensed milk, sugar and water and you are done! Simple enough recipe which comes together in 10 minutes . But there is a small catch - the characteristic of this lemonade is slightly on the bitter side. So if you don't like bitter taste in your drink,  this is not for you. 

Things you can do to reduce bitterness:

  • Many people would show you they just make lime quarters and blend everything with the condensed milk. But that would make your drink very bitter because of the pith. The white part of the lime/ lemon under the skin is called pith and causes bitterness so that has to be removed to reduce the bitter taste.
  • Don't blend for too long, pulse and pause on your blender and repeat.
  • It has to be consumed fresh, the longer it sits the bitter it becomes

This frothy creamy drink is sweet, tart and mildly bitter at the same time. This drink is definitely not everyone's cup of tea no matter how much the videos try to convince you. So if you want to try out something with complex flavors you may try this out.


Preparation Time : 5 minutes 

Making Time : 5 minutes 

Serves - 2 adults

Ingredients :

  • Lemon - 2, cut into wedges
  • Sweetened Condensed Milk (Mithai Mate) - 50 gm
  • Sugar - 1/4 cup (adjust as per taste)
  • Cold Water - 2 cup
  • Ice Cubes 
  • Lemon wedges (for garnish)

Brazilian Lemonade


Procedure :

1. Take out the juice from the lemon wedges in a bowl. Take care that no seeds are there. 

2. Add lemon juice, Cold water and sugar to a blender. Blend it for about 10 seconds on low.

3. Sieve the mixture through a strainer and discard any pulp. 

4.Now transfer the strained liquid into the blender, add the sweetened condensed milk and pulse 2-3 times until frothy.

Pour this drink over a glass full of ice cubes. Garnish with lime wedges and serve immediately 

Other Summer Cooler Recipes:

  • Kokam Juice Recipe 
  • Mango Banana Smoothie
  • Mexican Horchata Recipe
  • Mojito Popsicle 
  • Beetroot Rose Sorbet 

Brazilian Lemonade


Share
Tweet
Share
No comments
Mashed Potato


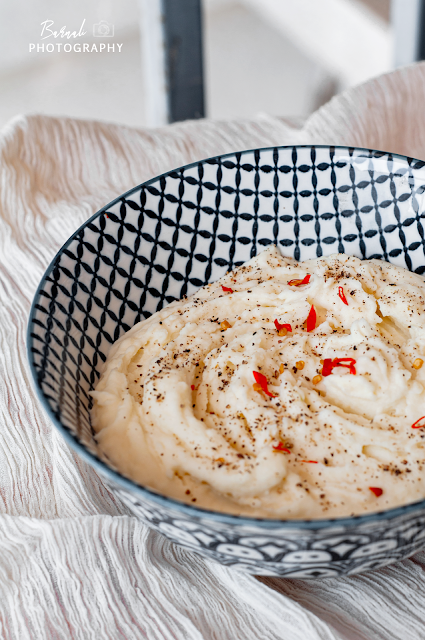
Last week there was a customer visiting one of our Pune offices from US. I was asked to anchor a few presentations for the customer for which I went to office - first time after November 14 last year. That was the fateful week when I got diagnosed with Sciatica followed by a very painful period of 3 months to recover. I think I will write about my Sciatica recovery journey in details so that it may help anyone looking for some light in the dark tunnel. But that's for a different blog. Let's come back to the present, when I was asked to visit office for the customer visit. The visit went really well as the customer was one of the most kindest and delightful personality, almost felt like he was just like Santa Claus by his personality and looks. So after wrapping up our presentation it was time for lunch. For all such corporate lunch events, usually our company has tie ups with various five star hotels who provide the food based on customer preference of cuisine. This time the food was from Sheraton grand, it was a complete Western platter - Chicken Steak in brown gravy, mashed potato, fish schnitzel and stir fried vegetable as salad. Looking at the brand name of Sheraton, my expectations rose and I was salivating at the thought of having a succulent piece of well seasoned chicken followed by some dreamy creamy mashed potato. In case if you did not know, I just love a good mashed potato, and this was the first time I was about to try one from a five star kitchen. It took just a bite of the mashed potato to abruptly crash my billowing expectations. The mashed potato was bland, grainy, dry and seemed like someone had just literally mashed a boiled potato and served. No where, I repeat not where it resembled a traditional mashed potato, which is supposed to be fluffy, creamy, melt in mouth gorgeous. The Chicken steak  lacked seasoning and the gravy was just a lumpy mass. The icing was the fish schnitzel which had a very thin layer of fish and had become cold by the time it reached the table. The customer in fact asked me what was he eating, might be because he did not identify any of the dishes which were supposed to be made as per his palate. No offence to Sheraton Grand, but I felt mortified in front of my customer. At the same time I also realized the mashed potato I make at home is hundred times more delicious and authentic than the one served by the five star hotel. 

So it was the obvious decision to share my version of mashed potato recipe with all of you. Mashed potato is like a Bengali Aloo seddho on a sedative! Hence I strongly feel all Bengalis would any day love a mean potato mash. This mashed potato can be enjoyed on its own or you may also make a traditional brown gravy to serve along. I would definitely recommend making the gravy as it just compliments the mashed potato and levels it up deliciously.

Preparation Time : 15 minutes 
Cooking Time : 40 minutes 

Serves - 2 adults

Ingredients :

For Mashed Potato
  • Potato - 2 big (skin on)
  • Water - for boiling
  • Milk - 1/2 cup
  • Fresh Cream - 3 tbsp
  • Butter - 2 tsp
  • Fresh Garlic - 3 cloves 
  • Fresh ground pepper powder - 1 tsp
  • Salt - As per taste
For Gravy
  • Chicken Stock - 3 cups
  • Chicken bullion cube - 1
  • All purpose flour - 2 tsp
  • Milk - 1/4 cup
  • Butter - 3 tsp
  • Thyme - 1 sprig 
  • Salt - To Taste

Mashed potato with gravy
Mashed potato topped with brown gravy


Procedure - Mashed Potato:

1. Wash and rinse the potato, making sure there is no dirt on the potato skin.  Make deep gashes on the potato to ensure it is cooked through. Now take enough water in a pressure cooker and add salt. Boil the potatoes in a pressure cooker for 3-4 whistles with skin on. Adjust the whistles as per the quality of the potato.

Tip: Instead of boiling the potatoes with skin on, you can peel off teh skin, chop the potatoes in small pieces and boil in water as well. But boiling the potato with skin on ensures the potato does not get watery when mashed. 

2. Once the potato is cooked drain the water and peel off the skin. This needs to be done when the potato is still hot so be careful.

3. Using a masher mash the peeled potatoes into a uniform texture. Use your fingers to feel any lumps in the mashed potato. If you still feel lumps then best way is to sieve the mashed potato through a steel strainer, pressing hard to ensure all lumps are broken down and the final mashed texture is lump free. Mash till you get a smooth, fluffy and light consistency. Do not mash too much as this will break down the starches more and make for a gummy texture.

4. While the potatoes are still hot you need to add the butter. If either the mashed potato or the butter is cold then you can put the mashed potato in the microwave for 20 seconds and then add the butter. This will help the butter to melt evenly. Mix well.

5. Now finely grate the garlic cloves and make it into a paste. Add to the mashed potato and mix well.

6.  Now fold in the fresh cream and milk mixed together. 
Tip: warm the fresh cream and milk a bit before adding to the mashed potato for best results. You can always add more butter, warm milk , fresh cream to get your desired consistency.

7. When everything is well integrated and the texture is silky and smooth, add the seasoning and the pepper powder.
Tip: The salt balance is the game changer in this recipe. You need to add the right amount of salt as per your taste to avoid it being bland.

Serving Tips: Mashed potatoes are served warm. So you can make mashed potatoes in advance and while serving warm it in the oven and add a few teaspoon of milk while you are reheating, then give it a nice stir and serve. You can top it off with some fresh herbs, pepper powder or some butter. 

Procedure - Mashed Potato 

1. Take a microwave safe mixing bowl and break the chicken bullion cube. Add milk and the chicken stock to this and give it a nice stir. Pop it into the microwave for about 30 seconds making sure the chicken bullion cube is dissolved well. 

Check the seasoning in this mixture, sometimes the chicken bullion cube contains a lot of salt, so make sure you check the seasoning and adjust accordingly.

2. Now melt butter in a saucepan over medium heat. Add the flour, thyme and whisk together till it turns golden brown.

3. Now add the stock mixture into teh saucepan and give it a good stir. Add pepper powder and stir constantly till the mixture comes to a boil.

4. Reduce heat and continue to stir until thickened. You will see they are slowly turning a shade of light brown. That's your cue to take it off the heat. Do a final taste test and you are good to go.

Serve it over your warm mashed potatoes, steamed chicken or rice and enjoy!

Additional Tip : If you have some leftover gravy then just fry some chicken cubes with salt and pepper and then pour over this gravy, cook for 5 minutes and you have a quick chicken gravy good to go with rice!


Share
Tweet
Share
No comments

Mango Smoothie

31 March

This year has been going super slow in terms of food blogging it seems. I just noticed today that I only have posted 9 blogs in the year so far and already we are at the end of a quarter. Last year this time I had already 20 posts. I have not even done half of it so far and hence this quick post. The workload is frankly quite high and hence the time for social activities has gone down drastically. Plus this summer heat doesn't help either. The more hot and sunny it gets the more I feel my creative juices get into hibernation mode. The light is just too harsh even at early morning to get some good shot even indoors. 

Though I do have a basic studio lighting setup but still I don't feel like dragging all my equipment out when I am already feeling lethargic due to to the weather. So most f the times if you have noticed I prefer shooting in natural light unless there is a deadline to shoot at unholy hours. The point is managing the exposure with this strong sun, is a task in itself. But then lazy people like me still find jugadu ways to navigate the situation. From the time lockdown started I had been shooting with a professional camera and  I tried out shooting in the various light situations across all the rooms in my house. I had read about this suggestion from a professional photographer who had given this important tip to beginners who are starting out on food photography to explore the light in all the available spaces in the house to get a fair enough idea which light at which time of the day works best for which kind of food shots. Like my guest bedroom has a window where I can get the best backlight. Whereas the living room is best to shoot everything with a sidelight. And most of the times I have seen I like the outcomes when I use sidelight. They really accentuate the textures and bring out the colors. 

When I started off, flatlays were my favorite photography angle. One of the main reason was when I had a lot of food in the scene I could accommodate all of them easily in a flatlay and number two reason was I was shooting mainly gravies which most of the time didn't have much of a height element to emphasize. There was a point I felt that I am only food in flatlays and other angles like straight on angle or 25-75 was not meant for me. And I had concluded that without even trying to learn the other angles or composition styles. That is what happens to most beginners, we struggle to find a niche and then don't want to come out of that comfort zone. We give up even before we try and keep repeating the same thing for years instead of exploring new things in which we might even be better. 

Mango Smoothie


After a point I was bored with the same kind of setup. Plus flatlays at times leaves very little to imagination as you expose all the cards or the elements of your composition in the frame. Everything is right there in the frame, very little is hidden away from the sight. Also to fill a frame you need a lot of elements - that was taxing. I had to cook at least 2 sides with a main dish to fill in the gaps in the frame. Too much time went for cooking and very little time left to setup the frame and think about a good composition. When I say good composition - I mean a frame which might tell a story, which my give you some fodder for thoughts, or have a technicality which might pique the interest of the audience. At that time I was just shooting flat frames with just the food. 

So I started spending some time on Instagram to look for inspirations. I found that Indonesian and Middle eastern food photographers did wonderful creative food frame which left you looking at the frame for long thinking who did they manage to get a certain effect. I am not saying the European or American food photographers are bad, but the aesthetics brought on the table (literally) by the Indonesian photographers appealed to my taste. The way they used the light, the way they brought in traditional utensils or local produces and created a rustic looking frame was simply mind blowing for me. I did notice they give a lot of importance to tiny nuances in the frame like a speck of chilli or a pod of garlic etc. and it was definitely not a minimalist frame. But the main takeaway was, creating moody frames aesthetically. 

I keep looking for such kind of inspiration everyday and anytime anything catches my fancy I save it or bookmark it. While I cannot say I am an expert photographer now, I have certainly come a long way from 2020. I can confidently say, now I understand a few things better than what I did when I started off and it definitely makes me happy. Even if its a delta growth I feel happy. Checkout for behind the scene for this particular frame on my Instagram feed to see how this shot was setup.

Today morning as I was making my breakfast I thought of shooting it as well. I think I had mentioned in a previous blog that I was turning to healthy food options slowly. Most of the days my morning breakfast is different king of smoothies. They are so easy to make that you don't even need to put your mind into making one. Just throw in the ingredients and blend. Some days I add nuts or chia seeds to make things a little interesting. I feel smoothies get a robust texture and and nice body when you add banana to it along with any other fruit of your choice. Moreover bananas add a natural sweetness to the smoothies as well. More than a pure Mango smoothie I like the taste of the combination of mango and banana. Try it once if you haven't yet. 

And if you think smoothies are the most boring things to start your day with, nothing can be far form truth. I know because I was also one of those people who didn't get excited at the thought of smoothies first thing in the morning. The first small step was to convince myself to start my day with something healthy and have controlled portion of food throughout the day. Having smoothies for breakfast is a great way to portion control and yet have a filling breakfast. The banana in the smoothie helps keep you full for a long time till lunch so that you don't feel any mid morning hunger pangs. Also a small tip is to replace sugar with honey, it helps loose weight over a period of time. This is a really really simple recipe and I will put some other smoothie recipe soon. 

Soaking Time : 10 minutes
Preparation Time : 5 minutes

Serves - 1

Ingredients :
  • Ripe Mango Chunks - 1/2 cup 
  • Banana - 1
  • Milk - 200 ml
  • Honey/ Sugar - 2 tsp or as per taste 
Ingredients for garnish:
  • Chia Seeds - 1 tsp
Equipment:
  • Blender
Procedure: 

1.  Soak the chia seeds in 3 tbsp of water for about 10 minutes.

2. Add all the ingredients - milk, banana, mango and honey in high-powered blender.

Note: I prefer to have cold smoothie hence I use chilled milk but you can use room temperature milk too.

3. Blend for 1-2 minutes until you get a smooth and creamy texture.

Note: Color will depend on the quality of the Mango used

4. Pour into serving glasses. Top it off with soaked chia seeds. Enjoy!

Mango Smoothie


Share
Tweet
Share
No comments

30 December

I know I am super late for this post but then a good savory pastry recipe never gets outdated isn't it? This is just like the usual chicken pastry which is glammed up for a party.  And its the perfect party pleaser for a cozy house party on the new year eve. Pune folks are anyway going to be following the curfew hours from 9 PM due to new restrictions imposed and ring in the new year from the comfort of our home. 

This beautiful puff pastry is filled with the goodness of fresh spinach, chicken, cheese and Italian flavors. It looks super cute and is super fun to assemble. It may look complicated but pulling the pastry to make those starry shape is where all the fun is. You can just put on your imagination hat and stuff it with any filling of your choice and you are good to go. Add a glass of wine and a Netflix playlist of Korean romcoms to the scene and nothing can sound more appealing to me when I think of a cozy night at home.

Preparation Time : 20 minutes

Baking Time: 20-25 minutes

Ingredients :
  • Puff Pastry Sheet  - 1 (thawed)
  • Chicken - 100 gm, cut into small pieces
  • Mushroom - 1/2 cup, cut
  • Garlic - 4 cloves, finely chopped
  • Spinach - 200 gm, chopped
  • Italian Seasoning - 1 tsp
  • Pepper powder - 1/2 tsp
  • Cheese - 1 cup cut into small pieces
  • Egg - 1
  • Salt as per taste
  • Butter - 1 tbsp
  • Olive Oil / Refined Oil - as required
  • Sesame Seeds - 1 tsp

Ingredients :
  • Skillet
  • Brush
  • Paring Knife
  • Rolling base and pin
  • Baking tray

Procedure: 

1.  Preheat oven to 180 Degree. 

Note: I made this in the convection mode of microwave at 200 degree.

2. If you have frozen pastry sheet then you need to thaw it as per the packet instructions. It can be thawed in the refrigerator overnight or in room temperature for minimum 40-50 minutes.

Tip: When you thaw it at room temperature, keep checking the pastry sheets every 15-20 minutes whether its ready or not. Gently press the ball of your finger in the middle of one of the sheets. f your finger leaves an indentation, the pastry is ready to be used. 

Note: To thaw in the microwave, remove 1 pastry sheet from the box and outer wrapping and wrap in a paper towel. Microwave on HIGH for 15 seconds.

3. Slice the mushrooms and onion.  Wash the spinach and drain the water. Chop the spinach into medium size. 

4. In a skillet, heat oil and butter. When hot, add chopped garlic and a pinch of salt . Sauté for a couple of minutes.

5. Add chopped onion and spinach. Sauté them till the spinach starts to sweat, for a about a couple of minutes. Squeeze the water from the spinach and keep aside. 

6. In the same pan add a knob of butter. Sauté the mushrooms till they sweat and caramelize a little. Take it off the flame and keep aside.

7. Slide the butter cube into the same pan. Once hot add the chicken pieces. Add salt and pepper powder. Fry on medium flame, till the chicken is done. Keep aside.

8.  Now in a mixing bowl crack open an egg and whisk it to make egg wash. 

Prepare the Puff pastry base:

1. Transfer the puff pastry to a sheet of parchment paper. Roll out the puff pastry. Use a 10.5 inch dinner plate as a template to cut a large circle out of the puff pastry. 

2. Now take a 4 inch bowl as a template for the inner circle and gently press into the center of the pastry sheet to outline a smaller circle. Make sure to not cut all the way through the pastry sheet.

3. Use a sharp knife to make a perpendicular cut across the small circle. Make two more cuts across the small circle to create four equal triangles. Refer to the image.


Note: If the pastry becomes too soft to work with, just transfer it to the fridge for 5 minutes to firm up the pastry.

Assembling the Wreath

1. Now we start to make the layers of the wreath. We start by adding a few pieces of cheese all around.  

Note: It is recommended to use mozzarella to get the gooey texture, but if you do not have mozzarella use any cheese of your liking. You can also vary the amount of cheese.


2. Spoon in the sautéed spinach next in a ring around the puff pastry leaving an inch boarder around the outer edge.


3. Now add the sautéed chicken, mushrooms and some more cheese pieces on top. Add some Italian seasoning on top and sprinkle some salt. 


3. Now pick up the tip of one of the center triangles and carefully wrap it over the filling and outer edge of pastry to seal. Use a little water and pinch the edges of the pastry as shown below. Continue with each triangle, wrapping over the filling to create a wreath.


4. Now brush the pastry surface with egg wash generously. 

5. Sprinkle toasted sesame seeds on the surface where egg wash was brushed. 


6.  Now bake in the pre-heated oven at 180 degrees for 20-25 minutes until the pastry becomes golden brown.

Serve warm with your choice of drink.

Wish you all a very Happy New Year in advance!


Share
Tweet
Share
No comments


Making pumpkin puree at home is a breeze. You really don't need to purchase the canned ones. This post talks about an easy recipe on how to make pumpkin puree from scratch. Use this delicious pumpkin puree in all of your favorite fall and holiday recipes. 


Which type of pumpkin works best?

Choose smaller baking pumpkin. "Sugar pumpkins" or "pie pumpkins" are what you want to look out for. These are smaller, fleshy varieties with are usually less watery and have better flavor.

Should you add sugar or any spice mixes to your Pumpkin Puree?

While you certainly can  add sugar or any spices to the puree, it is recommended you keep it as is without adding any additional seasoning. This will ensure you can use the puree for making both sweet or savory dishes later on.

Which all recipes can be made with Pumpkin Puree?

There is an array of recipes you can make with the pumpkin puree like pumpkin breads, pumpkin muffins, pumpkin drinks, pumpkin butter, pumpkin soup, pumpkin sauce for pasta and many other recipes that you can think of.


Preparation Time : 10 minutes 
Baking Time : 30 - 40 minutes
Serves - 3 cup

Ingredients :
  • Red Pumpkin - 1 small whole pumpkin / 500 kg pumpkin
Equipment:
  • Baking Tray
  • Parchment paper
  • Knife
  • Oven

Method

1. Using a sharp knife, cut pumpkin in half lengthwise. Then use a sharp spoon to scrape out all of the seeds and strings. Now cut lengthwise wedges.

Tip: Smaller pumpkins have more flavours. The bigger they are, the flavours are not that rich. You want a small pumpkin with firm, deep orange flesh to make the best Roasted Pumpkins.

2. Pre heat oven to 180 degrees Celsius/ 360 degrees Fahrenheit

3. You can remove the peels prior to baking if you want. I kept it on. 

4.  Line the baking tray with parchment paper. Arrange the pumpkin wedges in a single layer on the prepared baking tray. 

5. Bake in the preheated oven for 30-40 minutes until fork tender.

6. Cool until you can safely handle the pumpkin wedges and then peel off the skins. Scoop out the soft flesh into a food processor, depending on how large the pumpkin is, you may need to do this in two batches. Process until very smooth, a couple of minutes.

7. You can use this puree in any recipe immediately or store it in the freezer for later use.

8. To store in the freezer, spoon about 1 cupful of pumpkin into each plastic storage bag. Seal the bag with just a tiny bit of an opening remaining, then use your hands to flatten out the pumpkin inside the bag and push out the air. Store them in the freezer until you need them. You can freeze it up to 3 months. 


Share
Tweet
Share
No comments


22 October

As the calendar starts points towards October I feel a great amount of joy. It not only that time of the year when we Bengalis have our biggest festival - Durga Pooja or the entire country is into Navratri and Diwali celebrations but it also means my most cherished festival Christmas is not far behind. 

But before December October and November are the months which remind me of the beautiful fall time I had experience while living in Atlanta. We used to go on so many roadtrips in the Blueridge parkway region. I absolutely used to love those vibrant fall colors enveloping the rolling hills. 

But fall didn't only mean roadtrips or camping for us, it also meant Halloween, thanksgiving and baking some amazing stuffs with the seasonal pumpkins. The house would smell like a bakery - cinnamony, spicy , warm and bright. Those delicious pies and breads would make everyday of autumn so much more enticing. India doesnt really have a vibrant fall season. But still those experiences linger on in my mind and owing to lockdown situation last year I did have some time on hand to try a few autumnal recipes for the first time in India. 


This time however I was better prepared to welcome autumn. I made sure I had purchased a bottle of all spice before fall arrived. Homemade pumpkin spice, roasted pumpkins, pumpkin pies, pumpkin drinks - you name it and I have it on the list. I don't know how much of it would be feasible in reality, as I have a lot of travel plans in the next 15 days, but still I will try to indulge as much as I can :D.

Big basket actually surprised me this year with a new variety of small, dense, flavour rich and sweet pumpkins. They look super cute as you can see from some of these pumpkin shots, fitting right into my expanded palms. They taste absolutely heavenly. There is a dish in Bengal which we call seddho bhat - boiled vegetables with steamed rice and a dollop of pure ghee. Pumpkin is a very essential veggie in that Seddho bhat preparation. And with this pumpkin seddho bhat tasted like never before! I tried a bunch of Indian recipes before I thought let me now try some true blue autumnal recipes from the states.

Hence today here I am talking about the very basic Roasted Pumpkin recipe. This is the basic step before you use pumpkin in any of the other recipes. You can make a sweet or a savory roasted pumpkin depending on what you are going to use it for. This is a savory recipe meant to be had as a side. Indians can have it with your rice and daal too. I will also post a recipe later for pumpkin puree.


  • Do you leave the skin on when roasting pumpkin?
  • It depends on the type of pumpkin and on your preference. I prefer leaving the skin on as it helps hold the shape.
  • How do you ensure the roast pumpkin isn't soggy?
  • To prevent sogginess, you need to roast the pumpkin at high heat. I baked it at 200 degree in my convection oven.
  • What do you do with the seeds?
  • When making roasted pumpkin do not discard the seeds. They can be later roasted with spices to make a delicious healthy snack!

Preparation Time : 10 minutes 
Baking Time : 20-25 minutes
Serves - 2 -3 adults

Ingredients :
  • Red Pumpkin - small 1/2 pumpkin
  • Olive Oil - 1 tbsp
  • Garlic Powder - 1/4 tsp
  • Red Chilli Powder - 1/4 tsp
  • Rosemary Twigs- 1
  • All spice powder (Optional) - a tiny pinch
  • Salt - for sprinkling
Equipment:
  • Baking Tray
  • Parchment paper
  • Knife
  • Oven

Method

1. Using a sharp knife, cut pumpkin in half lengthwise. Then use a sharp spoon to scrape out all of the seeds and strings. Now cut lengthwise wedges.

Tip: Smaller pumpkins have more flavours. The bigger they are, the flavours are not that rich. You want a small pumpkin with firm, deep orange flesh to make the best Roasted Pumpkins.

2. Pre heat oven to 200 degrees Celsius/ 400 degrees Fahrenheit

3. In the meantime make the spice mix. The spice mixture can be changed as well according to your taste or needs. I used a very basic spice mix for this comprising of olive oil, garlic powder, chilli powder, all spice powder.

Tip: You can substitute chili powder with smoked paprika.

Tip: Garlic powder can be substituted by grated garlic.

4. Rub the wedges with the spice mixture until coated all over

5. Line the baking tray with a parchment paper. Now Arrange the pumpkin cubes in a single layer on the prepared baking tray.

6. Sprinkle with a little salt over the wedges

7. Bake in the preheated oven at 200 degrees Celsius/ 400 degrees Fahrenheit for about 20-25 minutes or until the wedges are as soft. Toss them once half way through and keep checking in between for doneness.

Let it cool for about 5 minutes and serve immediately. You can enjoy the spicy pumpkin wedges with a homemade yoghurt dip or as a side dish with your meals.


Share
Tweet
Share
No comments
Older Posts

About me

I am a software engineer by profession and a writer at heart. Born and brought up in Kharagpur, I moved to the city of dreams Mumbai when I got my first job. Till then I had not cooked a single dish in my life. Not even Maggi or tea. My dad had a strong belief that his little princess never will be in a situation where she had to cook for herself. Hence I was not allowed to spend time in the kitchen till I was studying.


So when I faced the daunting task of living alone, dabbas came to initial rescue. After that I managed a whole year on just boiled vegetables and rice. And then I landed in US. The bounty of fresh produce and cooking ingredients available in the super marts eventually lured me into making my very first meal ever. There was no turning back after that. I finally discovered how much I was in love with cooking and being creative in the kitchen.


This blog is a humble attempt to present our culinary heritage to one and all and document some of the very traditional recipes which gets passed on through generations just by word of mouth.


So just sit back with a cup of tea or coffee and enjoy the curries and the stories related to each.


Follow Us

Footprints

Blog Archive

  • ▼  2025 (2)
    • ▼  June (1)
      • Why I’ll Choose an Airbnb Over a Hotel—Every Singl...
    • ►  February (1)
  • ►  2024 (21)
    • ►  December (2)
    • ►  September (1)
    • ►  August (3)
    • ►  July (4)
    • ►  May (2)
    • ►  April (5)
    • ►  March (3)
    • ►  January (1)
  • ►  2023 (7)
    • ►  December (2)
    • ►  November (1)
    • ►  October (1)
    • ►  May (1)
    • ►  March (1)
    • ►  January (1)
  • ►  2022 (18)
    • ►  September (1)
    • ►  August (2)
    • ►  July (2)
    • ►  June (3)
    • ►  April (1)
    • ►  March (3)
    • ►  February (2)
    • ►  January (4)
  • ►  2021 (60)
    • ►  December (5)
    • ►  October (5)
    • ►  September (5)
    • ►  August (7)
    • ►  July (6)
    • ►  June (5)
    • ►  May (3)
    • ►  April (4)
    • ►  March (6)
    • ►  February (6)
    • ►  January (8)
  • ►  2020 (55)
    • ►  December (5)
    • ►  November (3)
    • ►  October (10)
    • ►  September (7)
    • ►  August (7)
    • ►  July (9)
    • ►  June (3)
    • ►  May (9)
    • ►  March (1)
    • ►  January (1)
  • ►  2019 (3)
    • ►  November (1)
    • ►  April (1)
    • ►  January (1)
  • ►  2018 (1)
    • ►  December (1)
  • ►  2017 (4)
    • ►  December (2)
    • ►  November (1)
    • ►  September (1)
  • ►  2016 (10)
    • ►  August (1)
    • ►  July (2)
    • ►  June (5)
    • ►  April (1)
    • ►  March (1)
  • ►  2015 (10)
    • ►  December (1)
    • ►  August (1)
    • ►  June (1)
    • ►  May (2)
    • ►  April (4)
    • ►  March (1)
  • ►  2014 (22)
    • ►  November (2)
    • ►  August (2)
    • ►  July (3)
    • ►  June (2)
    • ►  May (4)
    • ►  April (3)
    • ►  January (6)
  • ►  2013 (22)
    • ►  November (2)
    • ►  October (4)
    • ►  September (5)
    • ►  August (2)
    • ►  July (1)
    • ►  June (1)
    • ►  May (2)
    • ►  April (1)
    • ►  March (1)
    • ►  February (2)
    • ►  January (1)
  • ►  2012 (31)
    • ►  December (4)
    • ►  October (3)
    • ►  September (7)
    • ►  August (1)
    • ►  July (1)
    • ►  June (1)
    • ►  May (14)
  • ►  2010 (8)
    • ►  July (2)
    • ►  June (2)
    • ►  April (1)
    • ►  March (2)
    • ►  February (1)
  • ►  2009 (4)
    • ►  February (2)
    • ►  January (2)

recent posts

Pinterest Board

Popular Posts

  • Champaran Mutton / Ahuna Mutton - A Bihari Delicacy
      When I finish a long week of work, self doubt, frustration of dealing with people and finally when the weekend comes, I feel cooking somet...
  • Golda Chingri Malaikari (Giant River prawns in coconut milk gravy)
    One of the main reasons I love Kolkata is because of the fish we get here. Its so fresh and one can get restaurant grade fish quality even i...
  • Khandeshi Kala Masala - Kala Mutton Masala
      25 September Maharashtra is a land of unique local flavours. And still it is mainly known for its Vada Pavs, poha, pav bhaji and modaks. I...
  • Kochur Dum / Kochur Dalna / Arbi Masala/ Taro or Colocasia Curry
    August 19 Kochu or taro is one of my favorite vegetables. It is as versatile as potato only much more tasty. It is equally starchy an...
  • About Slow Travel | Spice2Nuts - a spice initiative by Harish Bali (Visa2Explore)
    Moments from my travels - 1. Forest in Meghalaya 2. An old boat in Shnongpdeng 3. Fish Mint 4. Local Cinnamon  Traveling has always been a p...
  • Macher Bhorta | Fish Bharta | Mach Makha| Bengali Style Mashed Fish
      October 18 Bhortas or bharta as we call it in pan India, are the quintessential Bengali food, a staple in Bangladeshi cuisine. They are th...
  • Varhadi Mutton - A Traditional Vidharba Cuisine
    Varhadi is a dialect of Marathi typically spoken in Vidarbha region of Maharashtra. Vidarbha is the north-eastern region of Maharashtra ...
  • Green Chilli Thecha || Maharashtrian Hirvi Mirchi Thecha || Green Chilli Salsa
     26 July Though I have been staying in Maharashtra for over a decade now, it was just a couple of years ago I started exploring the local or...
  • Baked Basa in Butter Garlic Lemon Sauce
      January 18 It doesn't feel like winter anymore. While I type, the blinds are drawn in the room, the fan is running on its maximum and ...
  • Dim Toast | Egg Toast | Dim Pauruti | Savoury French Toast
      April 25 Calcutta or Kolkata. A city known for its food and culture, where hospitality and love are synonymous with lip-smacking grub. Cho...

Liebster Award

Liebster Award

Very Good Recipes

Very Good Recipes

You can find my recipes on Very Good Recipes

Contact Us

Name

Email *

Message *

Pages

  • Travelogue Index
  • VEGETARIAN RECIPE
  • CHICKEN RECIPES
  • SEAFOOD RECIPES
  • MUTTON RECIPES
  • RICE RECIPES
  • EGG RECIPES
  • DAAL RECIPES
  • ROTI & PARATHA RECIPES
  • BAKING RECIPES
  • SWEET RECIPES
  • SNACKS RECIPES
  • SIDES RECIPES
  • SOUP RECIPES
  • SALAD & BOWLS RECIPES
  • ROASTED RECIPIES
  • JAM & PRESERVE RECIPES
  • BEVERAGE RECIPES
  • SAUCES, SPICES & CURRY BASE RECIPES
  • CHUTNEY & DIPS RECIPES
  • FESTIVE RECIPES
  • Contact Us
  • TRAVELOGUES OF EAST INDIA
  • TRAVELOGUES OF WEST INDIA
  • TRAVELOGUES OF SOUTH INDIA
  • TRAVELOGUES OF NORTH INDIA
  • TRAVELOGUES of ASIA
  • North East Recipe

This Blog is protected by DMCA.com

DMCA.com for Blogger blogs
FOLLOW ME @INSTAGRAM

Curries n Stories © 2020 All rights reserved.
Created with by BeautyTemplates