• Home
  • Recipes
    • Vegetarian
    • Seafood
    • Snacks
    • Chicken
    • Mutton
    • Egg
    • Roti & Parathas
    • Dessert
    • Sides
    • Soups
    • Salad & Bowls
    • Rice
    • Daal
    • Bakes
    • Roasted
    • Beverages
    • Sauces, Spices & Curry Base
    • Chutney & Dips
    • Festive Recipes
  • Cuisine
    • Bengali
    • Maharashtrian
    • Rajasthan
    • Punjab
    • Chennai
    • Andhra
    • Mangalore
    • Mughlai
    • Kashmiri
    • Chinese
    • Singapore
    • Mexican
    • Continental
    • Italian
    • French
    • American
    • Thai
    • Bangladeshi
    • Arab & Persia
    • North East
  • Meal Type
    • Breakfast
    • Lunch
    • Dinner
    • Snacks
    • Dessert
    • Appetizer
    • Accompaniments
  • How To
    • Preservation Techniques
  • Travel
    • East India
    • West India
    • North India
    • South India
    • Asia
    • America
  • Lifestyle
    • Craft & Creation
    • Experiences
  • Musing
  • Contact
  • Bengali Blogs

Curries & Stories

pinterest facebook twitter instagram tumblr linkedin

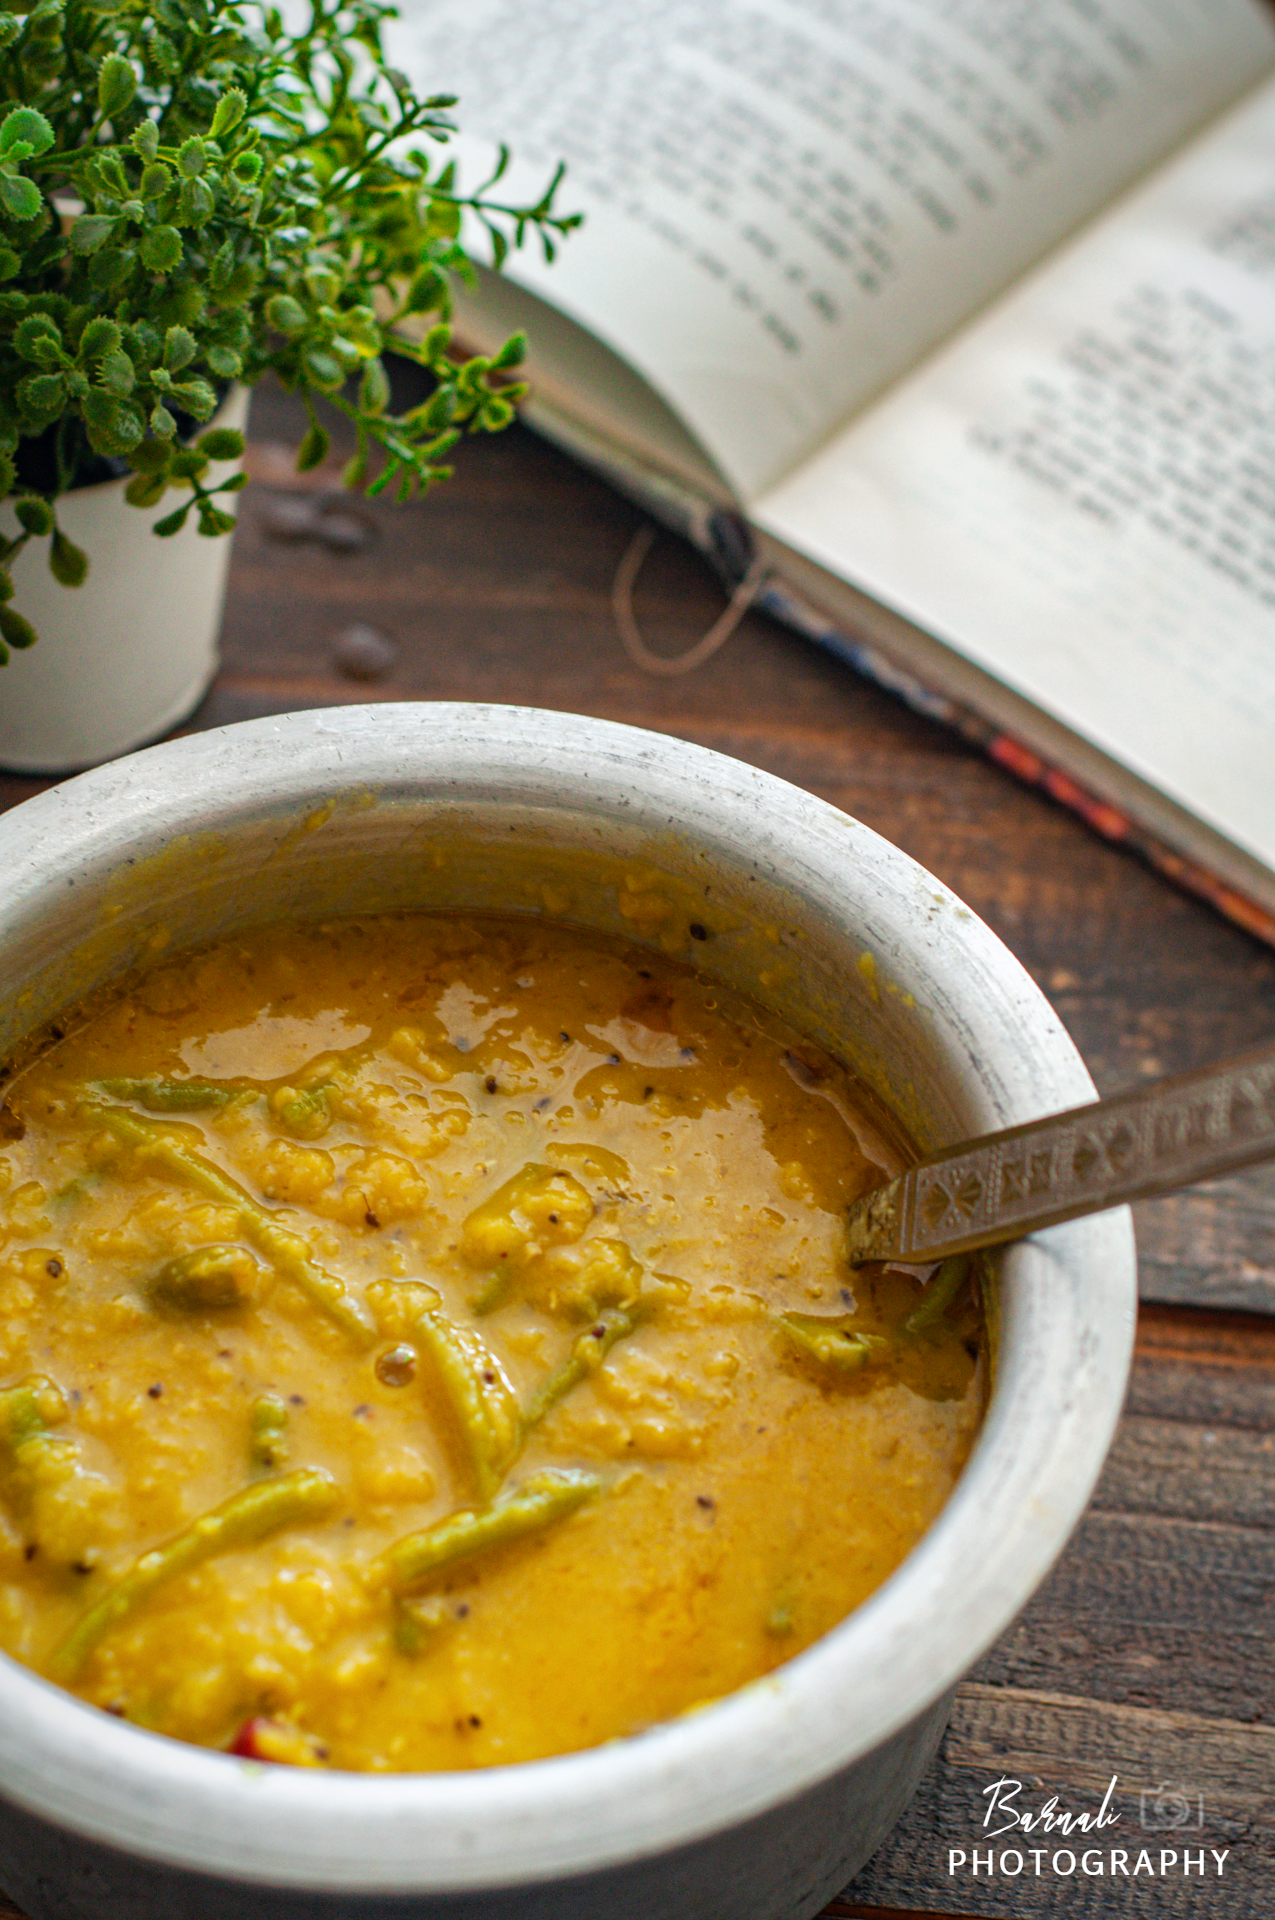
Datar Dal Recipe

This recipe is part of 'Best of Waste' series. As earlier you might have seen other recipes on my blog which were made using vegetable parts which are often discarded in our house holds. I will give a link of them towards the end of the blog.  Converting the vegetable waste into a unique dish is very satisfying for the soul.  It makes you feel like a culinary inventor if the dish ends up being awesome. 

In this recipe I have used the stems of the red saag which is known as Lal Shaak in Bengal and Red Amaranth in Maharashtra. The leaves are usually used to make a dry subzi and the stems are discarded here in Pune.  In Bengal however the thick stems of this Red saag is used for making dals and data chorchori. Thick stems have more flesh in them which makes it enjoyable to chew them. In today's recipe I have used the tender stems of the saag which my maid discarded after cleaning the saag. My maid at times questions my sanity when she sees me cooking with all these waste items. But when the final dish tastes and looks stellar she has to eventually agree that all these wastes pack a punch and can be actually made into nutritious and delicious recipes. 

Since tender stems are used, I made sure to take off any hard skin from the stems. Its very easy to remove them. Just cut the stems halfway through, you will see threadlike skins coming out, then pull the cut stems down which will also pull out teh threadlike skin with it. Keep repeating until you have all the hard skin peeled off. This is also needed as Lal saag stems tend to be a little hard and they don't soak up the seasoning from the dal. Removing the skin helps them absorb all the seasoning. 

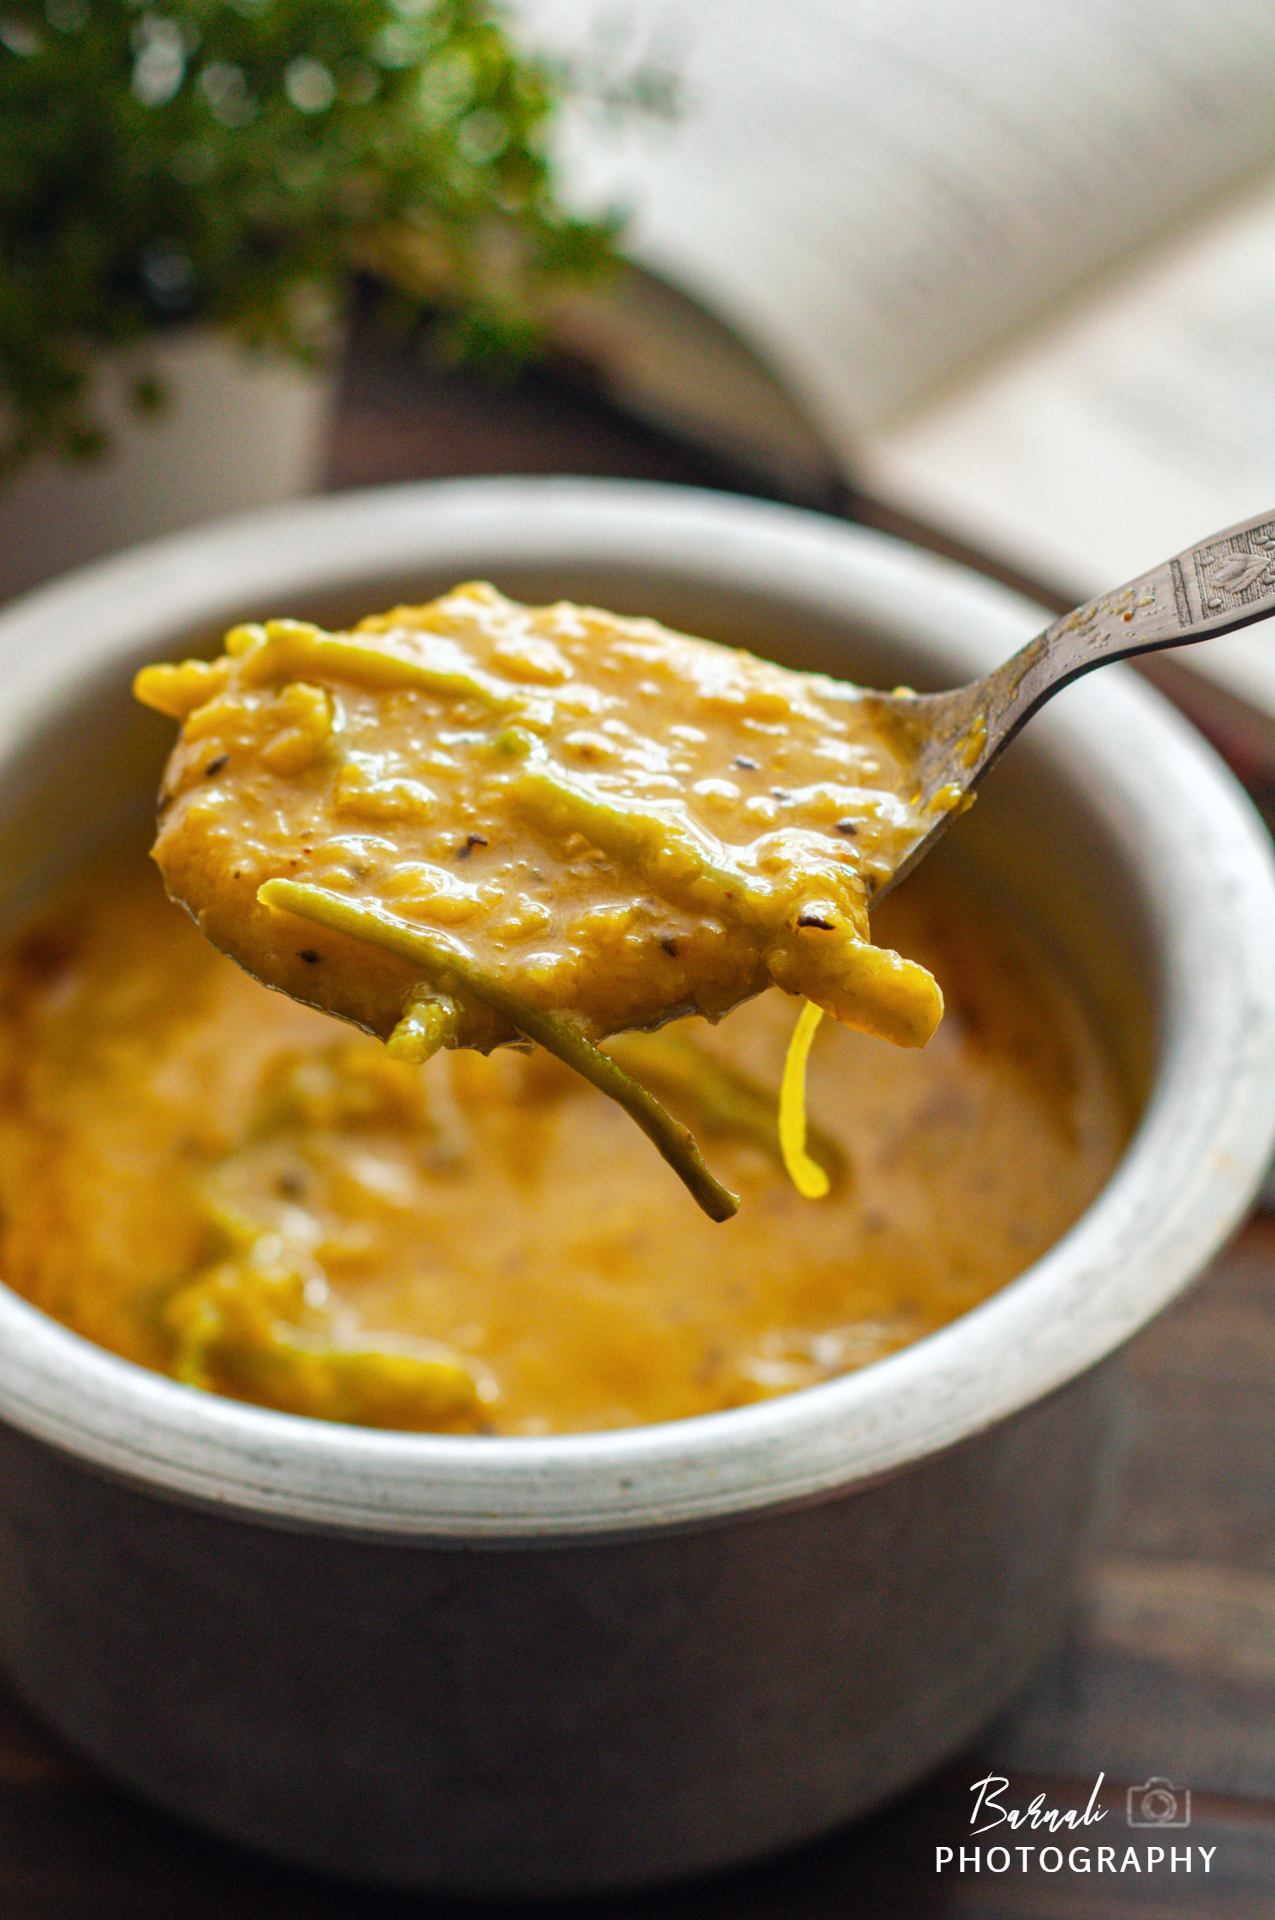
Now you might be wondering, the title says Red Saag Stems so why are the stems in the picture looking green? There is a scientific justification to this. Red vegetables lose their color when cooked because the pigments that cause the color, called anthocyanins, dissolve in water and leach into the cooking water causing color fading. Same is the case here, the color leached into the water in which it was boiled and the stems became green! Another surprising thing was, I did add the red color water into the dal when I boiled it but that did not make the dal red. Which means unlike Beetroot whose color is more pigmented and makes everything red, the Amamranth doesn't impart such a pigmented after effect. You can also make the same recipe with green Amaranth stems as well. The recipe is very earthy and pairs well with steamed rice and any vegetable on the side - perfect for hot summer afternoons.

Datar Dal Recipe

Preparation Time : 15 minutes 

Cooking Time : 20 minutes 

Serves - 4 adults

Ingredients :

  • Masoor Dal - 250 gm
  • Amaranth Leaves Stem - 50 to 100 gm 
  • Radhuni / Celery Seeds - 1 tsp
  • Green Chili - 2 (Slitted)
  • Red Dry Chili - 2 ( broken)
  • Bay Leaf - 2
  • Turmeric - 1/2 tsp
  • Mustard Oil - 2 tbsp
  • Water - As needed ( 2 cups or more as per consistency)
  • Salt - To Taste
Dal Recipe


Procedure :

1. Wash and rinse the masoor dal until all impurities are gone. Let it soak for about 30-40 minutes in some water. This will help in easily cooking the dal.

2. Meanwhile prep the stems. Cut the stems halfway through, you will see threadlike skins coming out, then pull the cut stems down which will also pull out the threadlike skin with it. Keep repeating until you have all the hard skin peeled off. This is also needed as Lal saag stems tend to be a little hard and they don't soak up the seasoning from the dal. Removing the skin helps them absorb all the seasoning. Cut all the stems into 2 inch pieces. Now wash the stems and keep it aside.


3. Now take a pressure cooker and put the washed stems inside. Add about 2-3 cups of water and 1/4th tsp of salt. Close the lid and cook it for a couple of whistles. Then immediately open the lid by placing the closed pressure cooker under running water and helping in the pressure inside to subside. Take out the boiled stems and keep the water ( red color) aside.

Tip: The key to making dals with vegetables is to have the vegetable stock cook with the dal. But if you boil the dal and the soft veggies together, the vegetables might disintegrate. So the tip is to cook them separately one by one. First the veggies, then use the veggie stock to cook the dal so that all the nutrients and taste remains in the dal as well.


4. Now take the soaked dal and add the red water from the steams boiled in Step 3. Top up with more water if needed, we only need to keep the water level as much in the pressure cooker to just submerge the dal. This ensures when the whistles start coming excess water is not flowing out.  Cook for a couple of whistles, and then let the pressure cooker stand till the pressure inside dies down naturally. 

5. Now open the pressure cooker lid and while the dal is still hot, using a ladle give everything a nice whisk for a couple of minutes so as to break down the dal into a uniform thick texture. Note that this makes the dal more tasty.

6. Now take a kadai and heat mustard oil. Once the pungent smell of mustard oil is gone and the oil is smoking temper it with bay leaves, radhuni and dry red chilies. Sauté it for a few seconds till you get the aroma of the spices. Now add the boiled stems from step 3. Sauté it for a few more minutes. Now add the whisked dal and fold in. Add salt, turmeric and slitted green chilies. mix everything well and cover the kadai. 

Tip : In case you dont have radhuni handy, you can replace it with Kalo Jire or kalonji or even the regular cumin.


7. Let it cook for about 3-4 minutes or until the dal comes to a rolling boil. Now drizzle some mustard oil on top and switch off the flame. Let is sit covered for the aroma of the mustard oil to incorporate with the dal.

Serve it with steamed rice and a choice of vegetables in the side. 

Other 'Best of Waste Recipes':
  • Lau er Khosha Bhaja
  • Beetroot Greens
  • Kach Kolar Khosha Bata


Share
Tweet
Share
No comments


Happy 76th Independence Day to all my readers! Today we are celebrating 75 years of independence and that is such a remarkable thing. the first jubilee day I had witnessed in my lifetime was the 50th year of Independence - the golden jubilee year. Back then we didn't have all the hoopla around the celebrations on social media. The only faithful media that we had was the Doordarshan and newspapers delivered to us the various news and images of the celebration. I tried to recollect what I was doing on this day back then, mostly like every year I think we had gone to school for the flag hoisting. No clear memory of the day that I can recollect. But this year the multi faceted celebrations started much ahead of 15th August. There were so many events and activities organized across the country. Hopefully if I get to see the next jubilee year, I would be recollecting more memories from this day than the 50th year celebration. 

While this day is meant to remember the sacrifices of the freedom fighters and looking forward to the new India in coming years, still a holiday on Monday gives us one more reason to celebrate and appreciate this day. Beautiful weather coupled with a much needed long weekend was just the thing I was looking forward to. And after a longtime I thought let me also pen down a recipe that I recently tried out. 

You can understand from some of my recent blogs that I am still into the Kahsmir mode, capturing all my tour diaries day wise. It gives such an adrenaline rush to be able to edit the travel pictures while revisiting the memories captured in each frame. I also realized that editing nature photographs are much more challenging than food photographs at times. The subject and light conditions outdoor are so dynamic that to bring the right amount of drama to any travel picture means a lot of hardwork on the editing table, because they were captured spontaneously. While when it comes to food photography, all the activities starting from what to make, cooking, plating, setting up the scene and then post editing, everything is calculated, measured and at times a little monotonous. I think that is the reason of late my food blogs have taken a back seat. It doesn't mean I am not cooking new stuffs these days, it just means that I am trying to enjoy the cooking and eating experience more than trying to capture every second of it. 

So after coming back from Kahsmir I started trying out different Pahadi recipes - from Kahsmir, Himachal or eastern states. I found that people in the mountains cook much more healthy meals than we city dwellers. Their food most of the times had less oil, less frying and a whole lot of more flavors. It is so interesting to be able to cook some unique dishes from the hills. While the taste may not always be 100% authentic but it is giving me a refreshing change in the regular menu. One such thing that I had learnt from Harish Bali's (Visa to explore) vlogs is Bhatt daal or bhat dal. I think he was travelling to uttarakhand in one of the videos where he spoke highly about how delicious this dal was. These beans dominate kitchens in the Garhwal and Kumaon regions of the state. Kala bhat or black soybean belongs to the leguminosae family. Soybean has seeds of many colours; the black one is rich in iron and protein. They are cholesterol-free, but contain linolenic acid, which has been found to prevent heart disease. I had tried looking for this daal locally but I got a different variant of black daal. So the next best option was to look up in Amazon and I got what I needed. Most of the variants I found on Amazon were the organic variant as this daal is still not mass produced for the cities. 

Bhatt ki dal is an iconic dish and a traditional Kumaoni recipe from Uttarakhand. I tried to make this Bhatt ki daal in a very simple way with very less masala and it turned out to be super yummy. I feel it is much tastier than the normal Rajma you et in the cities. It pairs superbly with steamed rice, jeera rice, rotis and even bread or pavs. Check out this yummy recipe below:


Soaking Time : overnight
Preparation Time : 15 minutes
Cooking Time : 50-60 minutes

Serves - 2 to 3 adults

Ingredients :
  • Bhatt/Bhat/ black Soyabean Dal - 200 gm
  • Onion - 1 medium sized chopped
  • Garlic Cloves - 10 fat crushed/chopped
  • Bay Leaf - 1
  • Tomato - 1 medium chopped
  • Black Pepper  - 1 tsp crushed
  • Garam Masala powder - 1 pinch (optional)
  • Green Chili - 2-3 chopped
  • Butter - 1 1/2 tsp
  • Refined Oil - 1 tsp
  • Salt - as per taste
  • Sugar - as per taste
  • Warm water - as needed
Garnish (optional):
  • Chopped Onion 
  • Chopped Coriander leaf Onion 
  • Chopped green chili
  • Lime wedge

Procedure:

1. Soak the Bhat dal overnight. Wash and drain the water. 

2. Switch on the heat. Place a pressure cooker on the stove and add butter. 

3. When the butter melts add the bay leaf, pepper powder, garlic, onion, tomato, green chili one by one. Fry for a minute till fragrant. 

4. Add soaked bhat daal and required amount of warm water. Add garam masala, salt and sugar. Note here sugar is just to balance the taste, the cooked beans should not taste sweet. Also note that this recipe does not need turmeric as it will clash with the natural flavors of Bhat daal.

5. Put the lid on and cook it for 10-15 whistles or enough time needed for the beans to get soft. Once done let it rest till the pressure dies and then open the lid. With a spatula give a nice stir or two and slightly mash a handful of the beans. This would help in increasing the consistency of the beans gravy.

Note: It took me quite a number of whistles to get this daal soft. If in a hurry there are two quick fixes for making the daal soft, either you can add a pinch of baking soda to the daal when you are cooking it, or place a steel spoon inside the daal. Both helps the daal getting cooked in fewer whistles. 

6. Once the daal has reached its desired thick consistency, add a knob of butter and give it a good stir. 

Garnish and serve it with rice or rotis and enjoy. 


Share
Tweet
Share
No comments


15 September

Raw papayas are considered very good for the stomach. When ever you need a happy bowel, a Bengali mother would always recommend you to have boiled raw papaya or what we call as seddho pepe. Full raw or partially ripened, seddho pepe always tastes awesome to me. There are many yummy vegetarian preparations in the Begali cuisine with Raw papaya and most of the times its cooked a little sweet apart from the time it is added to the daal. Cooking daal with vegetables is a common culture in Bengal. Usually Moong Daal pairs well with all sorts of vegetables and most of the time sobji diye moong er daal  (Daal with vegetables) is prepared on special occasions with seasonal produce. But pepe diye Moong daal ( Moong daal with raw papaya) is prepared like a everyday daal in a Bengali household. 

It is a simple hearty daal recipe, especially preferred during the summer months at my home. My mom used to find innovative ways to feed me vegetables when I was small, putting all the unattractive vegetables in daal was an easy way out for her.  As a result right from childhood I grew up loving this  preparation. This daal preparation doesn't have any bells and whistles but this makes up for a hearty meal when you pair it with any vegetable and steamed rice. 


Preparation Time: 10 minutes
Cooking Time : 20 minutes 
Serves - 4 adults

Ingredients :
  • Moong Daal - 200 gm
  • Whole Jeera - 1 tsp
  • Raw Papaya - 1 cup, cubed
  • Ginger Paste - 1 tbsp
  • Dry Red Chilli - 2
  • Turmeric Powder - as needed
  • Bay Leaf - 1
  • Salt as per taste 
  • Ghee - 1/2 tsp
  • Refined Oil/ Cooking Oil
Equipment:
  • Pressure Cooker
  • Kadai


Method
1. Dry roast on medium heat the unwashed Moong Daal in a wok till they are light brown and fragrant. You have to constantly keep stirring it so that they don't burn.

Tip: Roasting the daal perfectly is the key to a good bhaja moong er daal. The roasting decides how fragrant the daal will be. So be patient while you are roasting the daal and keep stirring,

2. Now wash the daal under running water to clean off any impurities and dirt. Transfer the roasted daal to a bowl and add about two cups of warm water. Cover and let the Daal soak for about 30 minutes to 1 hours, the more the better

Tip: Soaking the daal, reduces the cooking time.

3. Cut the Papaya into cubes. 

4. There are two ways to cook the papaya - either you boil it with the daal or you can shallow fry the papaya cubes in a kadai for about 1 minute and then add 1 cup of water and boil them separately in a pressure cooker. 

Note: The papaya I used had started to ripen, so I followed 2nd option. If you have a completely raw papaya, you can follow the 1st option as well.


5. Pressure cook the daal for 2 whistles or as required. Note that the daal should be cooked but not a mush. With a ladle give a couple of stir to mix the daal in the cooker after opening the lid.

6. Now put the pressure cooker with the boiled daal on medium flame and add salt and turmeric. Let it come to a boil and switch off the flame.

Note: If you have boiled the papaya with the daal, before this step take out the papaya cubes and keep aside, else they might get over cooked and mushy.

7. In a kadai, heat refined oil and ghee. When hot temper it with bay leaves, dry red chili and whole Jeera. 

Note: This recipe is made with white oil (refined oil) an ghee and not mustard oil which is commonly used in Bengali recipes.

8.When the spices are fragrant, add the ginger paste and sauté it keeping the flame on medium till the raw smell is gone. 

9. Now add the boiled papaya and the boiled daal. Let it simmer for about 4-5 minutes with lid on. Top it off with a dollop of ghee.

Serve it with steamed rice and vegetable of your choice.


Share
Tweet
Share
No comments

Motor daal Lau data shaak


March 11

It is getting hot! Last year this day we were already under lockdown. It still makes me shiver at the thought of how overnight our world had changed. I remember on Holi last year which was on the 9th March, very few people had gone down to celebrate. We already heard the news of Covid spreading rapidly and some folks were already detected in Pune. I had skipped going down to play and just enjoyed from my balcony watching people play down. No one knew right form next day, it would be a different story.

A year has passed and not much has changed. In fact history is kind of repeating again. Maharashtra is again showing a spike and Holi is just round the corner.  Fingers crossed this time. Hopefully we will tide through with minimum impact.

Meanwhile due to the hot weather, now all my recipes are turning towards simple , easy to digest and soulful dishes. No heavy tadkas or oily food especially. The dish I am talking about today is a daal prepared with tender stems of bottle gourd. While adding bottle gourds to daal is a common practice, in Bengal we also like to add the stems and greens of Bottle gourd with the daal. The health benefits of bottle gourd is also present in its greens. It keeps your body cool and easy on the tummy. The taste and aroma is an added incentive. Bottle gourd pairs up fabulously with Motor daal. Yellow split pea lentil or motor is is a very common household daal in Bengal, but I have never seen it outside Bengal. It has a very typical aromatics which might not be pleasant to all, hence we usually pair it up with some vegetables to balance out the aroma. The daal that I used in here is sourced from Bengal. You can however check in your areas, at times there are some vendors who keep sourcing Bengali food items. During lockdown, many such vendors made there presence in Pune, which was one of the best things that could have happened in this phase. If you cant get your hands on motor daal, you can as well use masoor daal (red lentils) for this recipe. 

This daal goes best with steamed rice and some basic stir fried subzis, like potato fry or bitter gourd fry. But you can also enjoy it with any other vegetarian subzis.


motor daal with lau data


Check Out the DIY Background I made for this shoot.


Preparation Time: 10 minutes  
Soaking Time : 30 minutes - 1 hour
Cooking Time: 10 + 10 minutes
Serves : 2 to 3

Ingredients :
  • Yellow Split Pea Lentil or Motor Daal - 1 cup
  • Lau Data ( Tender stems of bottle gourd plant) - 2 inch pieces ( 1 cup)
  • Radhuni / Celery Seeds - 1/2 tsp
  • Dried Whole Red Chilli - 2
  • Bat Leaf - 1
  • Turmeric - 1/2 tsp or as required
  • Salt - as per taste
  • Mustard Oil - for tempering
For 2nd Tempering :
  • Dried Whole Red Chilli - 1
  • Ghee - 1 tsp
  • Red Chilli powder - 1/2 tsp

Procedure

1. Wash the daal and soak it in water for about half an hour.

Pro Tip: If you are in a hurry and don't have much time to soak daal before cooking, just soak the daal in hot water. It brings down the soaking time to half or less.

2. Meanwhile cut the tender bottle gourd stems into 2 inch pieces. 

Tip: Select the stems which are tender but fleshy, especially the nodes

3. Now in a pressure cooker, add the stems and some water to submerge the stems. Pressure cook for 1 whistle. Then immediately release the pressure by putting the cooker under running tap water. Separate the stems and preserve the water.

4. Now take the soaked daal in the cooker and add the preserved water from Step 3 and additional water to pressure cook the daal. Once the daal is cooked, give it a good stir with the spatula to break it down and make the consistency thick.

5. Add the boiled stems back into this daal.

6. Now in a pan add mustard oil. When the oil is hot, temper it with bay leaf, radhuni, dried red chillies till fragrant.

7. Add the boiled daal and stems into the pan. Add turmeric and salt and fold in. Cover and cook on medium till it gets a rolling boil.

8. For a second tempering, take some ghee in a pan. Once hot add one dried red chilli and 1/2 tsp of red chilli powder. Let it sizzle for about 40 seconds. Now pour it over the finished daal.

Serve it with rice and subzi of your choice.


Motor Daal Lau data shaak


Check Out the DIY Background I made for this shoot.


Share
Tweet
Share
No comments


Usually sona moong daal has an elite status in Bengal . It's a smaller variant of the regular moong daal and is more flavorful than its counterpart. It is not that commonly found in rest of India however. But one can elevate the beautiful aroma of moong daal just by following a simple trick - dry roast it. It serves two purposes- the daal becomes more aromatic and also it doesn't stick to each other.  Popularly we call it as Bhaja Moong er daal or fried moong daal. Its sort of a misnomer, because we really do not fry it but dry roast it. The earthy aroma of dry roasted daal on slow flame gives the daal its characteristic flavor. 

We cook moong in both ways - with or without roasting. The without roasting variant has easier recipes while the roasted one follows an elaborate recipe to create a scrumptious daal loaded with beautiful spices, roasted coconut chunks, vegetables or fish. While it tastes awesome that way, the process is long and laborious. So when you are looking for a quick weekday daal, it really doesn't fit the bill. And that is the reason why I used to not make moong daal very often until a few weeks ago.

My mom told me about a very simple moong daal recipe comprising of only Kalonji (Kalo jire) and chillies in the tempering. Initially a person like me who is either used to adding whole garam masala or white jeera would find it hard to visualize how the Kalonji will go with the flavor profile. But when I did give it a shot, it turned out so amazing that it has now become one of my go to daals. Its quick, easy and delicious. The fragrance of kalonji fried in ghee weds the earthy aroma of roasted moong and creates a lingering magic.

Preparation Time : 5 minutes
Cooking Time: 20 minutes
Serving : 3-4 people

Ingredients :
  • Moong Daal - 250 gm
  • Kalonji (Kalo Jire) - 1/2 th tsp
  • Bay Leaf - 1
  • Green Chilli - 3, slitted
  • Ghee - 2 tsp +1 tsp
  • Turmeric - 1/2 tsp
  • Salt to taste

Method:

1. Dry roast the Moong daal in a flat pan, preferably with wide surface area, so that you can move around the daal uniformly. Do this on a low to medium heat.

Tip: Keep stirring the daal to roast it uniformly. If you let it just sit there, some might burn while others might not even be roasted.

Note: Daal has to be washed after it is roasted.

2. As soon as you can see them turning a light shade of golden brown and get a nice aroma, transfer them to another vessel and wash it nicely with water.

3. Transfer the washed daal into the pressure cooker and add necessary amount of water (add more water if you want a soupy daal). You can keep this to soak for about 30 minutes and then pressure cook, so that it gets cooked sooner or you can directly put it on pressure cooking for approximately 2 whistles. Let the steam die off and then open the lid and give it a nice stir. If the daal breaks a bit it will taste better and the consistency will be thicker.

3. Now in a wok add 2 tsp of ghee. Once heated add the kalonji, bay leaf and the slitted green chillies.

Tip: Remember to slit the chillies before adding to the ghee, else it may splutter.

4. Add the boiled daal and fold in.

5. Add turmeric and salt and give it a stir. Let it simmer for about 5-7 minutes on medium flame with lid on. Once it comes to  a rolling boil, switch off the flame and top it off with 1 tsp of ghee. Put the lid back on and let it sit till you are ready to serve.

Tip: Vary the ghee amount as per your liking. 

Serve it with steamed rice and choice of vegetable subzi or fritters.

Do try this out and tag me (@curriesnstories07) on Instagram on your photos whenever you try the recipe and I will give a shout out to you.


Share
Tweet
Share
No comments


Day 40 of lock-down

This is the last day of lock-down 2.0. And we already know the lock-down is extended by another 15 days. We knew it even before it was official. Now a new extension date doesn't bring in new anxiousness because somewhere we are used to this. The new ways of working efficiently. and frankly somehow I like this. No more morning rush to beat the traffic for reaching office. No long travel in the evening. More time at home, practicing all good habits, getting ample rest and investing in creative activities which were always put on back burner before. Not to add, watching the nature healing and thriving in a human intervention less world.

It was a long weekend with the additional Labor day holiday and today being a Sunday before another work week starts, wanted to make something simple and soothing. Bitter has become a part and parcel of my menu during lock-down. Different forms of bitter, be it in the form of subzi, or in daals or even in fish curries. They all taste great, work as a palate cleanser and is healthy too.

Our society is arranging vegetable vendors to visit us twice a week and and fruit vendors once a week. This arrangement was done to discourage people from venturing out unnecessarily in search of vegetables. Also, it was beneficial to the nearby farmers as well. They could sell all their produce in a hassle free manner. I had got some karela this week. Usually I was preparing karela ki subzis or stir fries on all the preceding weeks, so this time wanted to change that ritual and make a daal.

Tetor Dal is traditional Bengali daal which is often cooked during summer time in bengali homes. Teto means bitter in Bengali. Since bitter gourd is cooked with the daal hence the name. Traditionally ucche is used instead of Karela. But in my place I don't get ucche so I use Karela instead. There is hardly any difference of taste though. But inspite of the name, the daal doesn't taste bitter. In this, the bitter gourd is fried to a crisp before adding to the daal. This which adds a nice flavor and a mild bitterness to the daal. Thus even people who hate anything bitter in their meal, will enjoy this without any complains.

My mom usually makes this daal with matar daal. Matar daal itself has a very earthy fragrance. So it along with bitter gourd gives off a very unique flavor. Again, I don't get matar daal in my area so I had to look for the next best substitute. Today it is moong daal with karela, tempered with jeera, fresh ginger, dry red chillies and radhuni. Finally topped it off with ghee for that added flavor boost.


Preparation Time : 15 minutes
Cooking Time: 20 minutes

Ingredients:
  • Moong Daal - 100 gm
  • Karela (Bitter Gourd) - 1
  • Jeera (Cumin) - 1/2th tsp
  • Radhuni (optional) - 1/4 th tsp
  • Dry Red Chilli - 2
  • Green Chilli - 2
  • Ginger - 1 tsp
  • Refined Oil
  • Ghee - 2 tsp
  • Turmeric
  • Salt as per taste

Procedure: 

1.  Wash the daal and let it soak for half an hour

2. Cut the Karela in roundels and take any hard seeds off

3. Fry the karela until crispy. Keep it aside


4. Boil the daal till soft

5. Grate the ginger and separate the husk from the ginger juice. Keep both of them.

6. Now take a wok and add some refined oil and the ghee. Once its hot temper it with dried red chilli, ginger husk, jeera and radhuni. Saute till fragrant.


Note: Radhuni is optional. If you don't have radhuni, only jeera is sufficient

7. Add the boiled daal to this and add the turmeric, green chilli and salt. Also add the ginger juice now.  Let it come to a rolling boil. 

8. Now add the fried Karelas and let it cook for another 2-3 minute

9. Top if off with a dash of ghee


Enjoy the daal with steamed rice and choice of vegetable side.

Do try this out and tag me (@curriesnstories07) on Instagram on your photos whenever you try the recipe and I will give a shout out to you.

Share
Tweet
Share
No comments

Hello Readers, I am back like more than a year after. Different commitments on personal and professional fronts kept me away from my blog which I missed so much. And what can be a better time to be back other than our very dear Durga Pujas.

Just as Mahalaya was approaching the smell in the air also started changing. Especially in the mornings, one could distinctly smell the Shiuli, the signature smell of Durga Puja mornings. The place where I stay has a few Shiuli Trees on the way and passing them brings back a lot of childhood memories. During the Durga Pujas as a kid I visited my maternal grandparents house. We had a Shiuli tree in the garden. My dida used to wake very early in the morning and gather the flowers fallen on the ground for doing prayers. That earthy smell of morning mist and Shiuli is something I can only talk about but one has to experience it to understand.

This time around Durga Puja is happening on all weekdays. Hence I decided to take two days off on Ashtami and Navami. Pushpanjali, Pandal Hopping and Pet Puja was the main agenda for the days. Yesterday I went for the Ashtami Pushpanjali at Apte Road. Its a Puja hosted by the Bengali Association. The Puja used to happen in Siddhi Garden on Raja Mantri Road till last year which was considerably closer to my place. But for some reason this time they shifted base to the Central Park Hotel grounds which is pretty far from my place. By chance I noticed the change in venue, when it came in paper but many were not so lucky and ended up clueless after reaching Siddhi Gardens. Hence I felt the attendance was quite less as well at the pandal. Plus the previous location seemed better in terms of ambiance and space. I felt overall look was also lackluster unlike last year. Post pushpanjali I had luchi and cholar daal at the stall and it was super! Breaking the fast with such a scrumptious dish makes your day really.
Top: Congress Bhavan , Bottom : Apte Road
The other Puja I went to was of Congress Bhavan. Its also a very old Puja in Pune. And the pratima of Ma Durga over there was really very beautiful. She was decked in my favourite colours red and gold.  Stayed there for a while and then got some misti doi and fish fry as parcel and came back home.
Fish Fry & Misti Doi
Fortunately I was home before a heavy downpour started in the afternoon. This has been a lingering problem this puja. The rains are playing a spoilt sport this time every single day. Infact we had a dust storm today followed by a heavy downpour in the afternoon. I had plans of visiting otehr pandals in the city today but considering the weather I changed my mind and impromptu decided to make a full blown Bhog on Navami. Fortunately for me the main ingredients were all avilable in the pantry, a few of the vegetables I had to get from the market. It took me whole morning to prepare and make each of them but it was super fun and the final product was so awesome that I wish I could pat myself on the back.

Bhoger Khichudi is very special to every Bengali. It not only has the flavours of spices but the aroma of dhuno, which makes it taste awesome. Now when you prepare at home the aroma of dhuno apart everything else can be mimicked. I had made many mooger daaler khichudi before but this particular recipe that I found on the net today really came out awesome! I just added a little things here and there differently from the recipe. See the original recipe here.


Niramish Moong Daal Khichudi

Preparation Time: 30 minutes  
Cooking Time:  1 hour 45 minutes
Serves: 4
Cuisine: Bengali

Ingredients:
  • Sona Moong Daal/ Unpolished Moong Daal - 1 cup
  • Gobindobhog Rice / Kolam Rice - 1 cup
  • Fresh Ginger paste- 2 1/2 tbsp
  • Green Chillies - 3
  • Potato - 2 medium , diced
  • Cauliflower - 1 small, Cut into medium sized florets
  • Fresh Coconut - half cup cut into small pieces
  • Green Peas - 3/4 cup or as per preference
  • Raisins - handful, soaked for 5 minutes in water
  • Cumin Powder  - 1 tbsp
  • Turmeric Powder - 2 tbsp
  • Everest Sahi Garam Masala Powder - 1 tsp
  • Ghee (clarified butter) - 2 tbsp
  • Mustard Oil for frying
  • Sugar as per taste
  • Salt - as per taste
Procedure
1. Wash the rice and keep aside

2. Heat a heavy bottomed kadhai and add the daal to it. Dry roast it  till some of the daal gets a light bown/pink color, while stirring continuously with a spatula. You need to continuously stir it because unattended daal might burn which will impact the taste. Wash the roasted daal in cold water. Transfer the washed daal into the same kadhai and add 4 cups of water. On medium head cover and cook the daal till its half cooked.


3. Once the daal is half cooked add the washed rice and cook them together till rice is half 3/4th cooked. Add more water if required.

4. I used frozen peas here. So thaw the peas for half an hour by putting them in water. If using fresh peas, just peel and keep them aside.

5. Take another wok and fry the cauliflower florets, peas and diced potato. Keep aside

6. Add some ghee in the wok and fry the coconut pieces till edges are lightly brown. Then in leftover ghee toss the raisins for 1 minute. Keep this aside as well.


7. Now add 2 tbsp of mustard oil and let it heat. Toss in split green chillies and add the ginger paste, turmeric, cumin powder, salt and sugar. Saute for a few minutes lowering the flame so that raw smell of ginger is gone. Add a little water to make it a paste. Add the fried cauliflower, potato, peas, raisin and coconut and fold in.


8. Add this masala to the almost cooked rice and daal. Fold in. If you feel more turmeric is required add now. I also added 1 tsp of raw ginger paste at this stage to enhance the flavour. Let it cook for a while till everything is cooked nicely. Make sure you stir occasionally so that the khichudi doesn't stick to the base of the wok. 


9. When the khichudi is almost done, add the garam masala and top it off with a generous amount of ghee. Fold everything in and let it rest. Put the lid on so that the flavours are properly infused.

Enjoy your khichudi hot!


Labrar Torkari (Vegetable Medley)

Preparation Time: 20 minutes  
Cooking Time: 50 minutes
Serves: 4
Cuisine: Bengali

Ingredients:
  • Potato - 2 medium, each cut into four pieces
  • Sweet Potato - 4, diced
  • Pumpkin - 100 gm, diced
  • Brinjal - 2 medium, diced
  • Borboti (yard long beans) - 12, cut into 1 inch pieces
  • Fresh Ginger paste - 1 tsp
  • Fennel seeds - 1/2 tsp
  • Kalonji - 1/4 tsp
  • Fenugreek seeds or Methi dana - 1/4 tsp
  • Mustard Seeds - 1/4 tsp
  • Dried Red Chilli - 1
  • Turmeric - 1 tsp
  • Mustard Oil - 1 tsp
  • Sugar as per taste
  • Salt - a pinch

Procedure
1. Cut the vegetables as mentioned and keep them in water for 15-20 minutes.

2. Heat a heavy bottomed kadhai and add mustard oil. Fry all the vegetables in the following order - Potato, sweet potato, pumpkin, brinjal. Add a little salt while frying, to get them cooked quickly. And keep them aside. Then fry the borboti separately so that you can control the color. Keep aside.

Note: Frying the vegetables separately will give the dish a better taste

3. Heat a heavy bottomed kadhai and add mustard oil. When it is smoking add all the whole spices and red chilli. When the spices are fragrant add the ginger paste and fry for 30 seconds. Add the fried vegetables to it. Add turmeric, salt and sugar and fold everything in. Fry for a while till the raw smell of ginger is gone. 

4. Now add 1 and 1/2 cup cups of water and cover the pan. Let the vegetables get cooked properly. Give it an occasional stir so that the vegetables doesnt stick to the pan.

5. When the vegetables are tender, open the lid and dry any excess water till the vegetables reach its desired consistency.


Gobindobhog Chaler Payesh (Rice Kheer)

Preparation Time: 5 minutes  
Cooking Time: 15 minutes
Serves: 2
Cuisine: Bengali

Ingredients:
  • Gobindo bhog chal - 5 tsp
  • Full cream milk - 400 gm
  • Bay Leaf - 1
  • Raisins - handful
  • Nolen gur (optional) 2 tbsp
  • Sugar - 2 1/2 tsp

Procedure
1. Wash and keep the rice soaked in water for 30 minutes

2. Heat a heavy bottomed kadhai and add the full cream milk. Add the bay leaf. Let it come to a boil and then add the soaked rice. Reduce the flame to medium. Keep stirring it continuously so that layer doesnt form on the milk.

3. When the milk is reduced to half add the sugar. Keep coking it till the rice is cooked completely.

4. Meanwhile grate the gur and make a paste of it with water and keep aside.

5. When the payesh is almost done, switch off the flame and add the gur to it. Fold in. Make sure you add the gur only after heat is switched off else the milk might curdle.

Let it rest for a while. Serve the payesh hot or cold with the bhog.


Tomato Chutney

Click here to see the recipe ->


Serve everything piping hot. Add a dash of ghee to the khichudi before serving and have fried papads on the side.

Wish you all a happy Durga Puja!


Share
Tweet
Share
1 comments
Older Posts

About me

I am a software engineer by profession and a writer at heart. Born and brought up in Kharagpur, I moved to the city of dreams Mumbai when I got my first job. Till then I had not cooked a single dish in my life. Not even Maggi or tea. My dad had a strong belief that his little princess never will be in a situation where she had to cook for herself. Hence I was not allowed to spend time in the kitchen till I was studying.


So when I faced the daunting task of living alone, dabbas came to initial rescue. After that I managed a whole year on just boiled vegetables and rice. And then I landed in US. The bounty of fresh produce and cooking ingredients available in the super marts eventually lured me into making my very first meal ever. There was no turning back after that. I finally discovered how much I was in love with cooking and being creative in the kitchen.


This blog is a humble attempt to present our culinary heritage to one and all and document some of the very traditional recipes which gets passed on through generations just by word of mouth.


So just sit back with a cup of tea or coffee and enjoy the curries and the stories related to each.


Follow Us

Footprints

Blog Archive

  • ▼  2025 (2)
    • ▼  June (1)
      • Why I’ll Choose an Airbnb Over a Hotel—Every Singl...
    • ►  February (1)
  • ►  2024 (21)
    • ►  December (2)
    • ►  September (1)
    • ►  August (3)
    • ►  July (4)
    • ►  May (2)
    • ►  April (5)
    • ►  March (3)
    • ►  January (1)
  • ►  2023 (7)
    • ►  December (2)
    • ►  November (1)
    • ►  October (1)
    • ►  May (1)
    • ►  March (1)
    • ►  January (1)
  • ►  2022 (18)
    • ►  September (1)
    • ►  August (2)
    • ►  July (2)
    • ►  June (3)
    • ►  April (1)
    • ►  March (3)
    • ►  February (2)
    • ►  January (4)
  • ►  2021 (60)
    • ►  December (5)
    • ►  October (5)
    • ►  September (5)
    • ►  August (7)
    • ►  July (6)
    • ►  June (5)
    • ►  May (3)
    • ►  April (4)
    • ►  March (6)
    • ►  February (6)
    • ►  January (8)
  • ►  2020 (55)
    • ►  December (5)
    • ►  November (3)
    • ►  October (10)
    • ►  September (7)
    • ►  August (7)
    • ►  July (9)
    • ►  June (3)
    • ►  May (9)
    • ►  March (1)
    • ►  January (1)
  • ►  2019 (3)
    • ►  November (1)
    • ►  April (1)
    • ►  January (1)
  • ►  2018 (1)
    • ►  December (1)
  • ►  2017 (4)
    • ►  December (2)
    • ►  November (1)
    • ►  September (1)
  • ►  2016 (10)
    • ►  August (1)
    • ►  July (2)
    • ►  June (5)
    • ►  April (1)
    • ►  March (1)
  • ►  2015 (10)
    • ►  December (1)
    • ►  August (1)
    • ►  June (1)
    • ►  May (2)
    • ►  April (4)
    • ►  March (1)
  • ►  2014 (22)
    • ►  November (2)
    • ►  August (2)
    • ►  July (3)
    • ►  June (2)
    • ►  May (4)
    • ►  April (3)
    • ►  January (6)
  • ►  2013 (22)
    • ►  November (2)
    • ►  October (4)
    • ►  September (5)
    • ►  August (2)
    • ►  July (1)
    • ►  June (1)
    • ►  May (2)
    • ►  April (1)
    • ►  March (1)
    • ►  February (2)
    • ►  January (1)
  • ►  2012 (31)
    • ►  December (4)
    • ►  October (3)
    • ►  September (7)
    • ►  August (1)
    • ►  July (1)
    • ►  June (1)
    • ►  May (14)
  • ►  2010 (8)
    • ►  July (2)
    • ►  June (2)
    • ►  April (1)
    • ►  March (2)
    • ►  February (1)
  • ►  2009 (4)
    • ►  February (2)
    • ►  January (2)

recent posts

Pinterest Board

Popular Posts

  • Champaran Mutton / Ahuna Mutton - A Bihari Delicacy
      When I finish a long week of work, self doubt, frustration of dealing with people and finally when the weekend comes, I feel cooking somet...
  • Golda Chingri Malaikari (Giant River prawns in coconut milk gravy)
    One of the main reasons I love Kolkata is because of the fish we get here. Its so fresh and one can get restaurant grade fish quality even i...
  • Khandeshi Kala Masala - Kala Mutton Masala
      25 September Maharashtra is a land of unique local flavours. And still it is mainly known for its Vada Pavs, poha, pav bhaji and modaks. I...
  • Kochur Dum / Kochur Dalna / Arbi Masala/ Taro or Colocasia Curry
    August 19 Kochu or taro is one of my favorite vegetables. It is as versatile as potato only much more tasty. It is equally starchy an...
  • About Slow Travel | Spice2Nuts - a spice initiative by Harish Bali (Visa2Explore)
    Moments from my travels - 1. Forest in Meghalaya 2. An old boat in Shnongpdeng 3. Fish Mint 4. Local Cinnamon  Traveling has always been a p...
  • Macher Bhorta | Fish Bharta | Mach Makha| Bengali Style Mashed Fish
      October 18 Bhortas or bharta as we call it in pan India, are the quintessential Bengali food, a staple in Bangladeshi cuisine. They are th...
  • Varhadi Mutton - A Traditional Vidharba Cuisine
    Varhadi is a dialect of Marathi typically spoken in Vidarbha region of Maharashtra. Vidarbha is the north-eastern region of Maharashtra ...
  • Dim Toast | Egg Toast | Dim Pauruti | Savoury French Toast
      April 25 Calcutta or Kolkata. A city known for its food and culture, where hospitality and love are synonymous with lip-smacking grub. Cho...
  • Green Chilli Thecha || Maharashtrian Hirvi Mirchi Thecha || Green Chilli Salsa
     26 July Though I have been staying in Maharashtra for over a decade now, it was just a couple of years ago I started exploring the local or...
  • Baked Basa in Butter Garlic Lemon Sauce
      January 18 It doesn't feel like winter anymore. While I type, the blinds are drawn in the room, the fan is running on its maximum and ...

Liebster Award

Liebster Award

Very Good Recipes

Very Good Recipes

You can find my recipes on Very Good Recipes

Contact Us

Name

Email *

Message *

Pages

  • Travelogue Index
  • VEGETARIAN RECIPE
  • CHICKEN RECIPES
  • SEAFOOD RECIPES
  • MUTTON RECIPES
  • RICE RECIPES
  • EGG RECIPES
  • DAAL RECIPES
  • ROTI & PARATHA RECIPES
  • BAKING RECIPES
  • SWEET RECIPES
  • SNACKS RECIPES
  • SIDES RECIPES
  • SOUP RECIPES
  • SALAD & BOWLS RECIPES
  • ROASTED RECIPIES
  • JAM & PRESERVE RECIPES
  • BEVERAGE RECIPES
  • SAUCES, SPICES & CURRY BASE RECIPES
  • CHUTNEY & DIPS RECIPES
  • FESTIVE RECIPES
  • Contact Us
  • TRAVELOGUES OF EAST INDIA
  • TRAVELOGUES OF WEST INDIA
  • TRAVELOGUES OF SOUTH INDIA
  • TRAVELOGUES OF NORTH INDIA
  • TRAVELOGUES of ASIA
  • North East Recipe

This Blog is protected by DMCA.com

DMCA.com for Blogger blogs
FOLLOW ME @INSTAGRAM

Curries n Stories © 2020 All rights reserved.
Created with by BeautyTemplates