• Home
  • Recipes
    • Vegetarian
    • Seafood
    • Snacks
    • Chicken
    • Mutton
    • Egg
    • Roti & Parathas
    • Dessert
    • Sides
    • Soups
    • Salad & Bowls
    • Rice
    • Daal
    • Bakes
    • Roasted
    • Beverages
    • Sauces, Spices & Curry Base
    • Chutney & Dips
    • Festive Recipes
  • Cuisine
    • Bengali
    • Maharashtrian
    • Rajasthan
    • Punjab
    • Chennai
    • Andhra
    • Mangalore
    • Mughlai
    • Kashmiri
    • Chinese
    • Singapore
    • Mexican
    • Continental
    • Italian
    • French
    • American
    • Thai
    • Bangladeshi
    • Arab & Persia
    • North East
  • Meal Type
    • Breakfast
    • Lunch
    • Dinner
    • Snacks
    • Dessert
    • Appetizer
    • Accompaniments
  • How To
    • Preservation Techniques
  • Travel
    • East India
    • West India
    • North India
    • South India
    • Asia
    • America
  • Lifestyle
    • Craft & Creation
    • Experiences
  • Musing
  • Contact
  • Bengali Blogs

Curries & Stories

pinterest facebook twitter instagram tumblr linkedin
Bhutanese Meal

I wanted to recreate some of the amazing traditional recipes that we tasted in Bhutan. And when I say traditional, I don't mean the set menu that you get in the traditional restaurants in Thimpu. For me traditional means, the meal you are served in a farmhouse, following a farm-to-table concept. So if you are planning for a Bhutan trip and a farmhouse meal is not yet considered in your itinerary, then you better do because otherwise you will miss out on experiencing the charm of having food with the locals in their house with the ingredients they source directly form their farms. 

Traditional Bhutanese Meal

A traditional Bhutanese meal recreated by yours truly with as many sides as I could make in a single day! The meal I prepared today had the following items:

  • Chili Potato Stir Fry
  • Chicken with Bhutanese Chili Powder - Stir fry
  • Asparagus Stir fry
  • Brinjal stir fry
  • Chili Onion Salad with Cheese
  • Rice

All of these dishes take maximum 15-20 minutes to prepare and are super easy. I will have a separate series of blogs on the vegetarian and non-vegetarian Datshis that I made at home.


Traditional Bhutanese meal


Chili Potato Stir Fry

Preparation Time : 5 minutes 

Cooking Time : 15 minutes 

Serves - 1 adult

Ingredients :

  • Potato - 1 medium
  • Bhutanese Chili powder / Red Chili Powder - 1/2 tsp * ( can be adjusted)
  • Butter - 2.5 tsp
  • Oil - 1 tsp
  • Salt as per taste
Procedure :
  1. Cut potatoes into thin flat shapes ( Refer to image) and wash them well
  2. Now boil some water and blanch these potatoes for 2 minutes
  3. Discard the water and separate out the blanched potatoes
  4. Now in a pan heat 2 tsp of butter. Keep the flame on medium so as to not burn the butter. Once the butter melts, add 1/2 tsp of Bhutanese red chilli powder or any chilli powder.
  5. Add the blanched potatoes and coat them in the butter chilli sauce. Add salt. Add Sichuan pepper powder ( optional). Cook this for 5 minutes till potatoes are done. You can add a little water if you feel the potatoes are sticking to the pan. And that's it, a super simple potato side to go with rice.
    Traditional Bhutanese Meal

Chicken with Bhutanese Chili Powder - Stir fry

Preparation Time : 10 minutes 

Cooking Time : 20 minutes 

Serves - 1 adult

Ingredients :

  • Chicken - 300 gm
  • Bhutanese Chili powder / Red Chili Powder - 1/2 tsp * ( can be adjusted)
  • Dry Red Chili ( whole) - 2
  • Onion - 1 medium, sliced
  • Butter - 2 tsp
  • Oil - 1 tsp
  • Salt as per taste
Procedure :
  1. Cut chicken on the bone into bite sized pieces. You can use boneless chicken too. Wash and keep the chicken aside.
  2. Now heat some water in a vessel and add a spoon of salt. When the water comes to a rolling boil, drop in the chicken pieces. Let the chicken pieces be in the water for 2 minutes. Turn off the heat and strain the water and chicken in two different bowls and keep the water aside, we will use it later.
  3. Now heat a pan and add 3 tsp of butter and 1 tsp of refined oil. When the oil is hot, temper it with dry red chili. Once fragrant add the sliced onions and let it fry till pinkish.
  4. Now add the boiled chicken pieces and 1 tsp of Bhutanese chili powder or any chili powder. Toss everything well and let the chicken fry for about a minute.
  5. Now add about 1/2 cup of the reserved water and cover and cook. You can repeat adding a little water until the chicken is soft and cooked.
  6. Now remove the cover and dry out any excel water till the oil releases.
  7. Serve it hot with steamed rice. Best served with Bhutanese red rice.
Traditional Bhutanese Meal

Asparagus Stir fry
This asparagus stir-fry with garlic and butter is one of my favorite side dishes. Please note the Bhutanese version uses very tender spears of Asparagus which are in season in summer and tastes amazing.

Procedure :

Preparation Time : 5 minutes 

Cooking Time : 15 minutes 

Serves - 1 adult

Ingredients :

  • Asparagus - 250 gm
  • Garlic - 4 cloves, minced
  • Butter - 2 tsp
  • Oil - 1 tsp
  • Salt as per taste
Prepping
  • You need to separate the tough ends of the Asparagus before you cook them. The easiest trick for this is to remove the white or pale green/pink part of each spear, then rinse the spears under water and pat them dry.  
  • Asparagus cooks very quickly in the pan, so be sure to get your sauces ready before you start cooking the Asparagus. 
  • Mince the garlic finely.
Cooking
  1. Add refined oil to the pan and when the oil is hot, add the minced garlic and cook for a minute or two until it is fragrant. Add 1/2 tsp of chili flakes and toss in the oil. 
  2. Next add the asparagus and salt as per taste. Stir every 30-40 seconds to ensure each side of the Asparagus gets enough time to be in direct contact with the hot pan. Cover and cook, the Asparagus will get cooked in its own moisture, but if you feel they are sticking, sprinkle a few drops of water in between. The Asparagus usually gets cooked in 4-5 minutes. 
  3. When you are stir frying, you need to keep a close watch on the spears. Keep testing the spears during the cooking process, so you wont pull them out too early or you don't overcook them turning it into a mush.
  4. Add 1 tsp of butter before finishing the dish, let the butter melt in the pan and coat the fried Asparagus evenly.
Transfer to a plate and enjoy immediately while they are still hot for the best taste.

Traditional Bhutanese Meal

Brinjal stir fry
Tender brinjals which have no/ very less mature seeds are best for this preparation. We saw these long and tender brinjals everywhere in their vegetable markets which were completely seedless. The local name for Eggplant/ brinjal is "Dolom".

Procedure :

Preparation Time : 5 minutes 

Cooking Time : 10 minutes 

Serves - 1 adult

Ingredients :

  • Brinjal/ Eggplant ( preferably tender and thin) - 100 gm
  • Rice Flour - 2 tsp
  • Corn flour - 4 tsp
  • Sichuan Pepper - 1/2 tsp, finely crushed ( Optional)
  • Black Pepper powder - 1/4 tsp
  • Salt as per taste
Procedure :
  1. Wash and clean the brinjals.
  2. Cut the eggplants into thin long slices.
  3. Now make a slurry of corn flour, rice flour, salt and Sichuan pepper powder ( optional) or black pepper powder. The slurry will be slightly runny in texture.
  4. Heat oil in a wok enough for deep frying the brinjals.
  5. Now dip each of the brinjal slices in the slurry so as to coat them properly and slowly slower them into the hot oil. Fry till the outer layer is crispy
Serve immediately with steamed rice.

Traditional Bhutanese Meal

Chili Onion Salad with Cheese

Procedure :

Preparation Time : 5 minutes 

Serves - 1 adult

Ingredients :

  • Onion - 1/2 medium
  • Green Chili - 1, chopped
  • Tomato - 1/2 , medium
  • Cheese - 20 gm or 1 slice
  • Salt as per taste
Procedure :
  1. Chop onions, green chilli and tomato
  2. In a mixing bowl add the chopped onions, green chilli, tomato and add salt as per taste
  3. Now crumble some cheese and give it a nice mix
Serve it with your Bhutanese meal.
Share
Tweet
Share
No comments


My maid Savita has been making lunch for me from the past several months now. Not that I don't like to cook now-a-days. But every work from home working lady knows how challenging it becomes to prepare meals three times a day while you juggle a 10-12 hour work life also. Hence just to balance the yin and yang of cooking in my life, I have outsourced the lunch prep to my maid. 

The obvious question is has that really reduced my efforts in the kitchen ? The answer is both Yes and No. When I was managing my lunch, on days I didn't feel like cooking, I would just whip up some shortcut meals like leftover dishes from the past night or just make extra poha in breakfast and have the same in lunch. But now I am forced to start my day thinking what Savita needs to cook that day. If I happen to forget getting the vegetable she will be making, then there is an additional mad rush to get it delivered through any of the 15-minute delivery apps before my maid arrives. 

I want to have rotis in lunch but making them was always a pain for me, that was perhaps the strongest reason for me to think about getting a cook to make lunch. And while she is at it, I thought alright lets ask her to make the subzis as well, that way no leftovers from last night, I would always eat fresh - the first step to keep one healthy!

It didn't take me long to realize the fallacies of my decision. I had probably envisioned having something similar to what my palate was used to. But I was wrong. The inherent Marathi mulgi inside Savita was confused at my food requests like peyaj potoler , kundrur torkari, shada alu, khichudi, fulkopir torkari etc. I realized, just like I don't speak Marathi organically, Savita also doesn't speak my food language.  Most of the dishes she made had an unmissable amount of ground peanuts or like 3 cups of oil floating lavishly on top or the generous usage of chilly that would start a raging fire in my mouth. 

I was confused. I had tried food items from the boxes of my Marathi colleagues when we used to go to office everyday and still fondly remember the rustic taste of the Thalipeeth, the earthy notes of shepu bhaji or the comforting sabudana khichdi. Not to mention the delicious chicken curries. And none of these had any overpowering seasoning or spices. But the Marathi dishes that Savita was dishing out were making me contemplate my life decisions. Something had to be done and fast. I decided to teach her a thing or two especially about the seasoning and spice levels. Fortunately around this time my mom came down to Pune and I entrusted her the role of cooking teacher for Savita. 
While I would be sitting on conference call in my room, I would hear the daily banter of these two ladies from the kitchen, some of them borderline hilarious. After almost 3 months of scolding's and handholding Savita learnt to make some of the Bengali recipes. She also learnt more more thing, that at times we add a pinch of sugar in our dishes to balance. She also learnt to make smaller rotis which I preferred. The only catch was, I needed to keep repeating the recipes she had learnt, otherwise she would forget.

There were occasions when Savita would bring some special food cooked at her home - like ridge gourd gravy, capsicum gravy, masala baigan, spicy lauki subzi to name a few and I really loved them! So it was not that she didn't know to cook good stuff, its just that I discovered that she didn't want to spend much time cooking at my home as she wanted to wrap it up quickly just like how she finished her jhadu-poocha job at my home. I had to again council her and explain that if I was paying her a separate salary for cooking then she needs to devote appropriate time for the same. She probably understood I am still not sure, but I do see her giving time to this work now-a-days. But as you might have guessed by now, depending on a house help for anything comes with its own challenges and at times makes you feel you were better off doing it yourself. So as of now my bitter-sweet journey with Savita's cooking is going on till I decide on otherwise. 

The monsoons are already in, so one of these days I felt like having begun pora with roti. Begun Pora  is basically a mash of charred brinjal with some additional aromats. The northern part of India knows this by the name of Baigan bharta, but let me tell you there are several differences between a Begun Pora and a Baigan Bharta. First, we do not cook the the charred baigan mash again which is usually done for baigan bharta. Secondly I have seen people adding turmeric to Baigan bharta, but it is not added in a Begun Pora as turmeric would subdue the organic smokey charred flavor of the roasted Baigan. Its a very lazy kind of dish where you let the fire do all the hard work. I told Savita to make the rotis while I setup the brinjal to roast. I knew she wouldn't have the patience to roast the brinjal to perfection so I didn't want to leave the job to her.  Plus, the final finishing has to be done with a generous drizzle of mustard oil and a final mash to blend in everything harmoniously. Though its typically eaten in the winter months but monsoon in Pune is colder than winters. So I enjoyed the smokey rustic plate of deliciousness with the handmade rotis while it rained outside. 


Preparation Time : 15 minutes 

Cooking Time : 15 minutes 

Serves - 2 adults

Ingredients :

  • Brinjal - 1 Medium 
  • Garlic cloves - 10
  • Tomato - 1 medium
  • Onion - 1 medium, finely chopped 
  • Green Chilies - 1 finely chopped
  • Cilantro - half a cup loosely packed, finely chopped
  • Mustard Oil - 2 tsp
  • Salt to taste


Procedure :

1. Wash and pat dry the brinjal. Make deep slits all over the surface of the brinjal.
Tips: To ensure your brinjal is not having any mature seeds always select brinjals which feel lighter. 

2. Now carefully stuff each slit with a garlic clove ( the slits need to be deep enough so that you can push the garlic cloves completely inside).

3. Place the brinjal on an open flame and keep turning occasionally until the outer skin is completely charred and flaking. 

4. Place the charred brinjal in a plate and let it cool down

5. This is an optional step. I wanted to add a slight tanginess to the bharta hence I roasted the tomato as well. cut the tomato into quarter. Take a roasting net and place the tomatoes skin side up. Keep turning the tomatoes to get a uniform char all over. Let it cool down as well.

6. In the meantime finely chop the onions, cilantro and green chilli. 

7. Peel the skin off the eggplant and the tomato while they are still slightly warm as it will be easier to do.

8. Now chop the eggplant and tomatoes with a knife

9. Add the chopped onion, cilantro, green chilli, salt and mustard oil to the chopped eggplant and tomato.

10. Now is the time to use your hands as its traditionally done to mash everything up nicely. But if you don't want to use hands then use a masher or a fork to bring everything together. 

I like to serve begun pora with freshly made rotis or Indian flatbreads but you can enjoy it with steamed rice also.
Share
Tweet
Share
No comments

Neem Shukto


It is only mid of April and the temperature in Pune is soaring like crazy. last week however there was some mild relief from the heat due to thundershowers. The beauty of Pune is that once it rains, the mercury plunges quite a bit so even during intense heat spells these occasional rains are giving us the much needed respite. I think all over India it is almost the same situation. Today morning itself i read a news update which said a Doordarshan news anchor fainted during a live telecast due to the heatwave. It happened because of some technical snag the temperature controls were not working in the studio and due to the intense heat her blood pressure plummeted suddenly. I can resonate with the situation, because I have seen such situations in which the ac malfunctioned inside a closed room and the heat and suffocation was worse than being out in the sun where you at least have natural air.

We are trying to be as much hydrated as possible when we are at home or while going out during the afternoon. Also I usually keep a water bowl on the terrace for bigger birds and a small hanging water bowl for smaller ones. Both are earthen bowls which helps keep the water cold. I have seen birds enjoying a good bath in the morning or having a drink throughout the day. I would request everyone to have at least some sort of water bowl in front of their homes or balconies. It will help street animals or birds to be hydrated during these harsh summer days. 

When it comes to food, due to the heat I don't feel like eating much especially during the afternoons. I know many people might feel this way. Like always, the summer months call for such foods which are light on the stomach, mildly spiced, mostly of soupy consistency which is easy to digest. More than a lot of oily and spicy non-veg dishes, I crave for simple old school preparations with seasonal vegetables. 

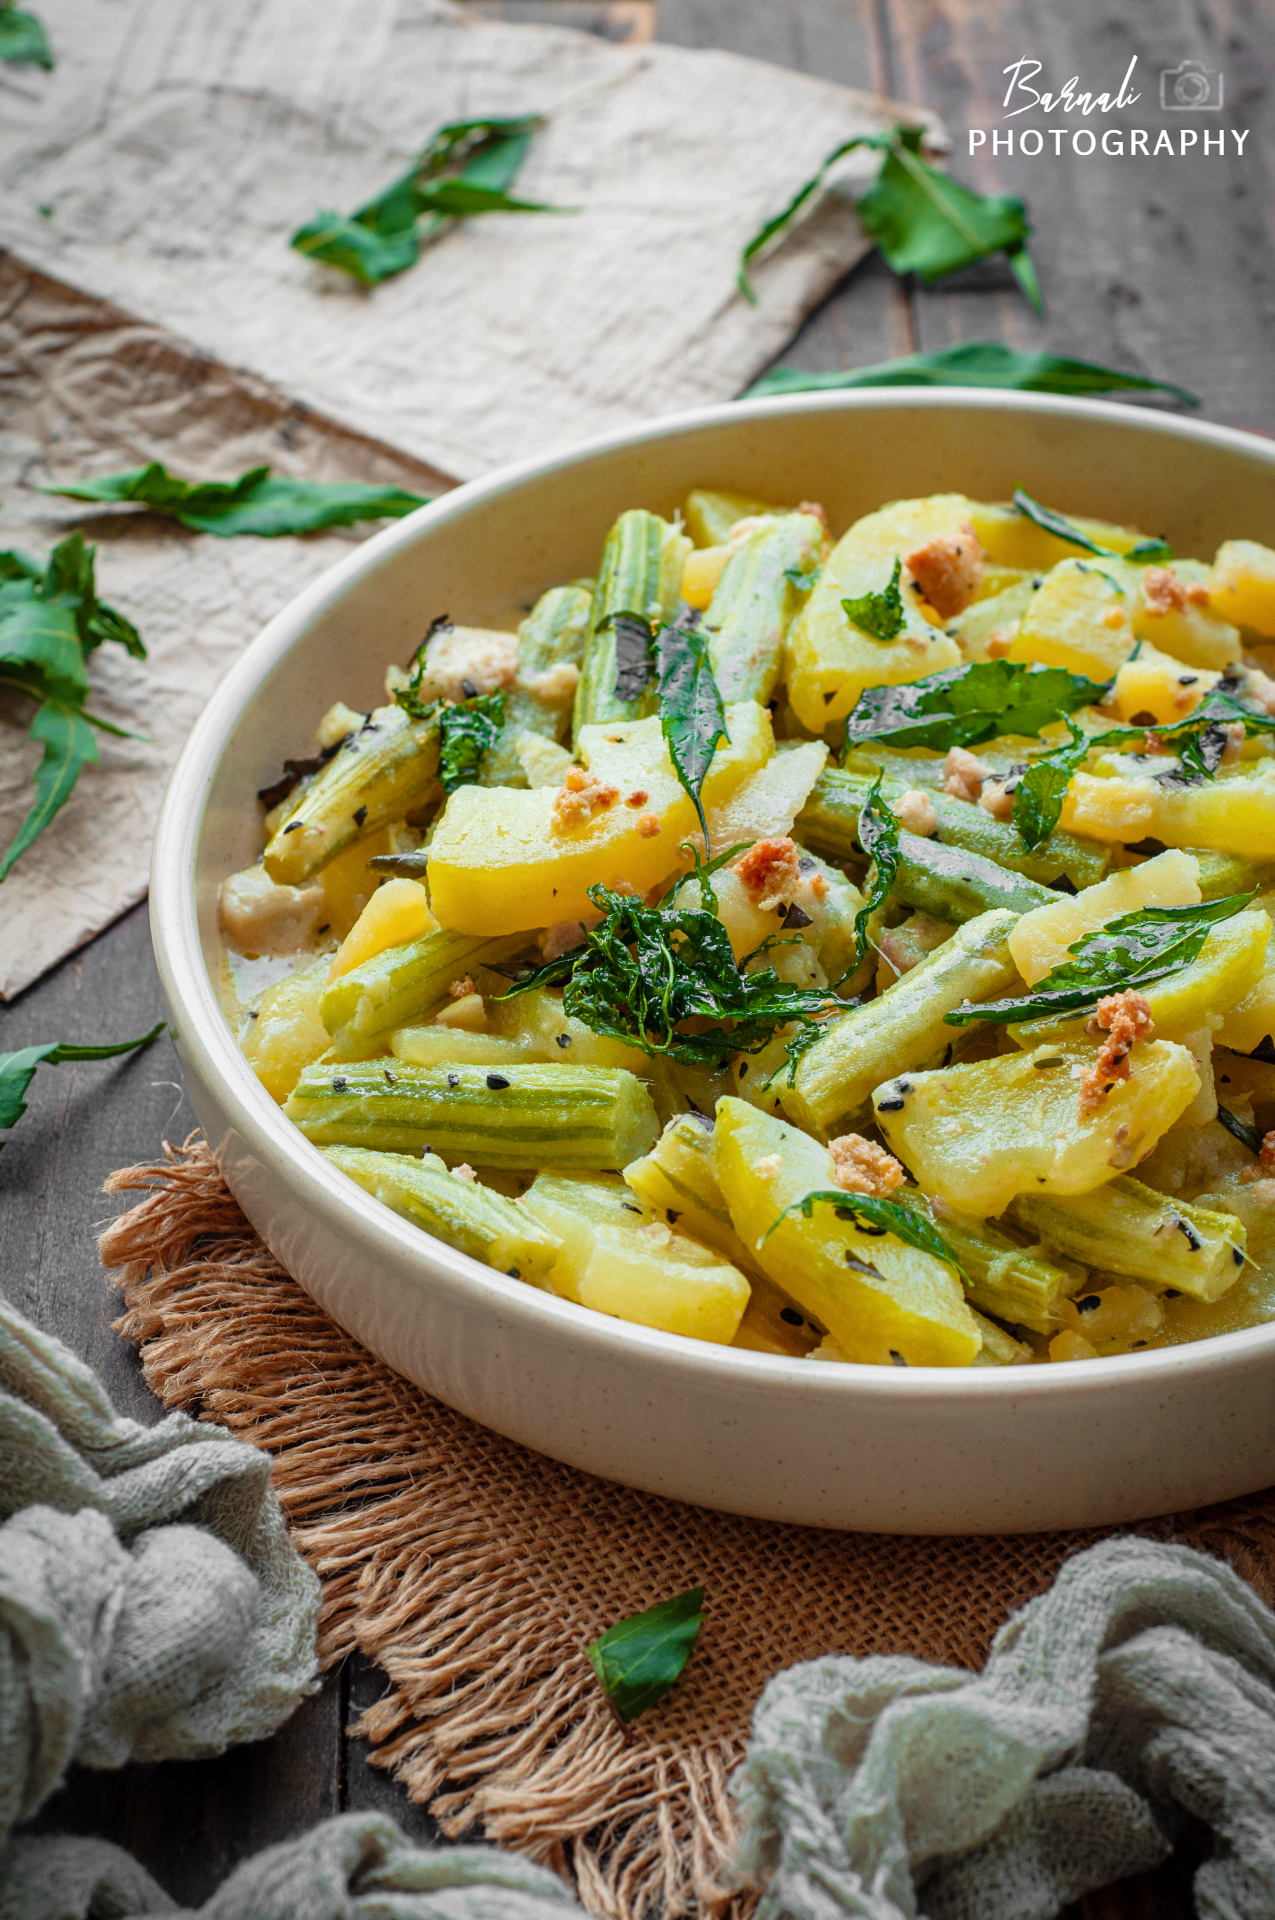
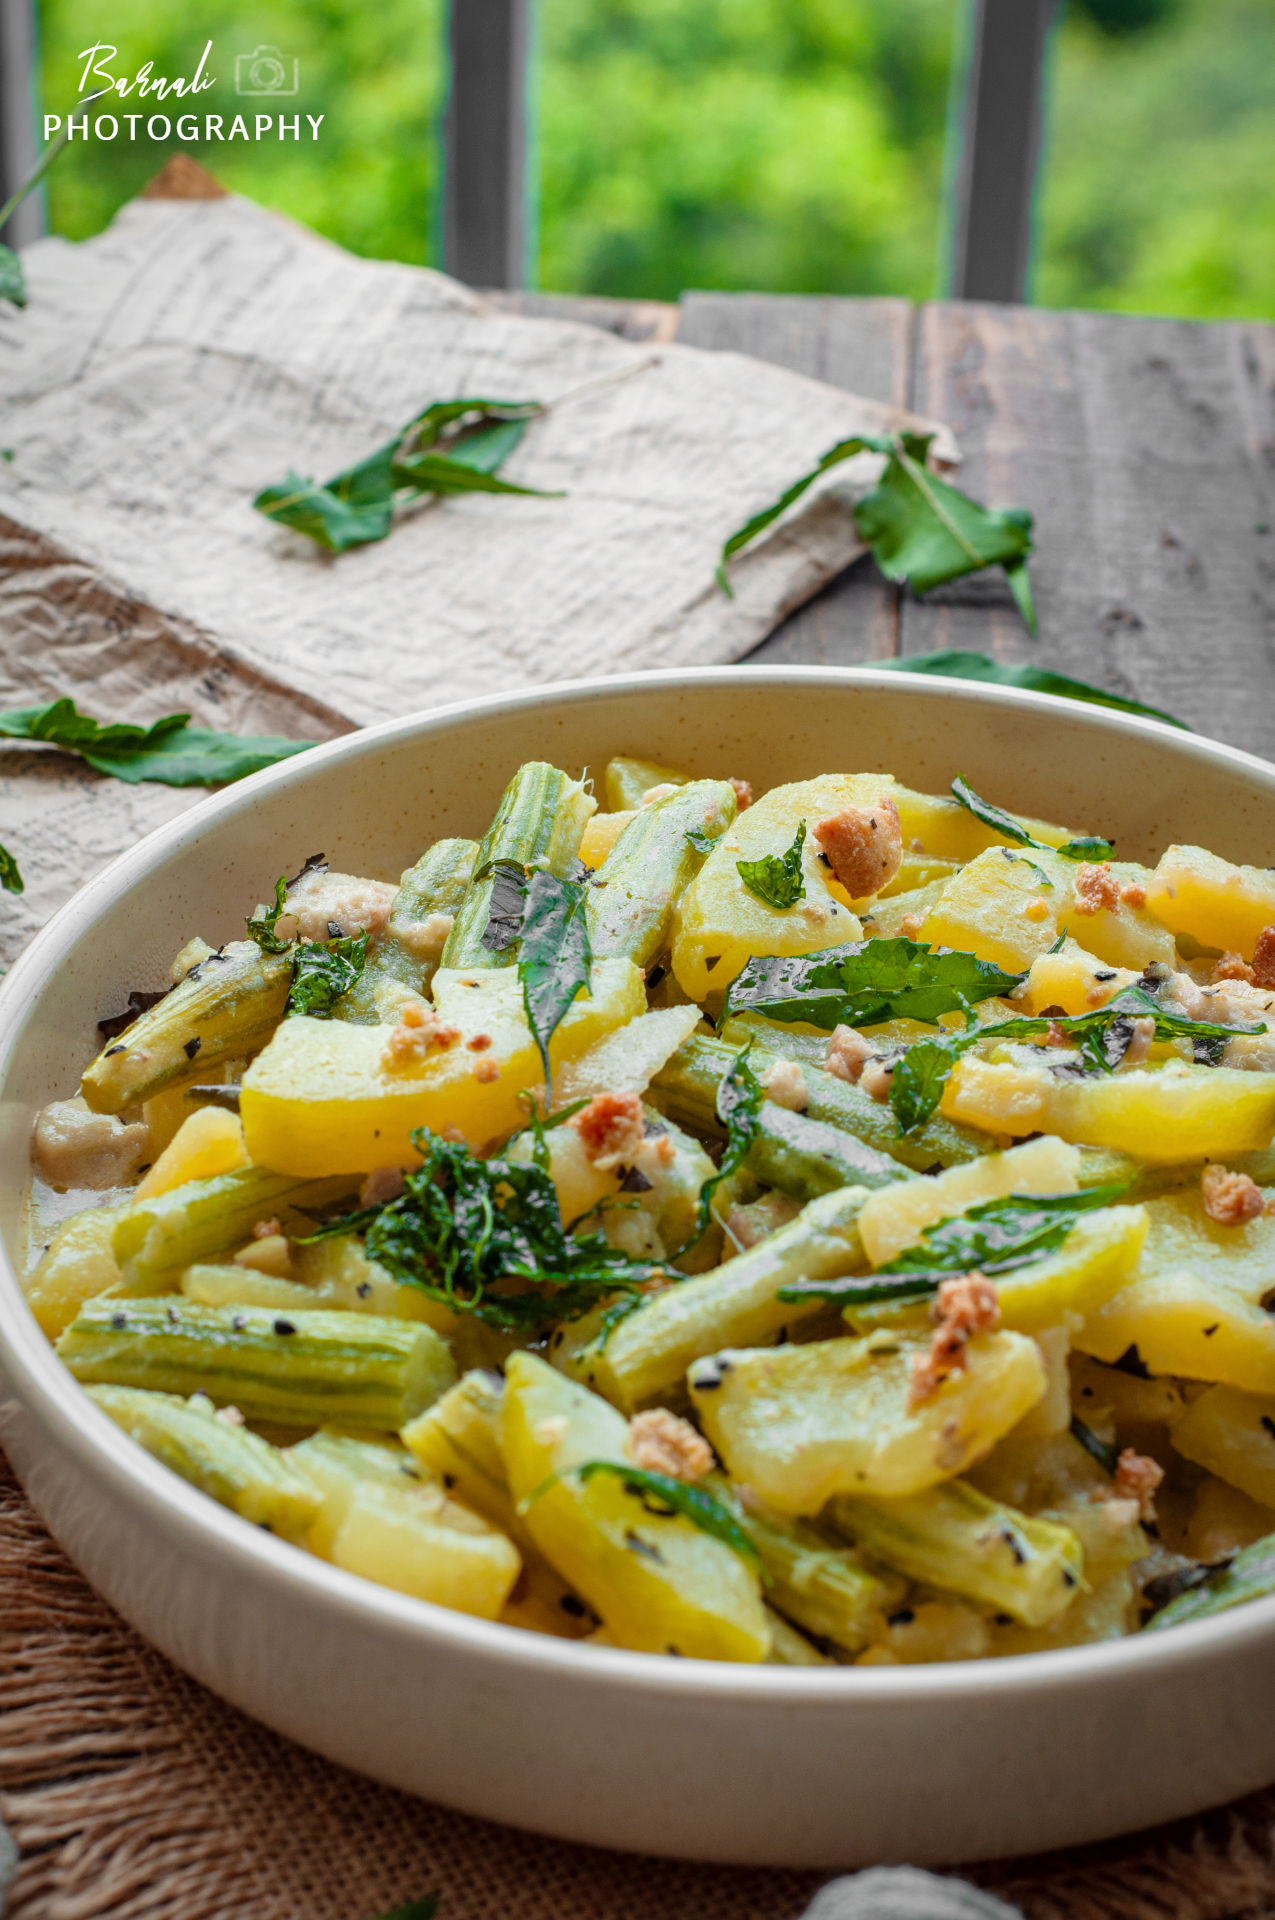
Neem Shukto

It is an age old traditional in Bengali cuisine to start the meal with something bitter or teto. The bitter taste cleanses the palate, aids digestion, and makes subsequent courses taste better. The bitter greens, such as hinche, kalmi, thankuni, and neem, also have medicinal properties. The tradition of eating bitter dishes at the start of a meal is rooted in ancient Ayurvedic dietary practices and medicinal value. The bitter dishes are eaten throughout the year, especially in late spring and early summer to ward off diseases like measles and chickenpox. And just because of that as a kid we were always advised / forced to have bitter dishes like neem pata bhaja or ucche bhaja during the summers. Obviously I hated it back then. But as I grew my palate for bitter also evolved and slowly I took a great liking for bitter dishes like shukto or fish curry with bitter gourd etc.

Shukto is one of the most iconic dishes of the Bengali kitchen is a distinctly bitter stew made with a medley of seasonal vegetable. Shukto can be made with so many different variations just by changing the vegetables in the dish. I have a couple of shukto dishes already in my blog including one with Hilsa. 

This time however its not a traditional shukto but a fusion of neem jhol and shukto. Neem leaves are known for their medicinal properties. And they are also tasty when used in the recipe in the right way. A small amount goes a long way in enhancing the flavor and taste.  You can also say this recipe is an easier version having all the earthiness of Shukto but with less hassles. So if you want to try out a simpler version of Shukto, do give this dish a try.


Preparation Time : 15 minutes 

Making Time : 20 minutes 

Serves - 4-5 adults

Ingredients :

  • Raw Papaya/ Kacha Pepe - 500 gm
  • Potato / Aloo - 2 medium
  • Drumstick - 3 whole 
  • Neem Leaves - 3 sprigs
  • Bori (sundried lentil dumplings) -10 
  • Black Cumin / Kalo Jeera / Kalonji - 1/2 tsp
  • Ginger - 1 tsp grated
  • Milk - 1 cup
  • Salt - as per taste 
  • Sugar - 3 tsp or more as per taste
  • Water - as needed
  • Mustard Oil - for tempering

Neem Shukto


Procedure :

1. Wash and dry the neem leaves a day before. Take out the leaves from the sprig. Now heat a kadai, add 1 tsp of mustard oil, when oil is smoking add the neem leaves, fry on medium heat for 2 minutes till they turn crisp. take care not to burn the leaves. Take out the leaves into a plate and let it cool.  

2. In the same oil, fry the boris till they take a light brown hue all around. Take them out in the same plate and let them cool down.

3. Take out the string from the drumsticks and cut into 3-4 cm long pieces. Peel the skin and cut the potato into long segments of same size and shape. Peel the raw papaya and slice them into small half moon shapes, about 5-mm thick. 

4. Boil water in a saucepan, once the water is boiling add 1 tsp of salt and drop the cut papaya pieces. Cover and cook for about 7-8 minutes. Drain the water and keep the papaya to cool down.

5. Take a pressure cooker, add a cup of water and add the drumstick pieces. Add a pinch of salt. Cook these for two whistles and immediately open the cooker lid by placing the cooker under running tap water to release the pressure inside. This way the drumstick will retain its green color. Drain the water and keep the drumstick aside. Preserve the water.

Neem Shukto


6. Now in a kadai heat mustard oil. When the oil is hot, add kalo jeera or Kalonji.  Add the potato pieces and some salt. Fry on medium heat for about 5-6 minutes turning them frequently till they are 80% done.

7. Now make some space in the kadai and add a little more oil, once its hot add 1/2 of the grated ginger. fry for a few seconds and mix with the potato. Now add the boiled drumstick and boiled papaya. fold in nicely.

8. Adjust the salt and sugar at this stage. It should be a little sweet so add accordingly. Add the remaining 1/2 of the grated ginger fold in and cook for 2-3 minutes.

9. Heat the milk slightly, this will prevent it from getting split when added to the subzi. Now add the milk in the kadai and give everything a nice mix. Add the preserved water from boiling the drumstick to increase the gravy. I prefer this to be a little soupy as it goes well with plain rice.

10. Lightly crush the fried neem leaves and add to the kadai. 

11. Break the boris and sprinkle it in the kadai. Now finish off the dish by adding half a teaspoon of ghee and mix well. Keep it covered for a few minutes for the smell of the ghee to spread inside.

Serve it with steamed rice on a hot summer afternoon. 

Neem Shukto


Other Vegetarian Recipes for Summer:

  • Lauer Khosha Bhaja | Bottle Gourd Peel Stir Fry
  • Potol Shorshe Posto Aam diye | Pointed gourd in mustard & poppy seed paste with raw mango
  • Bengali Shukto
  • Potol Aloo Posto | Pointed Gourd & Potato in Poppy seed paste
  • Doi Potol | Pointed Gourd in Yoghurt gravy
  • Lau Palong | Bottle Gourd & Spinach Medley
  • Jhinge Aloo Posto | Ridge Gourd & Potato in Poppy seed paste
  • Beet Greens
  • Tetor Daal | Moong Dal with Bitter Gourd

Share
Tweet
Share
No comments
Khud Bhat

First of all wish all my readers a very Happy New Year! May this new year help all of us become a better version of ourselves.

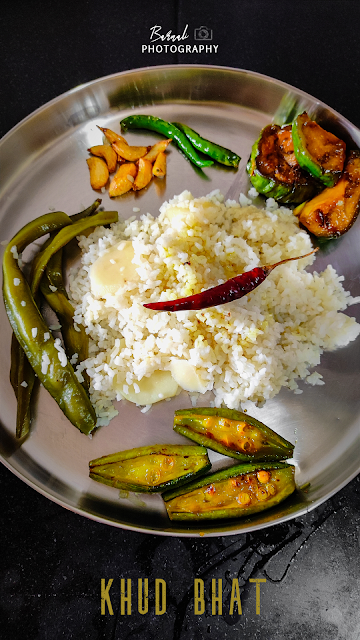
Even though I was born in the 80s, still there are many Bengali traditional foods which I had not experienced in my lifetime yet. khud bhat is one such traditional preparation which I had heard a lot about but got to experience only recently. 

Khud (broken rice) is a grade of rice consisting of grains broken in the milling process.  In Bengal you will find khud rice in many grocery shops so it not that difficult to get hold of some. 

This type of broken rice is traditionally cooked and had with an assortment of fried sides or bhortas. In Bangladesh sometime I have noticed, khud bhat is made more like a pulao with a lot of onions and aromats in it. This is the version of Khud bhat which is made at my home. It is a very simple preparation and light on the stomach.

Preparation Time : 15 minutes 
Cooking Time : 30 minutes 

Serves - 2 adults

Ingredients :

For Rice
  • Khud Rice - 100 Gm
  • Water - 200 Gm
  • Potatoes - 2 (cut in roundels) 
  • Broad beans - 4 to 5
  • Green Chili - 2 to 3
  • Salt - As per taste
For Assorted Fries
  • Dried Red Chili - 2
  • Green Chili - 3 to 4
  • Turmeric - 1/2 tsp
  • Brinjal (Medium) - 1 (cut in thick rounds)
  • Parwal (Potol) - 5 to 6 ( cut in halves)
  • Garlic cloves - 15 to 20 
  • Salt - To Taste
  • Sugar - to taste
  • Mustard Oil - for frying


Video :


Procedure:

1. Wash and drain the rice. Cut the Potatoes in roundels.

2. Take a deep bottom Kadai or Pan and add the washed rice. Add double the amount of water.

3. Place the potato roundels on the rice in a single layer. Place some broad beans or any other seasonal vegetable that you want. Also add two green chilies

4. Add salt and mix in the water

5. Now cover and cook the rice on medium flame.
Note: It is always better to cook Khud Bhat in a kadai, as in pressure cooker you cannot adjust water mid way through and the rice can end up being mushy.

6. While the rice cooks, prepare the vegetables for making the fries. First cut the brinjal in thick roundels and halve the parwals. Now marinate the brinjal and parwal with salt sugar and turmeric. Bengalis add sugar to the brinjals and parwals to enhance the taste of the fries. I have used powdered sugar here which easily melts. leave the marination till the vegetables release water.

7. In another Kadai heat mustard oil. Once the oil is hot fry a couple of red chilis.

8. Now fry the garlic cloves, green chilies, brinjals and parwals in batches. 

9. Check if the rice is done, it should take around 20-30 minutes. The rice should not be mushy. 

Once the rice is done, serve the rice with all the assorted fried vegetables and a dash of the mustard oil left in the kadai and enjoy!

Share
Tweet
Share
No comments


Happy 76th Independence Day to all my readers! Today we are celebrating 75 years of independence and that is such a remarkable thing. the first jubilee day I had witnessed in my lifetime was the 50th year of Independence - the golden jubilee year. Back then we didn't have all the hoopla around the celebrations on social media. The only faithful media that we had was the Doordarshan and newspapers delivered to us the various news and images of the celebration. I tried to recollect what I was doing on this day back then, mostly like every year I think we had gone to school for the flag hoisting. No clear memory of the day that I can recollect. But this year the multi faceted celebrations started much ahead of 15th August. There were so many events and activities organized across the country. Hopefully if I get to see the next jubilee year, I would be recollecting more memories from this day than the 50th year celebration. 

While this day is meant to remember the sacrifices of the freedom fighters and looking forward to the new India in coming years, still a holiday on Monday gives us one more reason to celebrate and appreciate this day. Beautiful weather coupled with a much needed long weekend was just the thing I was looking forward to. And after a longtime I thought let me also pen down a recipe that I recently tried out. 

You can understand from some of my recent blogs that I am still into the Kahsmir mode, capturing all my tour diaries day wise. It gives such an adrenaline rush to be able to edit the travel pictures while revisiting the memories captured in each frame. I also realized that editing nature photographs are much more challenging than food photographs at times. The subject and light conditions outdoor are so dynamic that to bring the right amount of drama to any travel picture means a lot of hardwork on the editing table, because they were captured spontaneously. While when it comes to food photography, all the activities starting from what to make, cooking, plating, setting up the scene and then post editing, everything is calculated, measured and at times a little monotonous. I think that is the reason of late my food blogs have taken a back seat. It doesn't mean I am not cooking new stuffs these days, it just means that I am trying to enjoy the cooking and eating experience more than trying to capture every second of it. 

So after coming back from Kahsmir I started trying out different Pahadi recipes - from Kahsmir, Himachal or eastern states. I found that people in the mountains cook much more healthy meals than we city dwellers. Their food most of the times had less oil, less frying and a whole lot of more flavors. It is so interesting to be able to cook some unique dishes from the hills. While the taste may not always be 100% authentic but it is giving me a refreshing change in the regular menu. One such thing that I had learnt from Harish Bali's (Visa to explore) vlogs is Bhatt daal or bhat dal. I think he was travelling to uttarakhand in one of the videos where he spoke highly about how delicious this dal was. These beans dominate kitchens in the Garhwal and Kumaon regions of the state. Kala bhat or black soybean belongs to the leguminosae family. Soybean has seeds of many colours; the black one is rich in iron and protein. They are cholesterol-free, but contain linolenic acid, which has been found to prevent heart disease. I had tried looking for this daal locally but I got a different variant of black daal. So the next best option was to look up in Amazon and I got what I needed. Most of the variants I found on Amazon were the organic variant as this daal is still not mass produced for the cities. 

Bhatt ki dal is an iconic dish and a traditional Kumaoni recipe from Uttarakhand. I tried to make this Bhatt ki daal in a very simple way with very less masala and it turned out to be super yummy. I feel it is much tastier than the normal Rajma you et in the cities. It pairs superbly with steamed rice, jeera rice, rotis and even bread or pavs. Check out this yummy recipe below:


Soaking Time : overnight
Preparation Time : 15 minutes
Cooking Time : 50-60 minutes

Serves - 2 to 3 adults

Ingredients :
  • Bhatt/Bhat/ black Soyabean Dal - 200 gm
  • Onion - 1 medium sized chopped
  • Garlic Cloves - 10 fat crushed/chopped
  • Bay Leaf - 1
  • Tomato - 1 medium chopped
  • Black Pepper  - 1 tsp crushed
  • Garam Masala powder - 1 pinch (optional)
  • Green Chili - 2-3 chopped
  • Butter - 1 1/2 tsp
  • Refined Oil - 1 tsp
  • Salt - as per taste
  • Sugar - as per taste
  • Warm water - as needed
Garnish (optional):
  • Chopped Onion 
  • Chopped Coriander leaf Onion 
  • Chopped green chili
  • Lime wedge

Procedure:

1. Soak the Bhat dal overnight. Wash and drain the water. 

2. Switch on the heat. Place a pressure cooker on the stove and add butter. 

3. When the butter melts add the bay leaf, pepper powder, garlic, onion, tomato, green chili one by one. Fry for a minute till fragrant. 

4. Add soaked bhat daal and required amount of warm water. Add garam masala, salt and sugar. Note here sugar is just to balance the taste, the cooked beans should not taste sweet. Also note that this recipe does not need turmeric as it will clash with the natural flavors of Bhat daal.

5. Put the lid on and cook it for 10-15 whistles or enough time needed for the beans to get soft. Once done let it rest till the pressure dies and then open the lid. With a spatula give a nice stir or two and slightly mash a handful of the beans. This would help in increasing the consistency of the beans gravy.

Note: It took me quite a number of whistles to get this daal soft. If in a hurry there are two quick fixes for making the daal soft, either you can add a pinch of baking soda to the daal when you are cooking it, or place a steel spoon inside the daal. Both helps the daal getting cooked in fewer whistles. 

6. Once the daal has reached its desired thick consistency, add a knob of butter and give it a good stir. 

Garnish and serve it with rice or rotis and enjoy. 


Share
Tweet
Share
No comments
Older Posts

About me

I am a software engineer by profession and a writer at heart. Born and brought up in Kharagpur, I moved to the city of dreams Mumbai when I got my first job. Till then I had not cooked a single dish in my life. Not even Maggi or tea. My dad had a strong belief that his little princess never will be in a situation where she had to cook for herself. Hence I was not allowed to spend time in the kitchen till I was studying.


So when I faced the daunting task of living alone, dabbas came to initial rescue. After that I managed a whole year on just boiled vegetables and rice. And then I landed in US. The bounty of fresh produce and cooking ingredients available in the super marts eventually lured me into making my very first meal ever. There was no turning back after that. I finally discovered how much I was in love with cooking and being creative in the kitchen.


This blog is a humble attempt to present our culinary heritage to one and all and document some of the very traditional recipes which gets passed on through generations just by word of mouth.


So just sit back with a cup of tea or coffee and enjoy the curries and the stories related to each.


Follow Us

Footprints

Blog Archive

  • ▼  2026 (4)
    • ▼  May (1)
      • A Suitcase Full of Stories: My Heartfelt Shopping ...
    • ►  January (3)
  • ►  2025 (3)
    • ►  December (1)
    • ►  June (1)
    • ►  February (1)
  • ►  2024 (21)
    • ►  December (2)
    • ►  September (1)
    • ►  August (3)
    • ►  July (4)
    • ►  May (2)
    • ►  April (5)
    • ►  March (3)
    • ►  January (1)
  • ►  2023 (7)
    • ►  December (2)
    • ►  November (1)
    • ►  October (1)
    • ►  May (1)
    • ►  March (1)
    • ►  January (1)
  • ►  2022 (18)
    • ►  September (1)
    • ►  August (2)
    • ►  July (2)
    • ►  June (3)
    • ►  April (1)
    • ►  March (3)
    • ►  February (2)
    • ►  January (4)
  • ►  2021 (60)
    • ►  December (5)
    • ►  October (5)
    • ►  September (5)
    • ►  August (7)
    • ►  July (6)
    • ►  June (5)
    • ►  May (3)
    • ►  April (4)
    • ►  March (6)
    • ►  February (6)
    • ►  January (8)
  • ►  2020 (55)
    • ►  December (5)
    • ►  November (3)
    • ►  October (10)
    • ►  September (7)
    • ►  August (7)
    • ►  July (9)
    • ►  June (3)
    • ►  May (9)
    • ►  March (1)
    • ►  January (1)
  • ►  2019 (3)
    • ►  November (1)
    • ►  April (1)
    • ►  January (1)
  • ►  2018 (1)
    • ►  December (1)
  • ►  2017 (4)
    • ►  December (2)
    • ►  November (1)
    • ►  September (1)
  • ►  2016 (10)
    • ►  August (1)
    • ►  July (2)
    • ►  June (5)
    • ►  April (1)
    • ►  March (1)
  • ►  2015 (10)
    • ►  December (1)
    • ►  August (1)
    • ►  June (1)
    • ►  May (2)
    • ►  April (4)
    • ►  March (1)
  • ►  2014 (22)
    • ►  November (2)
    • ►  August (2)
    • ►  July (3)
    • ►  June (2)
    • ►  May (4)
    • ►  April (3)
    • ►  January (6)
  • ►  2013 (22)
    • ►  November (2)
    • ►  October (4)
    • ►  September (5)
    • ►  August (2)
    • ►  July (1)
    • ►  June (1)
    • ►  May (2)
    • ►  April (1)
    • ►  March (1)
    • ►  February (2)
    • ►  January (1)
  • ►  2012 (31)
    • ►  December (4)
    • ►  October (3)
    • ►  September (8)
    • ►  July (1)
    • ►  June (1)
    • ►  May (14)
  • ►  2010 (9)
    • ►  July (3)
    • ►  June (2)
    • ►  April (1)
    • ►  March (2)
    • ►  February (1)
  • ►  2009 (4)
    • ►  February (2)
    • ►  January (2)

recent posts

Pinterest Board

Popular Posts

  • Champaran Mutton / Ahuna Mutton - A Bihari Delicacy
      When I finish a long week of work, self doubt, frustration of dealing with people and finally when the weekend comes, I feel cooking somet...
  • Tetor Macher Jhol (Bitter Gourd Fish Curry)
    Anything Bitter hardly finds takers. Same applies for Bitter Gourd. As a kid I hated bitter gourd in any form. Grown ups around me would...
  • Kochur Dum / Kochur Dalna / Arbi Masala/ Taro or Colocasia Curry
    August 19 Kochu or taro is one of my favorite vegetables. It is as versatile as potato only much more tasty. It is equally starchy an...
  • Khandeshi Kala Masala - Kala Mutton Masala
      25 September Maharashtra is a land of unique local flavours. And still it is mainly known for its Vada Pavs, poha, pav bhaji and modaks. I...
  • Macher Bhorta | Fish Bharta | Mach Makha| Bengali Style Mashed Fish
      October 18 Bhortas or bharta as we call it in pan India, are the quintessential Bengali food, a staple in Bangladeshi cuisine. They are th...
  • Varhadi Mutton - A Traditional Vidharba Cuisine
    Varhadi is a dialect of Marathi typically spoken in Vidarbha region of Maharashtra. Vidarbha is the north-eastern region of Maharashtra ...
  • Complete Details to plan your ISKON Mayapur Visit
    Radha Madhav during Pushya Abhishek on 6th Jan 2023 First of all wish you a very happy new year. I have been away from blogging for a while ...
  • Arabic Chicken Mandi | Smokey Chicken & Rice
      Dec 14 Chicken Mandi has always been on my bucket list. The soft succulent meat pieces soaked in beautiful aromatics, the fragrant long gr...
  • Golda Chingri Malaikari (Giant River prawns in coconut milk gravy)
    One of the main reasons I love Kolkata is because of the fish we get here. Its so fresh and one can get restaurant grade fish quality even i...
  • Pahadi Bhatt Ki Daal | Black Soyabean Dal
      Happy 76th Independence Day to all my readers! Today we are celebrating 75 years of independence and that is such a remarkable thing. the ...

Liebster Award

Liebster Award

Very Good Recipes

Very Good Recipes

You can find my recipes on Very Good Recipes

Contact Us

Name

Email *

Message *

Pages

  • Travelogue Index
  • VEGETARIAN RECIPE
  • CHICKEN RECIPES
  • SEAFOOD RECIPES
  • MUTTON RECIPES
  • RICE RECIPES
  • EGG RECIPES
  • DAAL RECIPES
  • ROTI & PARATHA RECIPES
  • BAKING RECIPES
  • SWEET RECIPES
  • SNACKS RECIPES
  • SIDES RECIPES
  • SOUP RECIPES
  • SALAD & BOWLS RECIPES
  • ROASTED RECIPIES
  • JAM & PRESERVE RECIPES
  • BEVERAGE RECIPES
  • SAUCES, SPICES & CURRY BASE RECIPES
  • CHUTNEY & DIPS RECIPES
  • FESTIVE RECIPES
  • Contact Us
  • TRAVELOGUES OF EAST INDIA
  • TRAVELOGUES OF WEST INDIA
  • TRAVELOGUES OF SOUTH INDIA
  • TRAVELOGUES OF NORTH INDIA
  • TRAVELOGUES of ASIA
  • North East Recipe

This Blog is protected by DMCA.com

DMCA.com for Blogger blogs
FOLLOW ME @INSTAGRAM

Curries n Stories © 2020 All rights reserved.
Created with by BeautyTemplates